Bindings and Certificates
SSL Certificates
SSL stands for Secure Sockets Layer, a global standard security technology enabling encrypted communication between a web browser and a web server. SSL certificate is a widely spread security approach for online businesses and individuals to decrease the risk of sensitive information being stolen or tampered with by cybercriminals of all sorts. In essence, SSL allows private communication just between the two intended parties.
An SSL certificate is installed on a web server and has two main functions to create a secure connection:
- The identity of the website authentication
- The encryption of the data being transmitted.
Manage Bindings and Certificates
Note that the Advanced Rebranding & Custom SSL license is required to access the Bindings and Certificates functionality. You can purchase this license at Buy New Licenses page of the Management Console
- Open the Management Console.
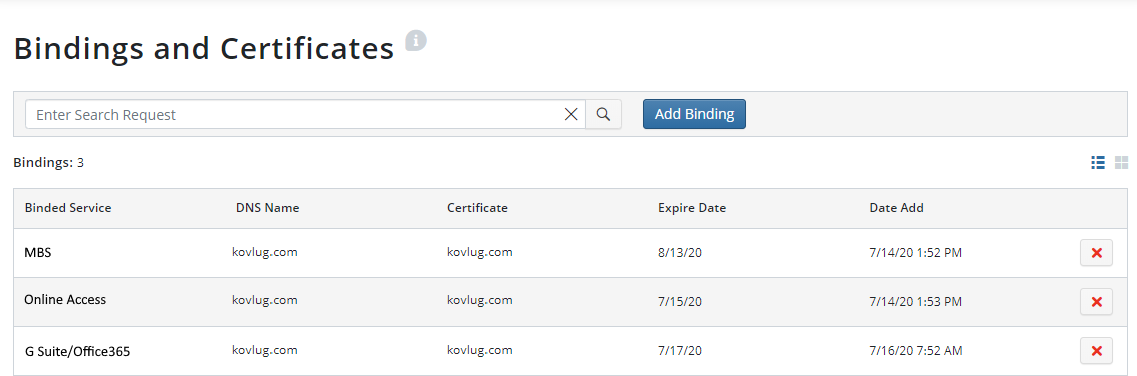
- In the Settings menu, select the Bindings And Certificates item.
Prerequisites
Apart from the settings available in the Management Console, add an A or CNAME record in your hosting provider web interface pointing your dedicated second or third-level domain name to MSP360 services.
Possible options:
- Create an A record for yourdomain.xyz pointing to 52.6.7.137
- Create an A record for somemsp360service.yourdomain.xyz pointing to 52.6.7.137
- Create a CNAME record for yourdomain.xyz pointing to console.msp360.com/
- Create a CNAME record for somemsp360service.yourdomain.xyz pointing to console.msp360.com/
Add New Binding
To add a new website binding, proceed as follows:
- Open the Management Console.
- In the Settings menu, select Bindings And Certificates.
- Click Add Binding.
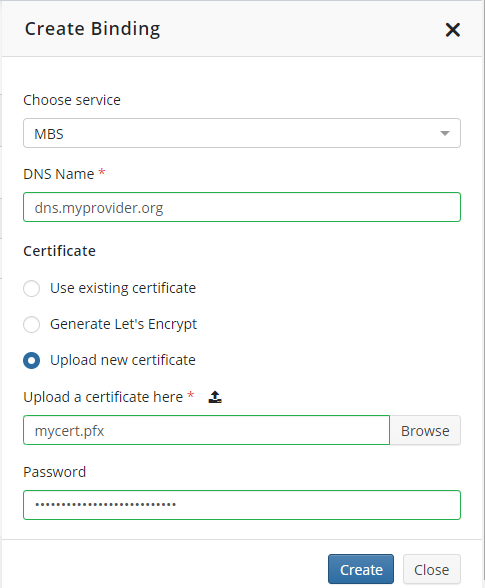
- In the Choose Service drop-down list, select the service the new binding will be applied to. Bindings are available for the following services:
- Managed Backup
- Online Access
- Microsoft 365 / Google Workspace
- In the DNS Name field, specify the DNS server address.
- Select an option for the certificate. The following options are available:
- Use Existing Certificate. Select this option to use a certificate that has been provided earlier
- Generate Let's Encrypt (default). Select this option to generate a Let's Encrypt free certificate
To learn more about Let's Encrypt certificate, refer to the Documentation section of the Let's Encrypt website
- Upload new certificate. Select this option to upload a new certificate file. If you selected to upload a new certificate, click Browse, them in the dialog box specify a location for the certificate file.
Note that only PFX certificates are allowed. A PFX, also known as PKCS #12, is a single, password-protected certificate archive that contains the entire certificate chain plus the matching private key. Essentially it is everything that any server will need to import a certificate and private key from a single file
- Specify your password.
- Once you are done, click Create.
Assign a Certificate to an Existing HTTP Binding
You can assign certificates to your existing HTTP bindings, so they become HTTPS bindings. To assign a certificate to an existing binding, proceed as follows:
- Open the Management Console.
- In the Settings menu, select Bindings And Certificates.
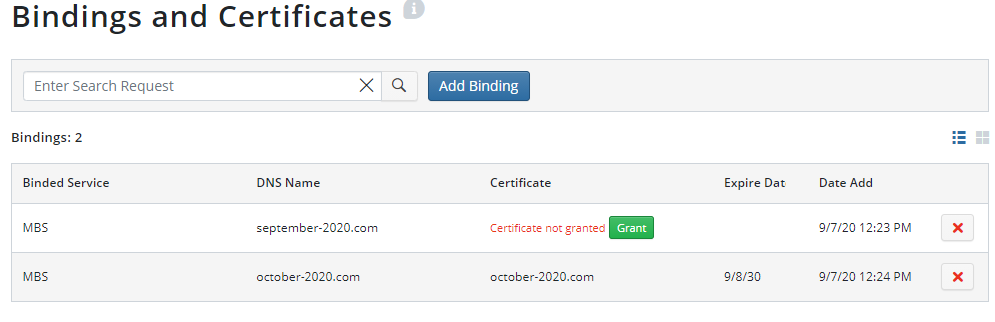
- In the binding list, find the required HTTP binding (they are marked with the Certificate Not Granted legend), then click Grant.
- Select an option for the certificate.
- Once you are done, click Save.
Delete An Existing Binding
To delete a new website binding, proceed as follows:
- Open the Management Console.
- In the Settings menu, select Bindings And Certificates.
- In the binding list, find the required binding, then click X.
- Confirm the deletion in the dialog box.