MS SQL Server Backup
Managed Backup Service allows you to perform MS SQL Server native backups (full, differential, transaction log) and restores with the benefits of encryption.
Consider that Managed Backup does not detect file changes based on content. Instead, it detects file changes by checking the modification date and uses this to determine whether a new copy of the file needs to be backed up.
For minimum permissions required for MS SQL Server backup, refer to the following KB article.
It is recommended to create only one backup plan for every MS SQL Server database to avoid one plan interfering with another. In case you need to back up the SQL Server data to several locations, select the hybrid backup on the Select Backup Storage step.
Features:
- Flexible selection of databases for backup
- Compression (native SQL Server compression if supported, otherwise, a custom compression)
- Encryption
- Copy-only backup
- Flexible schedules, pre-defined schedule templates
- Restore databases directly to MS SQL Server
- Restore databases as files (.mdf, .ldf)
- Point-in-time restore.
SQL Server performs backup and restore operations following a recovery model defined for the database, specifying how transactions are logged, whether or not this log requires (and allows) backups, as well as what kinds of restore operations are available. Transaction log backup is allowed for Full and Bulk-Logged recovery models only.
Note: Only local MS SQL Server instances can be configured for backup.
Supported for:
- MS SQL Server 2008/2012/2014/2017/2019/2022
- MS SQL Server Express
License: MS SQL Server, MS SQL Server + MS Exchange, Ultimate (Check out Backup Agent License Types)
This chapter covers the following topics:
- Create MS SQL Server Backup Plan
- Run the Backup Plan
- Force Full Backup
- Edit the Backup Plan
- Clone the Backup Plan
- Delete the Backup Plan
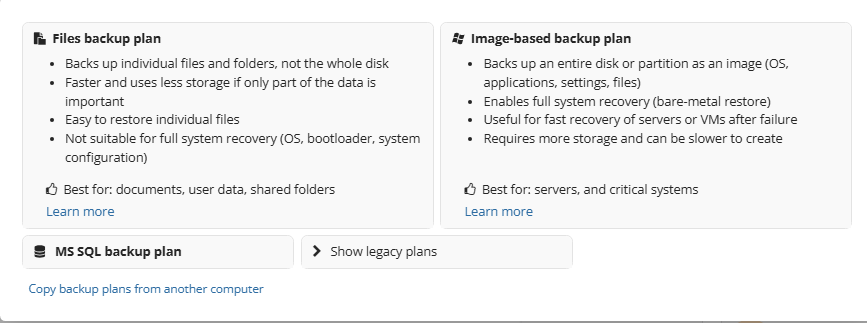
Create MS SQL Backup Plan
To create a new MS SQL backup plan, proceed as follows:
- Open the Management Console.
- Open Backup > Computers
- Find the required computer, then click on its name or on the Configure icon in the Backup Plan Status column to access the side panel.

- In the side panel, make sure you are within the “Backup Plans” tab. Click on the +Add New Plan button and select MS SQL backup plan.
Welcome
Specify the plan name.
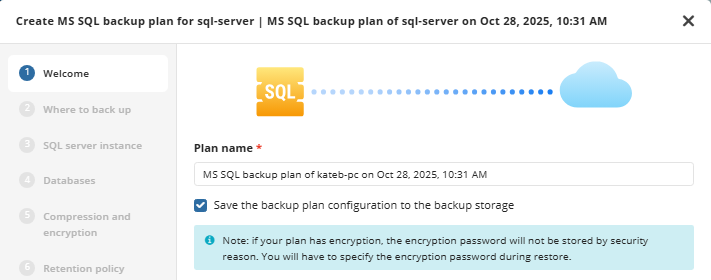
It is recommended to use a descriptive name which will distinguish the backup from others
The Save backup plan configuration to the backup storage checkbox allows you easily restore the backup plan to another destination if necessary.
If you use encryption in the backup plan, mind that for security reasons the encryption password should be kept in a safe place
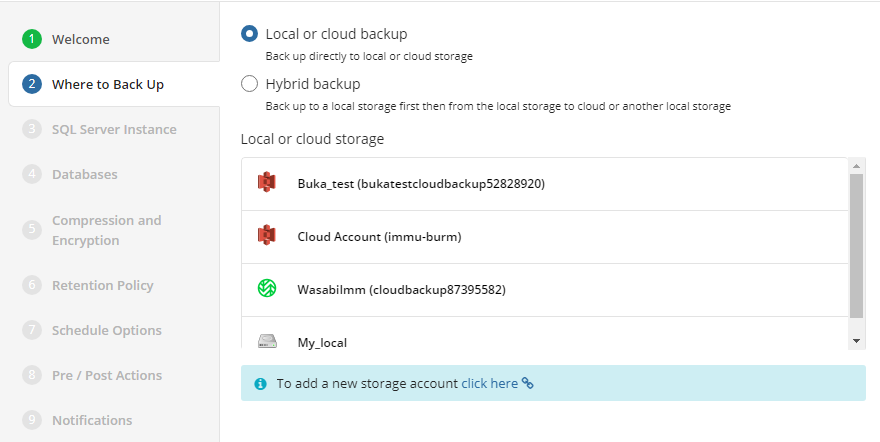
Where to Back Up
The next step is to select where you would like the backup to be stored and choose what backup you are planning to use, local, cloud or hybrid. If you choose to create a Hybrid backup the wizard will prompt you to select a second location.
Select SQL Server Instance
Select the SQL server instance to back up:
- In the SQL Server Instance drop-down list, select the instance for the backup plan.
- In the Authentication Type drop-down list, select the authentication method:
- Select the Windows authentication item, if you want to use the Windows principal token.
- Select SQL Server Authentication item, if you want to use proprietary SQL Server authentication. In case you use SQL Server authentication, specify the username and password.
- Select the Check if the specified account has necessary permissions to perform backup checkbox if you want to make sure the specified credentials are granted with sufficient permissions to perform SQL Server database backup. Once you click Next, the credentials will be checked if this account is granted enough permissions.
- To connect to SQL Server instance using SSL, select the Use secure connection (SSL/TLS) checkbox.
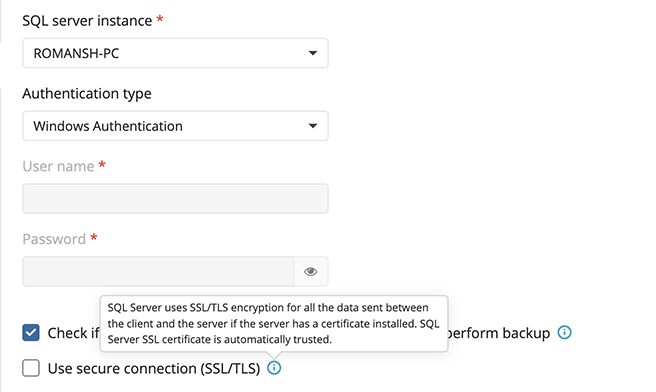
To utilize the Windows Authentication option, the Online Backup service account (typically NT AUTHORITY/SYSTEM by default) must be assigned the “sysadmin” role within the MS SQL instance
Only local databases and instances can be backed up
Databases
Select the databases within the instance which you would like to back up.
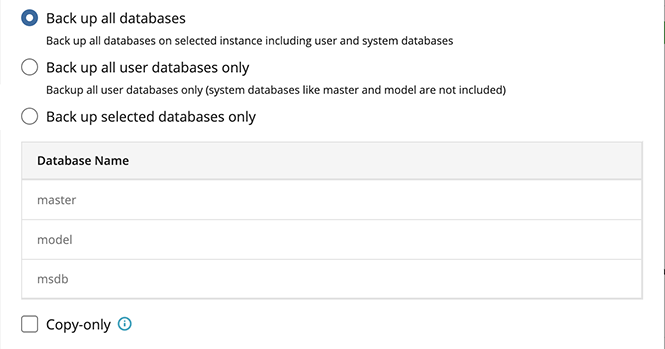
The following options are available:
- Back up all databases. Select this option if you want to back up all databases on the selected instance, including system and user databases
- Back up all user databases only. Select this option to back up only user databases. In this case, system SQL Server databases (master, model, msdb) will not be included in the backup plan.
- Back up selected databases only. Select this option if you want to select databases for the backup plan manually, then select databases from the backup in the table below.
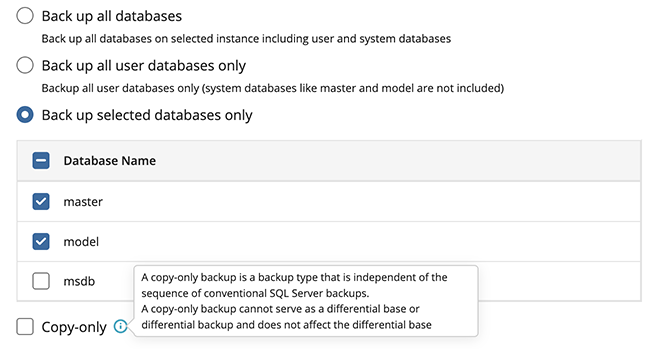
- Select copy-only backup if necessary. If copy-only backup is enabled, the differential backup becomes unavailable.
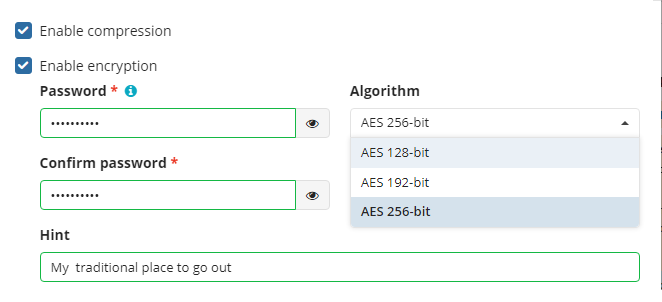
Compression and Encryption
Compression
Managed Backup offers compression to reduce the storage space required for your backup and to speed up the upload process to the target storage.
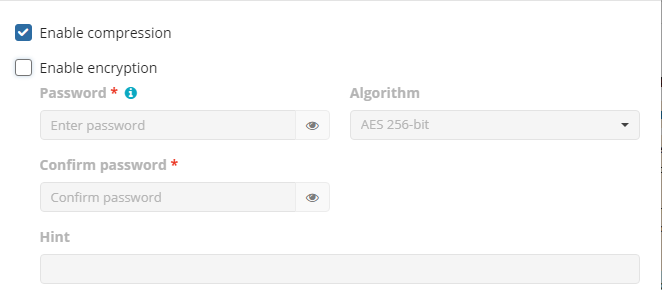
Encryption
You can protect your backup by encrypting its contents. Managed Backup supports AES encryption with key sizes of 128, 192, and 256 bits. A larger key size provides stronger encryption but may increase the time required for processing your backup. For more details on AES encryption, refer to the Advanced Encryption Standard.
To protect your backup contents with encryption, select the Enable encryption checkbox. Application supports AES encryption of 128, 192 and 256 bit key length. Select the appropriate key length in the Algorithm drop-down menu
- Specify the encryption password in the Password field, then confirm the password in the Confirm field. Mind to keep the encryption password in a safe place. Pay attention, if Password Recovery Service is not enabled in the Management Console, then if the encryption password is lost or forgotten, the encrypted backup cannot be restored. Password recovery Service requires the Two-factor Authentication (2FA) enabled.
- In the Hint field, specify some information that could help to recall the password in case you forget it.
If you change any encryption settings (algorithm or password) for an existing backup plan, a full backup will be executed the next time the backup plan runs.
Note that the encryption password will NOT be stored in the backup plan configuration for security reasons. Keep this password in a safe place to be able to restore the backup contents afterwards
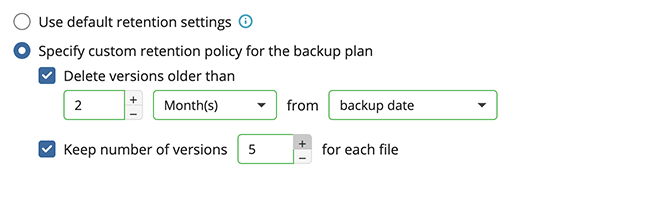
Retention Policy
Specify the retention policy settings. The following settings are available:
If you want to use the default retention policy for the backup plan, select Use default retention options option
If you want to set the custom retention policy for the backup plan, select Specify custom retention policy for the backup plan option. You can configure a different retention policy for the local backup in case you use the hybrid backup route.
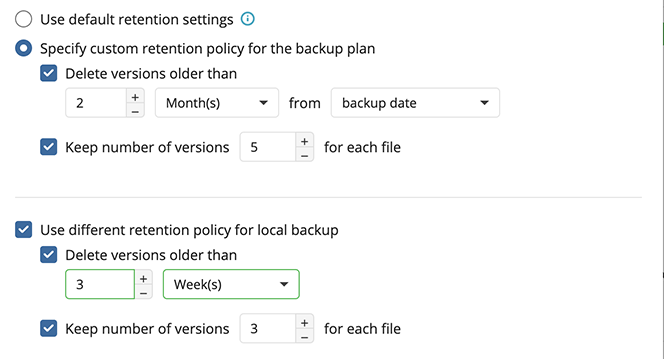
- Select the Delete versions older than checkbox if you want to keep the restricted number of database backup versions in backup storage. In the fields below, specify the criteria for the deletion of old database versions
- Keep number of versions for each file. Select this checkbox if you want to keep selected number of versions in backup storage. It is highly recommended to keep this checkbox selected for backup plans with sensitive data
Advanced Options (optional)
The next step displays any advanced options available for the plan storage. Options presented here will depend on the storage destination selected.

Schedule Options
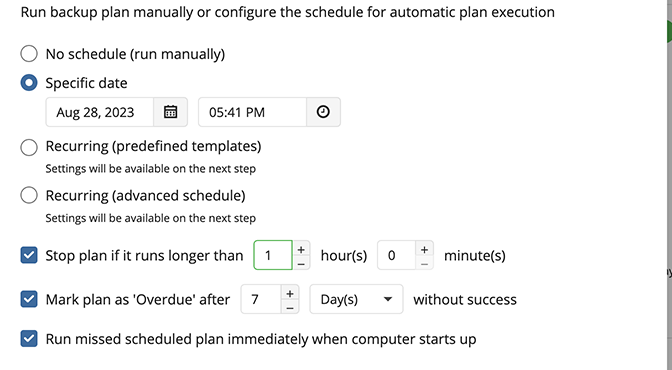
Specify the schedule options for the backup plan.
- If you plan to run the backup plan manually, select the No schedule option.
- If you want your backup plan to run on a particular date and time, select the Specific date option, then specify the date and time you want your backup plan to be run.
- If you intend to execute this backup plan on a constant periodic basis using the built-in templates, select the Recurring (predefined templates) option. Configure these settings on the next step.
- If you intend to execute this backup plan on a constant periodic basis, select the Recurring (advanced) option. Configure these settings on the next step
- To stop the backup plan in case it continues suspiciously long, select Stop the plan if it runs longer than checkbox, then specify the plan run duration.
- If you want to receive an alert in case the backup plan fails to run, select the Mark plan as overdue after checkbox, then specify the alert delay period.
- To run the backup plan after the computer is on in case the backup plan run has been missed, select the Run missed scheduled plan immediately when computer starts up checkbox.
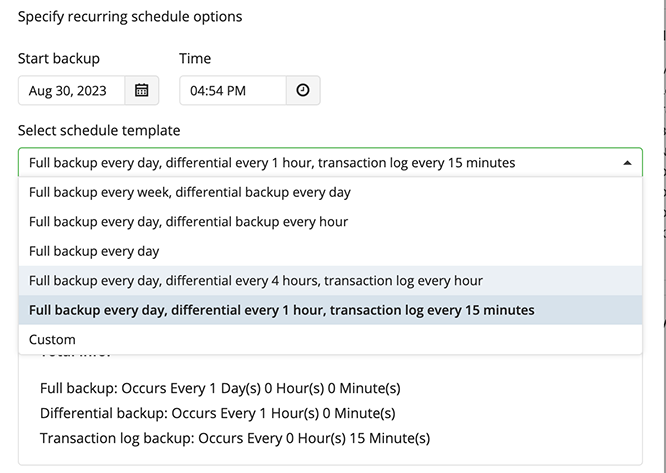
In case you selected one of the recurring schedule options, configure schedule settings.
In case you selected the schedule from the built-in templates, the following options are available:
In case you selected the advanced recurring settings, the following options are available:
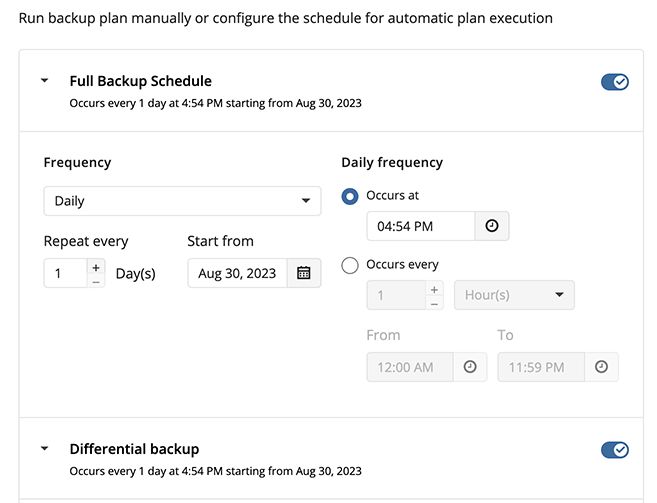
- Full backup: Clicking on this will open up the scheduling options for running a full backup. Full backups are required for the retention policy, Differential Backup, and restore operations to work.
- Differential backup: Clicking on this will open up the scheduling options for running a Differential Backup. A Differential Backup is similar to an incremental backup in that it only backs up new or changed data.
- Transaction log: Enable this to schedule transaction log backups of the selected databases.
Enable the type of backups you would like to run by clicking on the toggle. Each type will have similar scheduling options available.
The retention policy will only perform properly with regular scheduled full backups
Pre / Post Actions
Specify pre and post-actions for your backup plan. Usually, these are scripts that perform particular jobs before or after your data is backed up. The following settings are available:
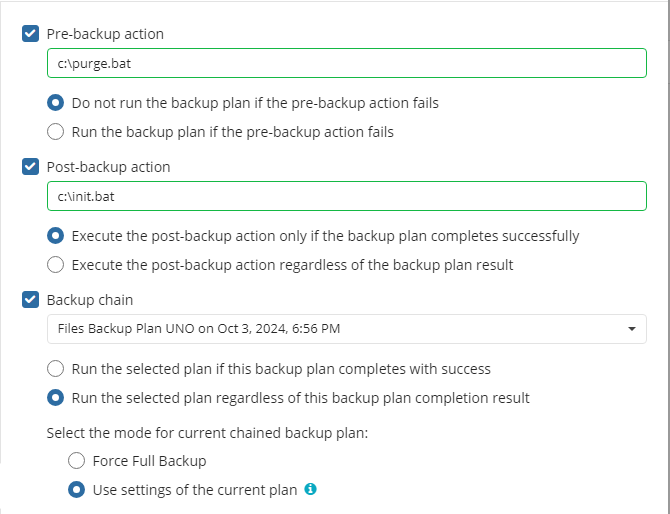
- To specify the action that will be performed before the backup plan starts, select the Pre-backup action check box.
- Specify the path to the script to be run as a pre-backup action.
- Specify the conditions of pre-action run:
- Select the Do not run the backup plan if the pre-backup action fails option if you do not want the backup plan to be launched if the pre-backup action fails.
- Select the Run the backup plan if the pre-backup action fails option if you want the backup plan to launch regardless of the pre-backup action result.
- To specify the action that will be performed after the backup is completed, select the Post-backup action check box.
- Select the Execute the post-backup action only if the backup plan completes successfully option if you want to run it only if the backup was executed without any errors or warnings.
- Select the Execute the post-backup action regardless of the backup plan result option if you want the post-action to be launched regardless of the backup termination results.
- To chain the backup plan with another plan, select Backup chain check box, then select the backup or restore plan name in the drop-down menu.
- Select the Run the selected plan if this backup plan completes with success option if you want to run the specified plan only if the backup plan was executed without any errors or warnings.
- Select the Run the selected plan regardless of this backup plan completion result option if you want the chained backup plan to be launched regardless of the backup termination results. Select the mode for the current chained backup plan:
- Force full backup. Full backup will be forced for the chained backup plan.
- Use settings of the current backup plan. Chained backup plan will be run as full or incremental, according to this backup plan run.
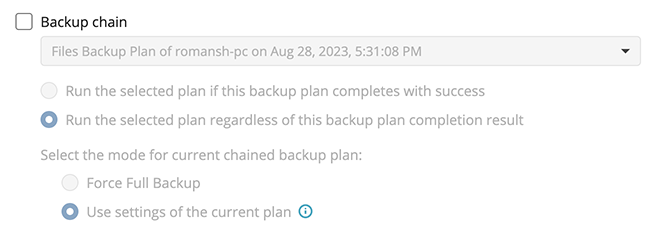
Backup Chain
This option will be available in case the pre- and post actions are not allowed. Specify the backup chain options.
- To chain the backup plan with another plan, select the plan name in the drop-down menu.
- Select the Run the selected plan if this backup plan completes with success option if you want to run the specified plan only if the backup plan was executed without any errors or warnings.
- Select the Execute regardless of this backup plan completion result option if you want the chained backup plan to be launched regardless of the backup termination results.
Also you can force full backup or use the current plan settings for the chained plan.
Notifications
Specify notification settings for backup plan results. You can use the company notification settings or customize them as needed. You can specify the required recipients and customize the notifications on different backup plan results:
- Success
- Warning
- Failed
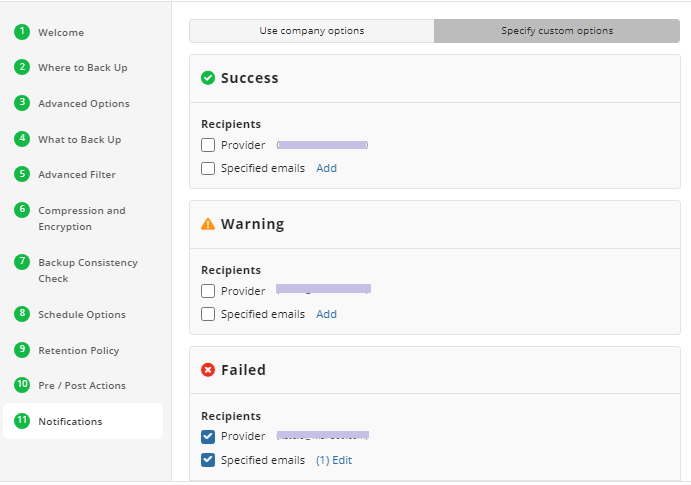
You can configure a notification threshold for Managed Backup alerts, so that notifications are sent only after a specified number of consecutive plan failures
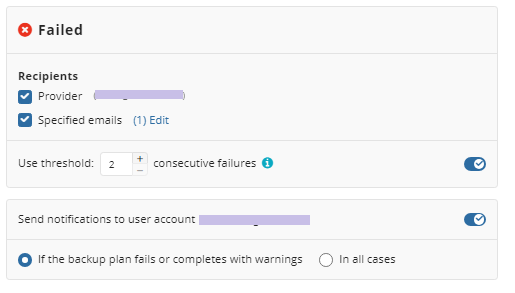
In case you select to customize notifications, select the recipients for different events.
- Select Send notifications to user account... if you want to notify the associated user about the backup process.
- Select If the backup plan fails or completes with warnings option if you want to receive the notification message in case of the backup plan failure
- Select In all cases option if you want the entry to be put in Windows Event Log in any case.
Click the Next, then click Save to finish the wizard.
Run Backup Plan
To Run the Existing Backup Plan:
- Open Backup > Computers.
- Find the required computer, then click the Configure icon in the Backup Plan Status column.
- On the side panel, navigate to the Backup Plans (Beta) tab
- Find the plan to run.
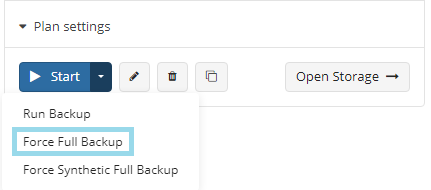
- Click the Start button to run the backup plan. You can expand this control to use the following options:
- Run Backup
- Force Full Backup
- Force Synthetic Full Backup

Force Full Backup
To Force Full Backup
- Open Backup > Computers.
- Find the required computer, then click the Configure icon in the Backup Plan Status column.
- On the side panel, navigate to the Backup Plans (Beta) tab
- Find the plan to force.
- Expand the Start control and click Force Full Backup.
To configure regular full backup settings, refer to the Schedule step of the backup wizard
Edit Backup Plan
To Edit the Existing Backup Plan
- Open Backup > Computers.
- Find the required computer, then click the Configure icon in the Backup Plan Status column.
- On the side panel, find the plan you want to edit, then click the edit icon.

- Once you have made the required changes, click Save.
Clone Backup Plan
To Clone the Existing Backup Plan
- Open Backup > Computers.
- Find the required computer, then click the Configure icon in the Backup Plan Status column.
- On the side panel, find the plan you want to clone, then click the clone icon.

- Specify the name of the plan clone.
- Click Save.
Delete Backup Plan
To Delete the Existing Backup Plan
- Open Backup > Computers.
- Find the required computer, then click the Configure icon in the Backup Plan Status column.
- On the side panel, find the plan you want to delete, then click the deletion icon.

- In the dialog box, click OK to confirm the deletion.
| Top |