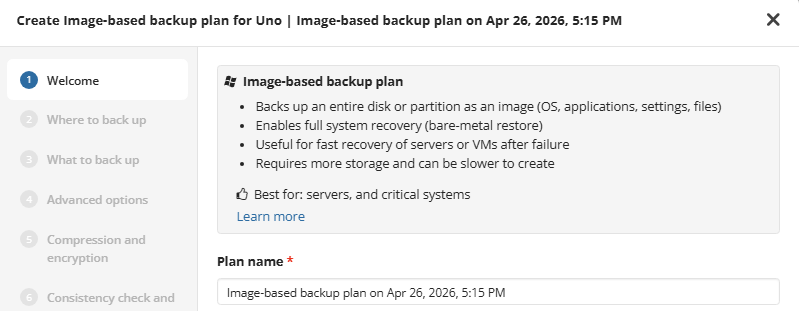
Image-Based Backup Plan
Image-Based Backup is a backup of an entire operating system with all the data associated with it including the system state and all the application configurations including application data saved in a single file called "image".
With this feature, you can restore the operating system onto your users' computers straight from the system image file as it was at the moment of the last run of the image-based backup plan. Currently, the image-based backup plan is the most reliable way to back up everything on a computer. Image-based backup is an efficient tool to prevent the consequences of system crashes on servers and workstations.
This chapter covers the following topics:
- Create Image-Based Backup Plan
- Run the Backup Plan
- Force Full Backup
- Edit the Backup Plan
- Clone the Backup Plan
- Delete the Backup Plan
Objects Excluded from Backup by Default
To reduce the backup size, the following objects are excluded by default from the backup:
| Path | |
|---|---|
| \System Volume Information*{3808876B-C176-4e48-B7AE-04046E6CC752} | ❌ |
| \Pagefile.sys | ❌ |
| \hiberfil.sys | ❌ |
| \swapfile.sys | ❌ |
| \Windows\Temp | ❌ |
| \Windows\ServiceProfiles\NetworkService\AppData\Local\Microsoft\Windows\DeliveryOptimization\Cache | ❌ |
| \Users*\AppData\Local\Temp | ❌ |
| Data folder of MSP360 backup (mbs or standalone data folder) | ❌ |
| \Windows\SoftwareDistribution\Download | ❌ |
Create Image-Based Backup Plan
Backup plans can be created from scratch or using a backup template.
Create a Backup Plan from Scratch
- Open the Management Console.
- On Computers select Remote Management if you use legacy main menu, or open Backup > Computers page in the new main menu.
- Find the required computer, then click the Configure icon in the Backup Plan Status column.
- On the side panel, click +Add New Plan.
- Select Image-based backup plan. Follow the backup wizard steps.
- Once you are finished with the plan settings, click Save.
Plan Name
Name the backup plan.
In the new backup format, a backup plan configuration is always saved in a backup storage
Click Next to proceed.
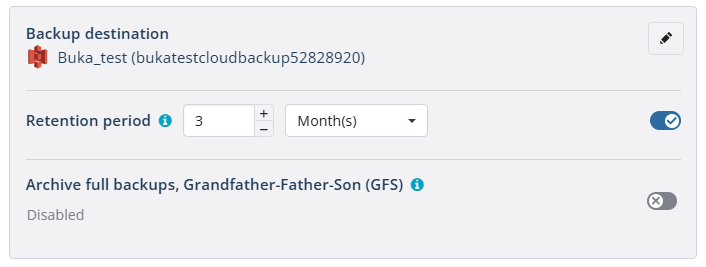
Where to Back Up and Retention
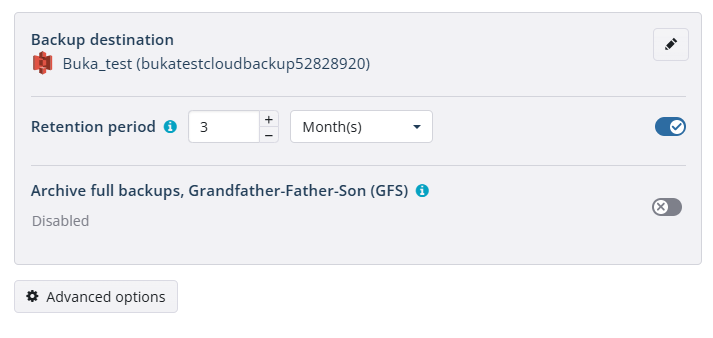
Select a target backup storage for the backup plan, set the retention policy for the plan. Also you can enable and configure the advanced options .
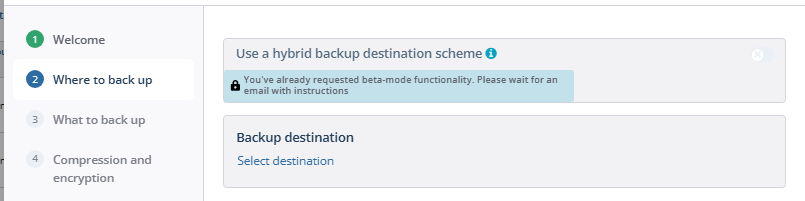
The Use a hybrid backup destination scheme option will be available soon.
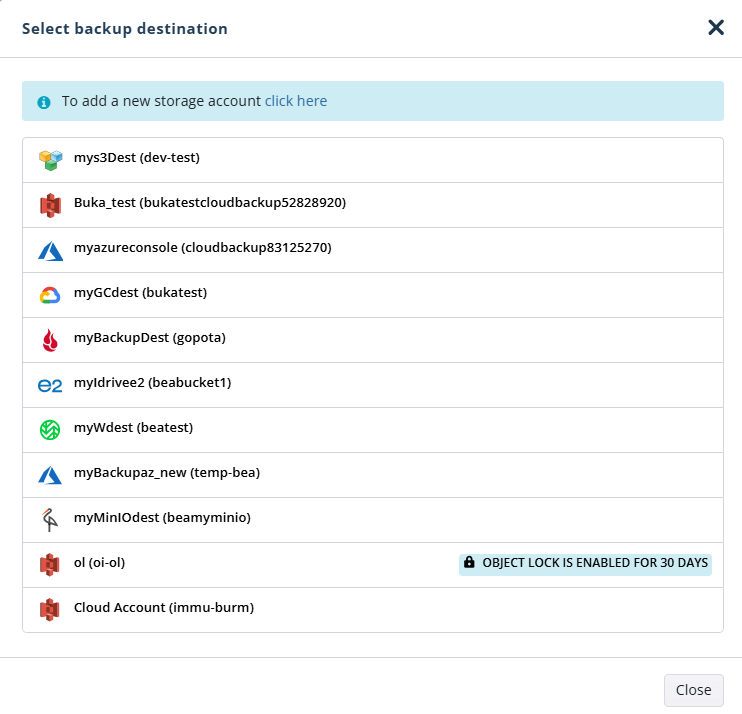
To select a backup destination:
- Click Select destination to select a storage account. If no storage accounts are available, create a new one. Refer to Add New Storage Account to learn how to do it.
- Now you can configure the retention policy for the plan. By default, the retention period is set to 3 months.
It is not recommended to keep image-based backups in long-term storage. Note that long-term storages have several limitations: in the case of a restore, data retrieval can take up to several hours and retrieval charges may apply. Also, keep in mind that in some cases your backup data can be moved to long-term storage according to lifecycle policies. Learn more about lifecycle policies:
Retention Policy for Advanced Schedule, GFS, and Object Lock for GFS backups
Specify the retention period for the backup plan.
GFS Settings
To apply the GFS retention policy, enable the Archive Full Backups, Grandfather-Father-Son (GFS) feature, then specify the GFS retention settings. GFS will require the Advanced schedule on the Schedule step and is incompatible with Forever Forward Incremental (simple schedule).
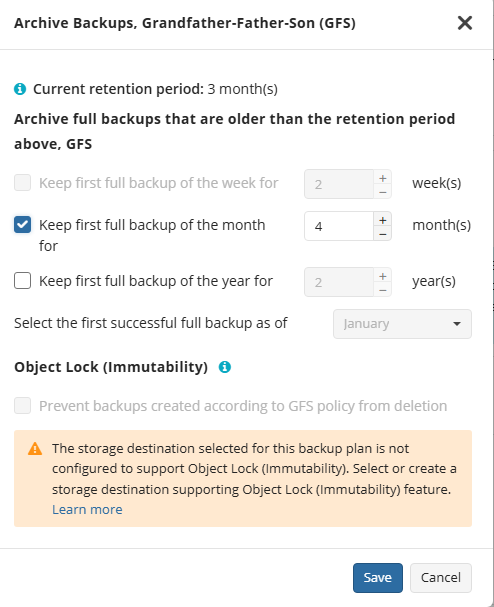
Learn more about GFS retention settings in the GFS Examples chapter
Object Lock for GFS Backups
Object Lock for GFS backups is linked to the GFS retention policy. If the Object Lock for GFS backups is applied along with GFS settings, full backups that are subject to the GFS retention policy become immutable for the GFS retention period.
Select the Prevent backups created according to GFS policy from deletion checkbox, then confirm the use of this feature.

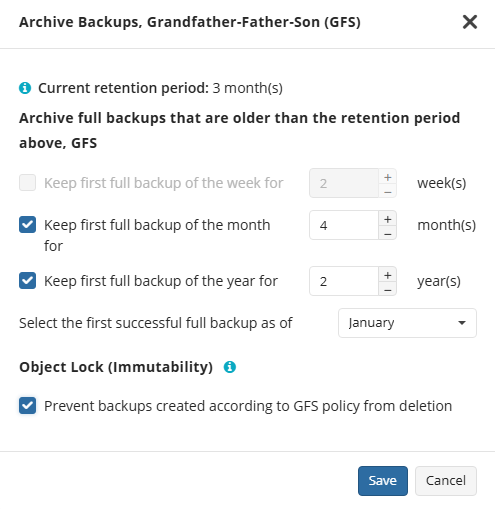
Use the Immutability feature with extreme caution. Once a backup data becomes immutable in Compliance mode, there is no way to delete them from the storage until the specified GFS retention period expires except for the storage account termination. Incorrect settings can cause high storage bills.
To find more information about the Object Lock for GFS Backups feature, supported storage providers, and required permissions, refer to this article.
Retention Policy for Simple Schedule
If you want to use the simple schedule, you should set a retention period and do not enable GFS settings.
For the Simple schedule, the Retention period value defines how long restore points are kept. Restore points with an expired retention period are merged into a full backup. (With Forever Forward Incremental, only one full backup is kept on the backup storage). If your storage has a minimum retention period, the creation of a new full backup will be postponed to avoid early deletion fees.
Advanced Options
By default advanced options are skipped for the backup plan. You should enable them, if necessary (not recommended).
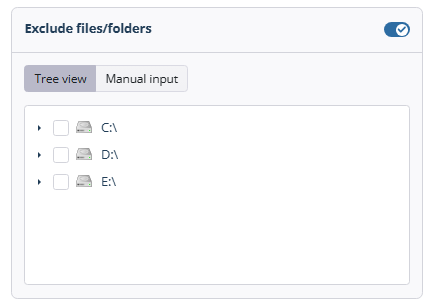
On the Where to back up step you can specify the advanced options for the backup plan, exclude unnecessary contents.

To exclude specific files and folders, select the Exclude files/folders checkbox, then specify the path to the object to exclude. Note that the disk labels must be capitalized (Example: C:\trash).
Available advanced options depend on selected backup storage
- Synthetic Full backup. Select this option to enable Synthetic Full for selected backup storage. Consider, in case you enable this option for long-term backup storage, this can result in increased storage costs. Refer to your cloud storage provider documentation to check the prices of in-cloud copy creation for selected storage classes.
- Use S3 Transfer Acceleration (available only for Amazon S3). Use this option to accelerate file transfer for an extra fee. The target bucket must have this feature enabled. Select this check box if you want to use the data transfer acceleration service provided by Amazon. To learn more, refer to the Amazon S3 Transfer Acceleration documentation.
- Ignore bad sectors. Select this check box to bypass any damaged/corrupted sectors on backup source disks. Even in case the volume with bad sectors is restored, these sectors will become empty sectors, and you will not be able to read any files that were allocated in these sectors.
- Disable VSS, use direct access to NTFS volume. Select this check box to disable Volume Shadow Copy Service (VSS). This option may be required when a disk is not used for writing operations and does not have sufficient space to create a VSS snapshot. Basically, this applies to system volumes
Note that the enabled Disable VSS, use direct access to NTFS volume option overrides the Use VSS settings made on the What To Back Up step
Use system VSS provider. Select this check box to use the system default VSS provider. It is recommended to use it in case of the presence of any third-party VSS providers installed that may interfere with the proper processing of VSS snapshots made by MSP360 (CloudBerry) Backup
Prefetch block count (0 without prefetch. Specify the maximum block number stored in memory for each disk volume (cache). Consider, by default you will see the recommended optimal value in this field. It is not recommended to change it. You can only use this field for testing purposes, if this is recommended by technical support.
A block is a minimum unit of information that can be processed at a time when preparing a backup.
When you need to perform a backup over a disk containing several terabytes of data, you can speed up the backup processing by increasing the block size (see below).
Additional Advanced Options for Amazon S3
If your backup destination is Amazon S3, the following custom settings are available in this step.
- Use S3 Transfer Acceleration. Use this option to accelerate file transfer for an extra fee. The target bucket must have this feature enabled
- Select the S3 storage class for the backup plan:
Using different storage classes for different backup purposes helps you to optimize the storage costs.
Learn more about Amazon S3 storage classes here
Additional Advanced Options for Microsoft Azure
If your backup storage destination is Microsoft Azure, and you have the General Purpose v2 Azure account, select the required storage class (access tier).
The following options are available:
- Hot tier. An online tier optimized for storing data that is accessed or modified frequently. The hot tier has the highest storage costs, but the lowest access costs.
- Cool tier. An online tier optimized for storing data that is infrequently accessed or modified. Data in the cool tier should be stored for a minimum of 30 days. The cool tier has lower storage costs and higher access costs compared to the hot tier.
- Cold tier. An online tier optimized for storing data that is rarely accessed or modified, but still requires fast retrieval. Data in the cold tier should be stored for a minimum of 90 days. The cold tier has lower storage costs and higher access costs compared to the cool tier.
- Archive tier. An offline tier optimized for storing data that is rarely accessed, and that has flexible latency requirements, on the order of hours. Data in the archive tier should be stored for a minimum of 180 days.
Note that this feature is only supported for General Purpose v2 Azure accounts. If you are using another kind of account, you need to upgrade your account to be able to use this feature
Be aware of the additional charges and increased blob access rates after your Azure account upgrade
To learn more about the difference between Azure storage tiers, refer to the Azure Blob Storage - Hot, cool, cold, and archive storage tiers article at docs.microsoft.com.
Click Next.
What to Back Up
Select partitions to back up.
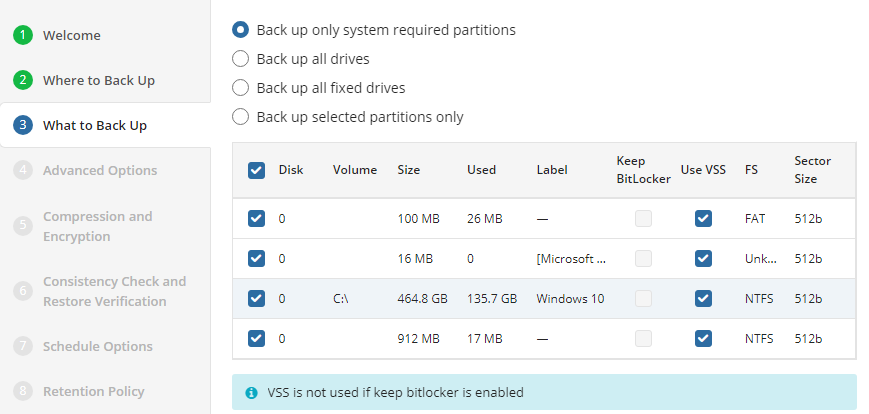
The following options are available:
- Back up only system-required partitions. Select this option to back up only partitions with operating system files and boot sectors
- Back up all partitions. Select this option to include all available partitions at the moment of backup
- Back up all fixed drives. Select this option to include all fixed drives at the moment of the backup plan execution. All drives except for removable media are to back up
- Back up selected partitions only. Select this option to configure the partition list manually
If the Back up all fixed drives option is selected, all connected fixed drives (e.g., physical drives attached to the mainboard, iSCSI LUN, virtual machine disks (inside the guest OS), virtual disk files (.vhd/.vhdx) mounted/attached to the OS at the moment of the backup plan execution will be backed up with success status reported. Thus, if some drives are disconnected for some reason or some drives are added, they all will be backed up 'as is'.
All removable drives (i.e USB flash drives, USB-connected portable HDDs) are not included in the backup plan
In case you intend to restore the backup dataset along with the operating system, note that selected partitions must include all system volumes as they contain the information which is necessary for loading the operating system. Without backing up these volumes, you will not be able to restore your disk image and load the operating system
For each partition you can configure the following options:
- Use VSS. With this option enabled, a Volume Shadow Copy Service is applied for the volume at the moment of backup plan execution
- Keep BitLocker. For BitLocker-encrypted volumes, the Keep BitLocker option is selected by default. This means that the BitLocker-encrypted volumes will be backed up 'as is'. With the Keep BitLocker option disabled, volumes will be backed up encrypted with the proprietary encryption
Note that if you have system partitions encrypted with BitLocker, it is highly recommended not to use BitLocker encryption to back them up. Instead, you can use the built-in encryption of Backup for Windows.
This recommendation comes because image-based backups can be corrupted if a partition is BitLocker-encrypted. For these partitions, VSS (Volume Shadow Copy) is not available. This can cause the following issues on restore: the operating system may not start properly and result in a BSOD message BAD_SYSTEM_CONFIG_INFO
Consider that Managed Backup does not detect file changes based on content. Instead, it detects file changes by checking the modification date and uses this to determine whether a new copy of the file needs to be backed up.
Click Next.
Compression and Encryption
Compression
Managed Backup offers compression to reduce the storage space required for your backup and to speed up the upload process to the target storage.
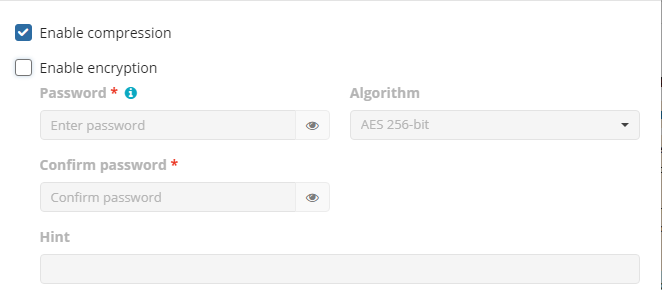
Encryption
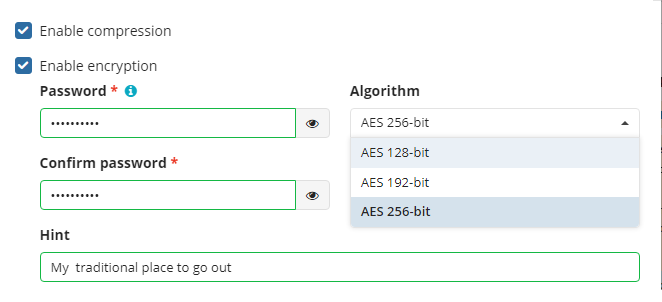
You can protect your backup by encrypting its contents. Managed Backup supports AES encryption with key sizes of 128, 192, and 256 bits. A larger key size provides stronger encryption but may increase the time required for processing your backup. For more details on AES encryption, refer to the Advanced Encryption Standard.
To protect your backup contents with encryption, select the Enable encryption checkbox. Application supports AES encryption of 128, 192 and 256 bit key length. Select the appropriate key length in the Algorithm drop-down menu
- Specify the encryption password in the Password field, then confirm the password in the Confirm field. Mind to keep the encryption password in a safe place. Pay attention, if Password Recovery Service is not enabled in the Management Console, then if the encryption password is lost or forgotten, the encrypted backup cannot be restored. Password recovery Service requires the Two-factor Authentication (2FA) enabled.
- In the Hint field, specify some information that could help to recall the password in case you forget it.
If you change any encryption settings (algorithm or password) for an existing backup plan, a full backup will be executed the next time the backup plan runs.
Note that the encryption password will NOT be stored in the backup plan configuration for security reasons. Keep this password in a safe place to be able to restore the backup contents afterwards
Click Next.
Consistency Check and Restore Verification
Enable or disable the full consistency check and restore verification for the backup plan. A mandatory consistency check will be completed with every backup plan run regardless of this setting.
Full consistency check implements checks of data integrity for all generations (full and incremental backup sequences) with the exception of the current generation check, which is the subject of a mandatory consistency check. A mandatory consistency check is performed at each backup plan run.
After the successful full consistency check, a user can be sure that backed up data is ready to be restored.
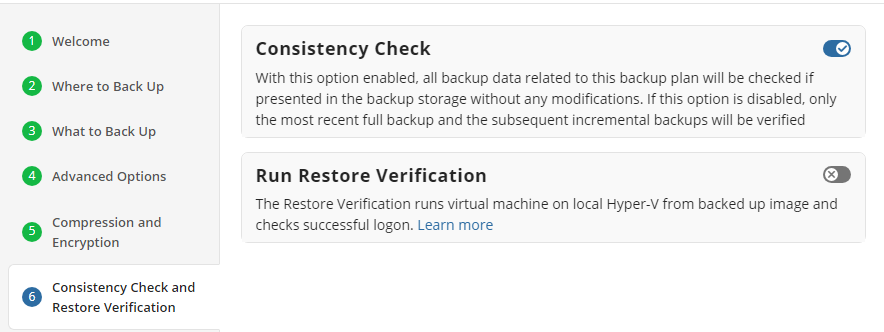
Also, you can configure the Restore Verification.
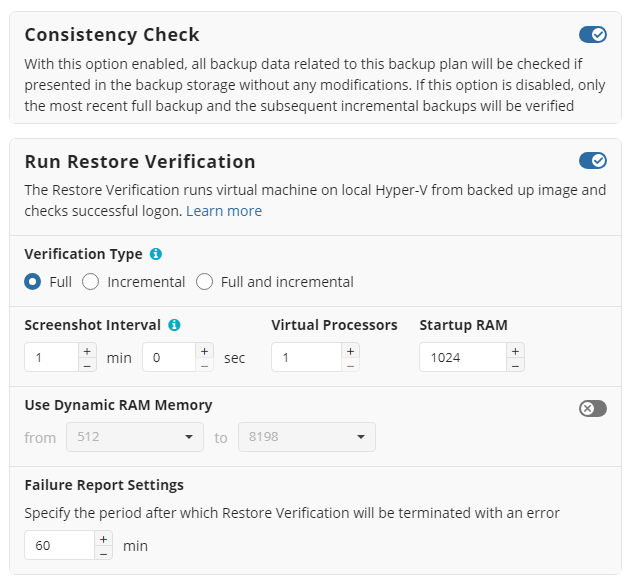
Restore verification is an auxiliary restore plan that retrieves only necessary backup parts from backup storage, mounts a Hyper-V virtual machine on the fly, then performs a system logon.
Since there is no need to download the whole backup dataset to make sure the disk image backup is valid and can be guaranteed for restore, the restore verification does not take much time.
You can run the Restore Verification for incremental backups only, full backups only, or for all backup runs.
Along with the Restore Verification running mode, customize the Hyper-V auxiliary virtual machine configuration to run the Restore Verification (screenshot interval,number of virtual processors, RAM).
Configure the failure handling. Specify the period after which the Restore Verification will be terminated with an error report. By default, this period is 60 min.
Click Next.
Schedule Options
Specify the backup plan schedule settings.
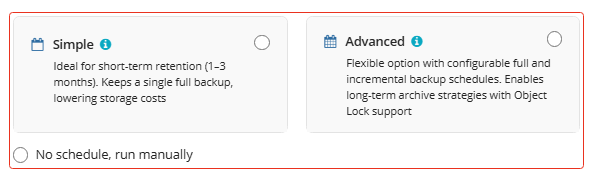
The following options are available:
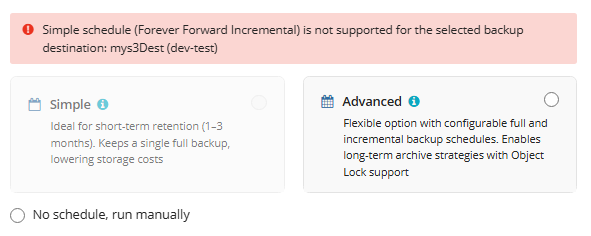
- Select the Simple option to apply the Forever Forward Incremental (FFI) schedule.
- Select the Advanced option to apply the recurring schedule and, if necessary, use Grandfather-Father-Son and Object Lock (Immutability).
- Select the No schedule, run manually option to run the backup plan manually. Retention policy will not work for this option.
The simple schedule is unavailable if the selected storage account does not support synthetic full backups.
For more guidelines on schedule selection, refer to the following article.
Simple Schedule
Select the Simple (Forever Forward) option to use the Forever Forward Incremental (FFI). This schedule offers one full backup followed by a limited number of incrementals. Once the limit is exceeded, a new full backup is created using in-cloud copying (synthetic full backup.
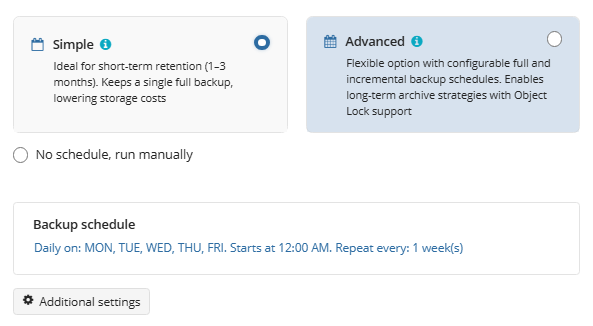
Once you select this option, the predefined schedule will appear. You can edit this schedule, if necessary. You can select the Daily or Monthly schedule type, depending on how often the incremental backups will be performed.
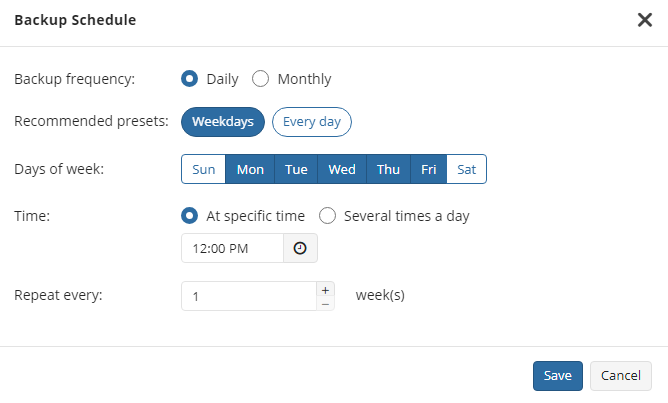
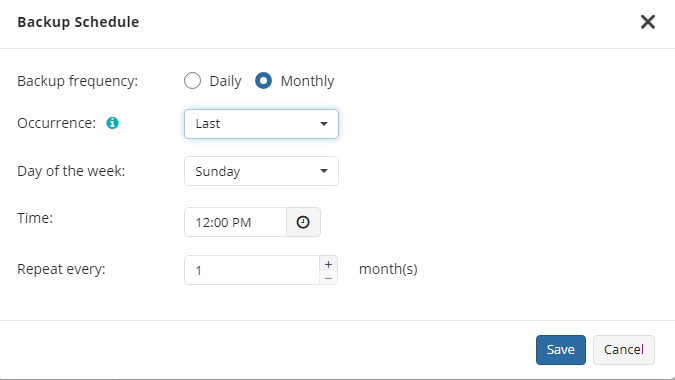
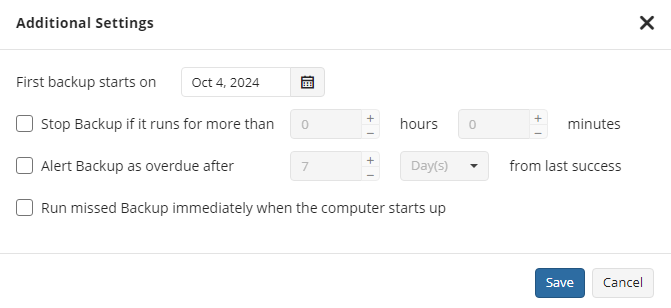
Use the Additional Settings to configure the following:
- First backup start date
- Stop condition for the long backup
- Overdue alert condition
- Missed backup handling
Advanced Schedule
Select the Advanced option to set up a flexible, recurring schedule with generations. Every generation contains one full backup followed by incrementals.
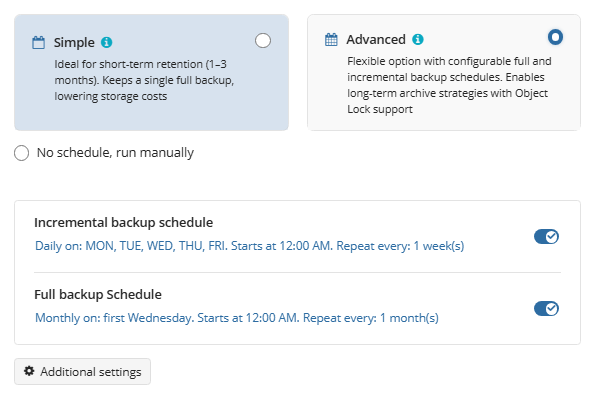
Once you select this option, the predefined schedule for full and incremental backup will appear. You can edit this schedule, if necessary.
The advanced schedule allows you to configure a flexible backup plan according to your requirements. To modify the schedule, use the edit icon next to the selected schedule. If needed, you can disable the incremental backup schedule to run only full backups.
You can select the Daily or Monthly schedule type, depending on how often the incremental backups will be performed.
Use the Additional Settings to configure the following:
- First backup start date
- Stop condition for the long backup
- Overdue alert condition
- Missed backup handling
It is recommended to schedule full backup at least once every 3 months for selected schedule
Click Next.
Schedule Options: Backup Agent v 7.9.7 and lower for Windows
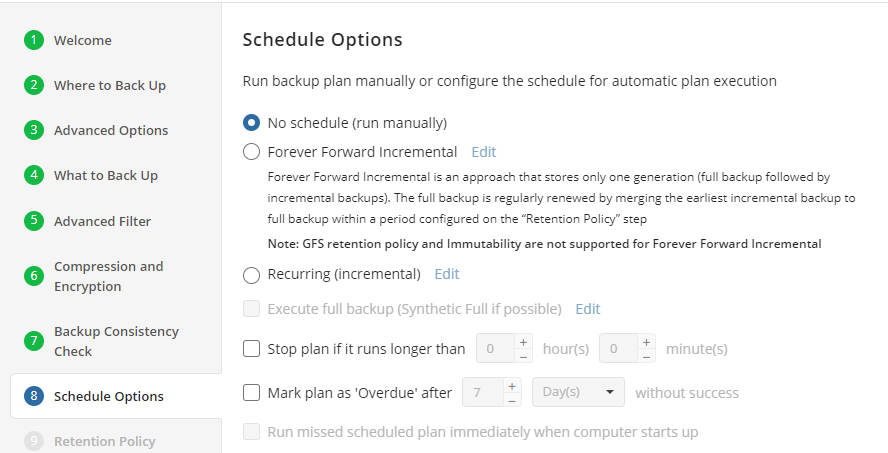
The following schedule options are available:
- Select the No schedule option to run the backup plan manually
- Select the Forever Forward Incremental option to apply the Forever Forward Incremental (FFI) schedule, then specify the schedule parameters
- If you want the backup plan to run incremental backups on a constant periodic basis, select the Recurring (incremental) option, click Edit, then specify the settings for incremental backup plan runs
- If you want the backup plan to run full backups on a constant periodic basis, select the Execute full backup (synthetic full if possible) option, click Edit, then specify the settings for full backup plan runs
- To stop the backup plan if it continues suspiciously long, select the Stop the plan if it runs for... option, then specify the backup plan's maximum duration
- Select the Run Missed Scheduled Plan Immediately When Computer Starts Up option to run the plan that was not executed while the computer was down.
It is recommended to schedule full backup at least once every 3 months for selected schedule
Recurring Schedule for Incremental Backups
You can set the periodic run intervals for incremental backups. Specify if the incremental backup plan runs on a daily or monthly basis, then specify the recurrence parameters and start time. Click Save. It is recommended to set the periodic run intervals for full backups as described below, it is not recommended to use incrementals only. You can check your settings at the bottom of the step page.
Recurring Schedule for Full Backups
You can set the periodic run intervals for full backups. Specify if the full backup plan runs on a daily or monthly basis, then specify the recurrence parameters and start time. Click Save. You can check your settings at the bottom of the step page. In case you want to enable GFS on the next step, you should configure full backup runs accordingly.
Schedule for Forever Forward Incremental Backup
Refer to Forever Forward Incremental chapter for details.
Click Next.
Pre / Post Actions
Specify pre and post-actions for your backup plan. Usually, these are scripts that perform particular jobs before or after your data is backed up. The following settings are available:
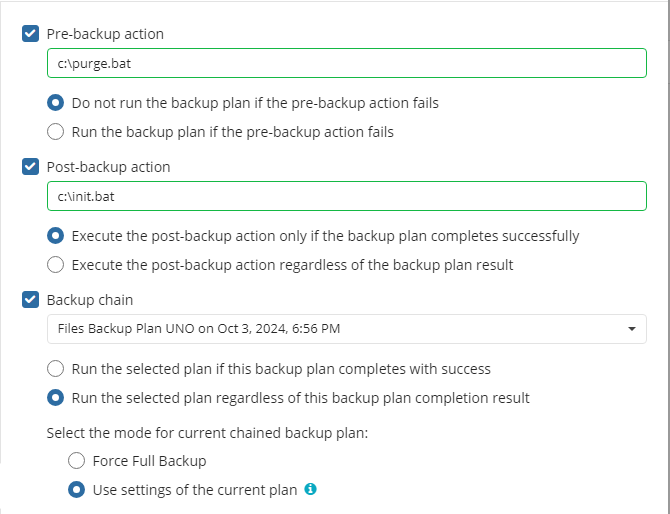
- To specify the action that will be performed before the backup plan starts, select the Pre-backup action check box.
- Specify the path to the script to be run as a pre-backup action.
- Specify the conditions of pre-action run:
- Select the Do not run the backup plan if the pre-backup action fails option if you do not want the backup plan to be launched if the pre-backup action fails.
- Select the Run the backup plan if the pre-backup action fails option if you want the backup plan to launch regardless of the pre-backup action result.
- To specify the action that will be performed after the backup is completed, select the Post-backup action check box.
- Select the Execute the post-backup action only if the backup plan completes successfully option if you want to run it only if the backup was executed without any errors or warnings.
- Select the Execute the post-backup action regardless of the backup plan result option if you want the post-action to be launched regardless of the backup termination results.
- To chain the backup plan with another plan, select Backup chain check box, then select the backup or restore plan name in the drop-down menu.
- Select the Run the selected plan if this backup plan completes with success option if you want to run the specified plan only if the backup plan was executed without any errors or warnings.
- Select the Run the selected plan regardless of this backup plan completion result option if you want the chained backup plan to be launched regardless of the backup termination results. Select the mode for the current chained backup plan:
- Force full backup. Full backup will be forced for the chained backup plan.
- Use settings of the current backup plan. Chained backup plan will be run as full or incremental, according to this backup plan run.
Click Next.
Notifications
Specify notification settings for backup plan results. You can use the company notification settings or customize them as needed. You can specify the required recipients and customize the notifications on different backup plan results:
- Success
- Warning
- Failed
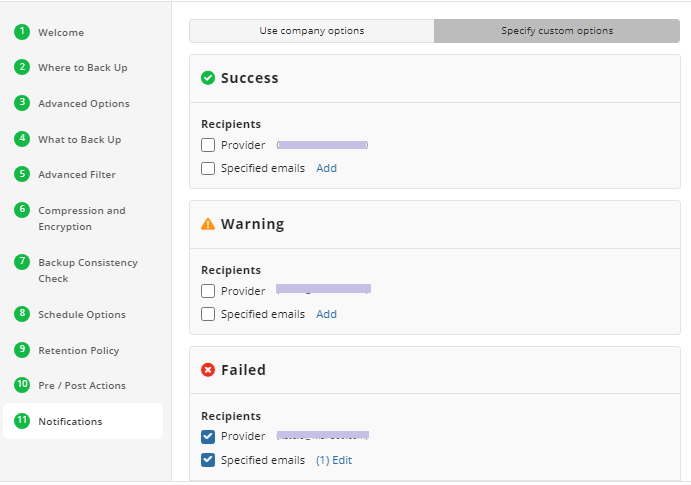
You can configure a notification threshold for Managed Backup alerts, so that notifications are sent only after a specified number of consecutive plan failures
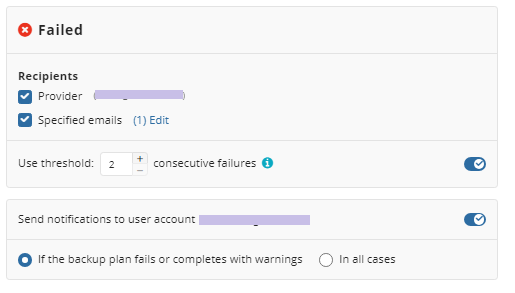
In case you select to customize notifications, select the recipients for different events.
- Select Send notifications to user account... if you want to notify the associated user about the backup process.
- Select If the backup plan fails or completes with warnings option if you want to receive the notification message in case of the backup plan failure
- Select In all cases option if you want the entry to be put in Windows Event Log in any case.
Click the Next, then click Save to finish the wizard.
Run Backup Plan
To Run the Existing Backup Plan:
- Open Backup > Computers.
- Find the required computer, then click the Configure icon in the Backup Plan Status column.
- On the side panel, navigate to the Backup Plans (Beta) tab
- Find the plan to run.
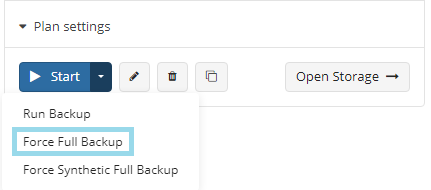
- Click the Start button to run the backup plan. You can expand this control to use the following options:
- Run Backup
- Force Full Backup
- Force Synthetic Full Backup

Force Full Backup
To Force Full Backup
- Open Backup > Computers.
- Find the required computer, then click the Configure icon in the Backup Plan Status column.
- On the side panel, navigate to the Backup Plans (Beta) tab
- Find the plan to force.
- Expand the Start control and click Force Full Backup.
To configure regular full backup settings, refer to the Schedule step of the backup wizard
Edit Backup Plan
To Edit the Existing Backup Plan
- Open Backup > Computers.
- Find the required computer, then click the Configure icon in the Backup Plan Status column.
- On the side panel, find the plan you want to edit, then click the edit icon.

- Once you have made the required changes, click Save.
Clone Backup Plan
To Clone the Existing Backup Plan
- Open Backup > Computers.
- Find the required computer, then click the Configure icon in the Backup Plan Status column.
- On the side panel, find the plan you want to clone, then click the clone icon.

- Specify the name of the plan clone.
- Click Save.
Delete Backup Plan
To Delete the Existing Backup Plan
- Open Backup > Computers.
- Find the required computer, then click the Configure icon in the Backup Plan Status column.
- On the side panel, find the plan you want to delete, then click the deletion icon.

- In the dialog box, click OK to confirm the deletion.
| Top |