MS Exchange Backup in Backup Agent
Along with Management Console, you can set up the MS Exchange Backup in Backup Agent.
Learn Backup Plan Wizard steps:
- Select Backup Storage
- Plan Name
- Select Databases
- Advanced Options
- Compression and Encryption Options
- Retention Policy
- Schedule
- Advanced Schedule Settings
- Pre/Post Actions
- Open Backup Agent for Windows with the Ultimate license.
- In the ribbon menu, click MS Exchange.
Select Backup Storage
Specify Backup Plan Type
On the first backup wizard step, select the backup type for your backup plan. The following options are available:
- Local or Cloud Backup. Select this option to back up MS Exchange data to the local or the cloud storage
- Hybrid Backup. Select this option to back up MS Exchange data to local storage first with subsequent backup to another (cloud or network share) storage
Click Next.
Select Backup Destinations
If you selected the Hybrid Backup type, first specify the local storage that will be used as the destination for a local backup. Click Next, then select the cloud storage for the backup plan.
If you selected the Local or Cloud Backup type, specify the cloud storage for the backup plan.
Click Next.
| Top |
Plan Name
Specify the name for the backup plan.
You can save your backup plan configuration along with backup data. This can be useful to restore the backup plan configuration onto some other computer. To do this, select the Save backup plan configuration to the backup storage check box
Click Next.
| Top |
Select Databases
Select MS Exchange databases to back up.
In most cases, databases are detected automatically.
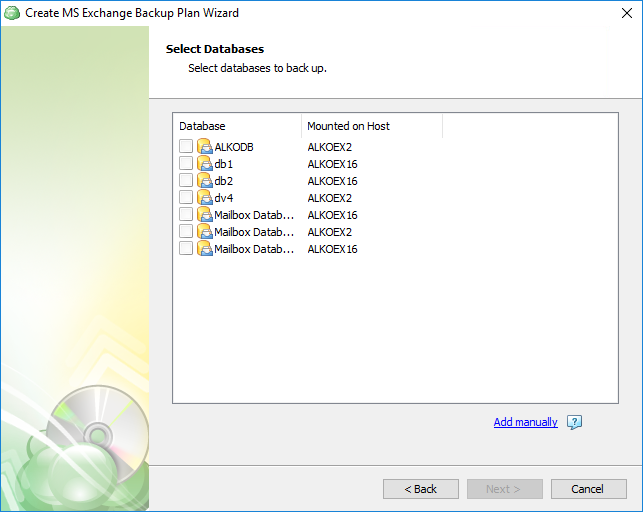
- In case databases to back up were not detected for some reason, click Add manually
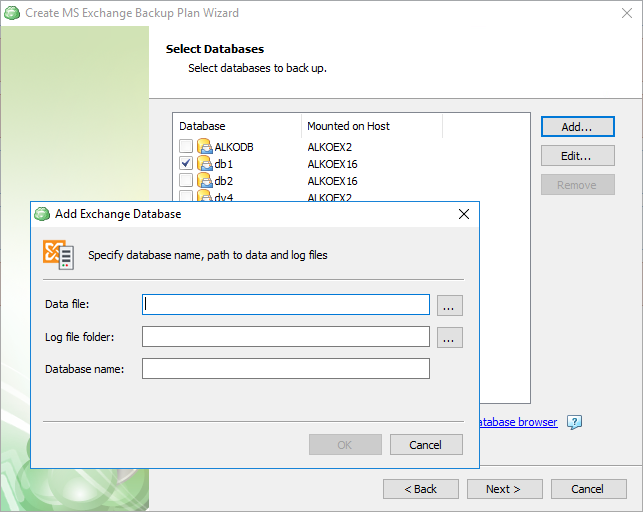
- In the Add Exchange Database dialog box, specify paths to the database and the log folder
- In the Database Name field, specify the display name for the database, then click OK
- To add another database to the backup plan, click Add
- To edit the database location or the log folder location, click Edit
- To delete the database from the backup plan, click Remove
Click Next.
| Top |
Advanced Options
Configure the VSS provider usage.
VSS provider is a Windows component that creates and maintains shadow copies. This can occur in the software or the hardware. Windows operating system includes a VSS provider that uses copy-on-write
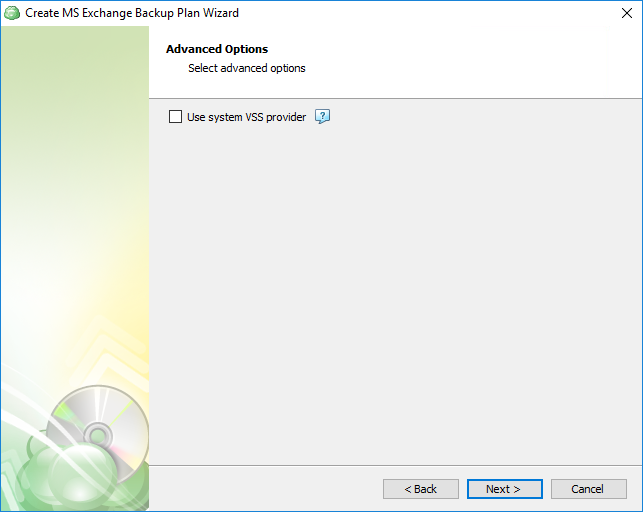
Select the Use system VSS provider check box to enable the system the VSS provider.
Click Next.
| Top |
Compression and Encryption Options
Customize compression and encryption settings for the backup plan.
CloudBerry Backup uses a built-in compression mechanism to reduce backup size on storage. To enable compression, select the Enable compression check box.
To protect the backup data with encryption, select the Enable encryption check box. CloudBerry Backup supports AES encryption of 128, 192 and 256 bit key length. Select the appropriate key length in the Algorithm drop-down menu.
Learn more about AES encryption here.
Specify the encryption password in the Password field, then confirm the password in the Confirm field. To display the password, select the Display password check box.
Note that the encryption password will NOT be stored in the backup plan configuration file for security purposes. Keep this password in a safe place and remember that without the encryption password you will not be able to perform a restore of encrypted backups
If you change any of the encryption settings (algorithm or password) for the existing backup plan, a full backup will be executed on the next backup plan run
Specify Amazon S3 Encryption Options
If you use Amazon S3 as cloud storage for your backup plan, the backup wizard enables server-side encryption settings to protect data stored on Amazon cloud servers.
The following additional settings are available when using Amazon S3 for storing your backup:
- Server-Side Encryption. Select this check box to enable encryption of your backup on the Amazon S3 side.
Specify Options for Accessing Amazon S3
- Use the Amazon S3 Service master key. Once this option is selected, Amazon S3 will decrypt data for anyone who is granted permission to access this object in the cloud
- Use the Amazon Key Management Service master key. Once this option is selected, Amazon S3 will decrypt data for anyone who has the permissions to access this object in the cloud, along with permissions to use a specified master key
To learn more about AWS Key Management Service, visit AWS Key Management Documentation website.
Select S3 Storage Class
If you selected Amazon S3 as a destination storage for your backup, you can make the backup service use the following storage classes:
- Standard
- Intelligent-Tiering
- Standard-IA
- One Zone-IA
- Glacier-Instant Revtrieval
- Glacier-Flexible Restrieval
- Glacier Deep Archive
These storage classes help to keep the right balance between storage costs and data availability. Learn more about Amazon S3 storage classes here.
Select Microsoft Azure Blob Storage
If you selected Microsoft Azure as destination storage for the backup plan, the backup wizard provides specific Azure Blob Storage settings.
You can choose among the following options:
- Archive Blob Storage. This is a low-cost storage option for infrequently accessed data. As opposed to hot and cool storage tiers, retrieving data from archive storage may take up to several hours
- Cool Blob Storage. The Cool Blob storage tier has lower storage costs and higher access costs compared to hot storage. This tier is intended for data that will remain in the cool tier for at least 30 days.
This feature is only supported for General Purpose v2 Azure accounts. If you are using another kind of account, you need to upgrade your account to be able to use this feature.
Be aware of additional charges and increased blob access rates having an Azure account upgraded
To learn more about Azure storage tiers, refer to the Azure Blob Storage - Hot, cool, and archive storage tiers article.
Click Next.
| Top |
Retention Policy
Specify the retention settings for the backup plan.
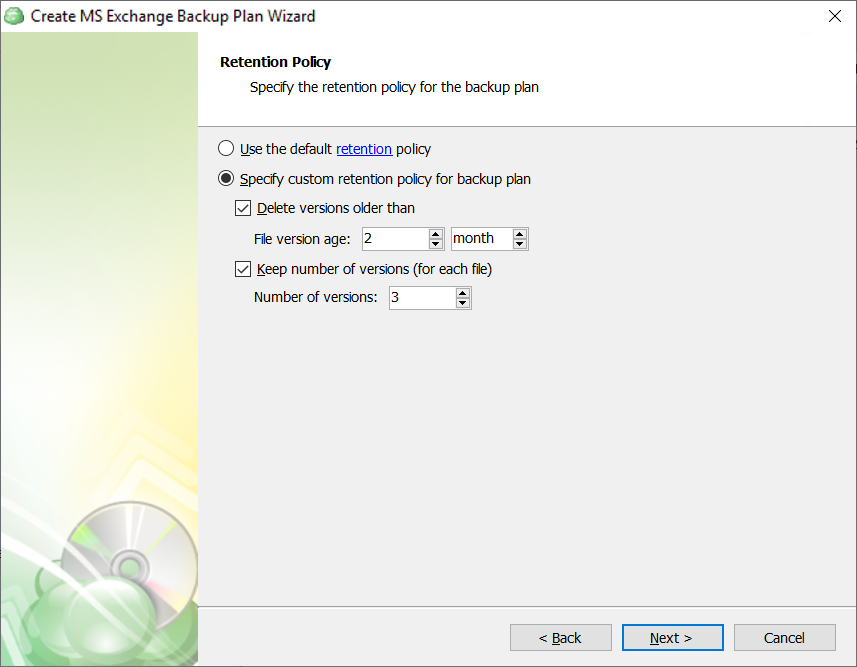
The following settings are available:
- Use the default retention policy. Select this option to use the default retention policy settings. To view and edit them, click the retention link in the option legend
- Specify custom retention policy for backup plan. Select this option to apply custom retention settings
- Delete versions older than. Select this check box to delete old file versions on backup storage, then specify the period
- Always keep the last version. Select this check box to keep the last versions of MS Exchange databases and logs on backup storage. This setting guarantees a restore
- Keep number of versions (for each file). Select this check box to specify the number of versions of database files to keep on backup storage, then, in the Number of versions field, specify the number of versions to keep
To learn more about the retention policy, refer to the Retention Policy chapter
Separate Retention Policy for the Local and the Cloud Storage
If your plan is a hybrid one, you can configure a separate retention policy for local destination and cloud destination. In this case, the Retention Policy step of the backup wizard will feature a Use different retention policy for local backup. To configure the separate retention policy, click the edit retention policy link.
In the Retention policy for local backup dialog box, specify custom retention policy settings for local backup.
Once finished, click OK.
Click Next.
| Top |
Schedule
Specify the schedule settings.
The following options are available:
- If you plan to run the backup plan manually, select the No schedule option
- If you intend the backup plan to run on a particular date and time, select the Specific date option, then specify the date and time you want your backup plan to be run
- If you want the backup plan to run on a constant periodic basis with the use of predefined templates, select Recurring (predefined templates) option
- If you want the backup plan to run on a constant periodic basis using custom settings, select Recurring (advanced schedule) option
- To stop the backup plan in case it continues suspiciously long, select Stop the plan if it runs for check box, then specify the backup plan maximum duration
- To run the backup plan after the computer is on in case the backup plan run has been missed, select Run missed scheduled backup immediately when computer starts up check box.
Click Next.
| Top |
Advanced Schedule Settings
The Recurring Schedule wizard step has different layout depending on the options selected on the 'Schedul'e step:
- Once you selected the Recurring (predefined templates) option, refer to the Predefined Templates paragraph
- Once you selected the Recurring (advanced settings) option, refer to the Advanced Settings paragraph
Predefined Templates
- In the Start backup field, specify the date and time of the first backup plan run
- Select the required schedule from the Select schedule template drop-down list. The following schedules are available:
- Full backup every week, block-level backup every day
- Full backup every day, block-level backup every hour
- Full backup every day
- In case you want to customize the schedule templates:
- Select or deselect the Full backup every: check box, and, if the check box is selected, specify the period of an incremental backup run in hours and minutes
- Select or deselect the Block-level every: check box, and, if the check box is selected, specify the period of a block-level backup run in hours and minutes.
Click Next.
Note that block-level backup can be enabled only on Recurring Schedule steps of the backup wizard. To learn more about block-level backup, refer to the Block-Level Backup chapter
Advanced Settings
- Select or unselect the Full backup: check box, then click Edit schedule and specify the period of an incremental backup in the Recurring Schedule Options dialog box. Once you are finished, click OK
- Select or deselect the Block-level: check box, then click Edit schedule and specify the period of a block-level backup in the Recurring Schedule Options dialog box. Once you are finished, click OK
Note that block-level backup can be enabled only on Recurring Schedule steps of the backup wizard. To learn more about block-level backup, refer to the Block-Level Backup chapter
Refer to the following technical blog post to learn more about the difference between full and block-level backup types:
Click Next.
| Top |
Pre / Post Actions (optional)
Customize actions before and/or after the backup plan execution.
Note that step may be skipped according to provider settings
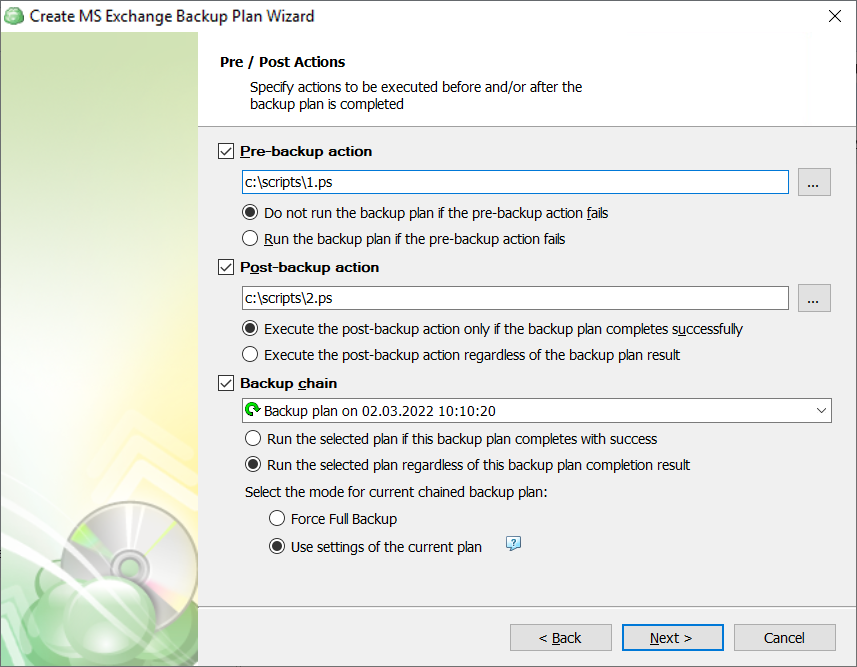
Execute Custom Scripts
You can execute custom scripts before or after running the backup plan.
- To specify the script execution before the backup plan starts, select the Pre-backup action check box, then specify the path to the script in the field below. To open a standard Windows dialog box, click the ... button
- Select the pre-backup script execution options:
- Exit backup plan if pre-backup action failed. Select this option to cancel the backup plan in case the specified script fails
- Continue backup plan if pre-backup action failed. Select this option to run the backup plan regardless of the specified script execution results
- To specify the script execution after the backup plan terminates, select the Post-backup action check box, then specify the path to the script in the field below. To open a standard Windows dialog box, click the ... button
- Select the post-backup script execution options:
- Execute post-backup action only if backup plan has been successfully completed. Select this option to execute the post-backup script only in case of a backup plan success
- Execute post-backup action regardless of the backup result. Select this option to execute the post-backup script in any case
Note that an absolute path to a script is required, i.e. if you specify the path to a script, it should be as follows:
c:\scripts\prebackup-script.bat
In case the absolute path to a script file is not specified, the default directory for the script is "C:\Windows\System32"
The following script formats are supported: EXE, COM, BAT, CMD, or PIF
Mind that CloudBerry Backup supports EXE file execution with several restrictions: EXE script files must not use GUI and must close automatically upon script termination.
For example, the following script execution will be failed:
cmd.exe /F:ON
In this case, this command must be used with the /C parameter, as shown below:
cmd.exe /F:ON /C
The same restriction applies to applications executed by PowerShell scripts:
PowerShell.exe Start-Process cmd.exe exit
It is recommended to perform a test run for the created backup plan to ensure that CloudBerry Backup properly executes specified scripts.
Backup Plan Chains
In case you need to run another backup or restore plan once the backup plan is finished, use the Backup Chain feature. To create a backup chain, select the Backup chain check box, then select a backup or restore plan to be chained.
- Run the selected plan if this backup plan completes with success. Select this option to execute the chained plan only in case of a backup plan success
- Run the selected plan regardless of this backup completion result. Select this option to execute the chained plan in any case
Specify the mode for the chained plan (applies to backup plans only).
- To run a full backup for the chained plan, select the Force Full Backup option
- To apply the current plan settings for the chained plan, select the Use settings of the current plan option. Thus, if a current plan execution was incremental, the chained plan execution will also be an incremental one. If a current plan execution was full, the chained plan will be performed as a full backup
Click Next.
Review the plan settings on the Summary step.
Edit a Backup Plan
To edit the backup plan, proceed as follows:
- Switch to the Backup Plans tab.
- Open the backup plan you want to edit by expanding it, then click Edit.
- Proceed through the Backup Wizard steps to adjust settings as needed.
- If the plan is currently running, you'll need to select one of the following options:
- Apply changes after the backup plan completes
- Stop the plan and apply changes.
- After choosing the desired option for the running backup plan, click Apply.
- Save the edited plan configuration.
You can edit certain backup plan parameters directly, without using the backup wizard, as long as the backup plan is not currently running. Editable parameters are marked with a pencil icon. To make a quick edit, simply click the pencil icon next to the parameter
Delete a Backup Plan
To delete the backup plan, proceed as follows:
- Switch to the Backup Plans tab.
- Open the plan to delete, expand it, then click Delete.
- Confirm the backup plan deletion.