Restore Verification for Image-Based Backups
Restore Verification is a special backup health check that guarantees a subsequent restore. Restore Verification is available for image-based backups and can be executed locally (on users' computers) and in virtual environments (with Backup Agent installed on Hyper-V virtual machines).
This chapter covers the following topics:
- How It Works
- System Requirements
- Run Restore Verification
- Enable Restore Verification
- Restore Verification in Notification Emails
- Restore Verification in Long-term storage
How It Works
Restore verification is an auxiliary health check that retrieves only the necessary backup parts from backup storage, mounts a Hyper-V virtual machine on the fly, then performs a system logon. It is performed in one thread and takes a while to complete.
Since there is no need to download the whole backup dataset to make sure the image-based backup is valid and is guaranteed to be restorable, restore verification is performed quickly. The amount of data on partitions not related to system boot does not affect restore verification time.
For example, when backing up a 160 GB system disk with 120 GB of occupied disk space, restore verification downloads only 8 GB from backup storage and takes a few seconds from the start to a system logon.
System Requirements
Since the restore verification feature is based on Hyper-V mechanisms, a Hyper-V environment is required on your operating system.
The table below contains the list of supported Windows versions and editions.
| Windows Version | Supported Editions |
|---|---|
| Windows 8 | Enterprise, Pro |
| Windows 8.1 | Enterprise, Pro |
| Windows 10 | Enterprise, Pro, Education |
| Windows 11 | Pro |
| Windows Server 2012 R2 | Essentials, Enterprise, Datacenter |
| Windows Server 2016 | Standard, Essentials, Datacenter |
| Windows Server 2019 | Standard, Essentials, Datacenter |
| Windows Server 2022 | Standard, Datacenter |
Run Restore Verification
To run a restore verification for an image-based backup, perform the following steps:
- Switch to the Backup Storage tab.
- Find the required image-based backup plan generation.
- Expand the generation to select the required restore point.
- Right-click the required Restore Point, then select Restore Verification. This creates and runs a test restore plan that starts a Hyper-V VM using the necessary part of the backed-up data downloaded from backup storage. To check that the test virtual machine is running, see its state in the preview.
- Optionally, to log on to the VM, click the Open Hyper-V VMC link.
Enable Restore Verification in Backup Plans
You can apply the Restore Verification on a regular basis by including it in a backup plan (applies to the new backup format only).
To Enable Restore Verification
- Open the Management Console.
- In the Computers menu, select Remote Management if you use the legacy main menu, or open the Backup > Computers page in the new main menu.
- Find the required computer.
- Click the gear icon, then click Show Plans.
- Find the required image-based backup plan, then click Edit. You can create a new one as well.
- Follow the Backup Wizard steps to the Consistency Check and Restore Verification step.
After a successful full consistency check, the user can be sure that backed-up data is ready to be restored. The consistency check is turned on by default.
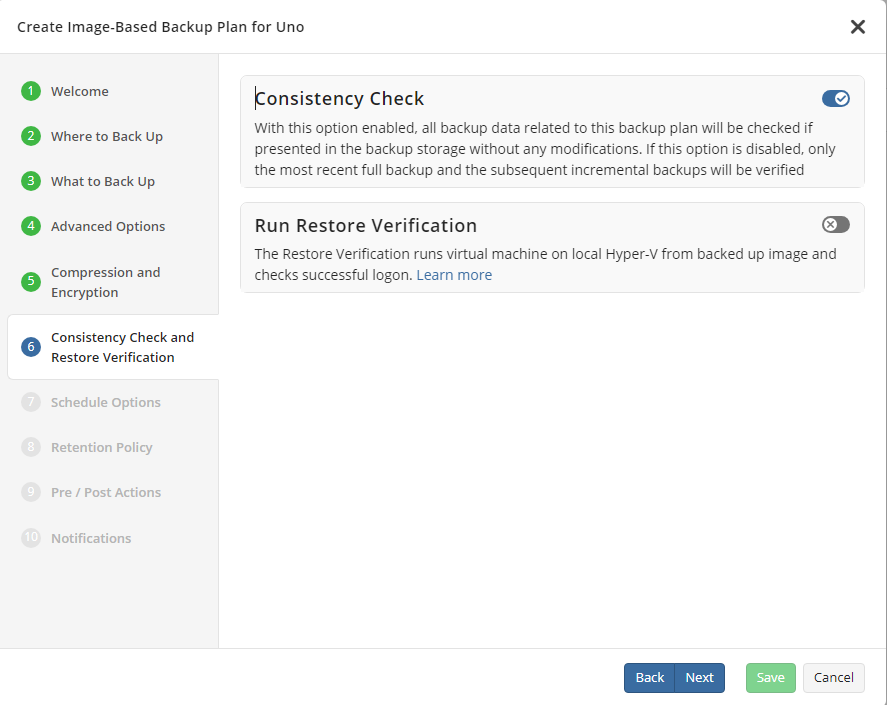
Also, you can configure the Restore Verification.
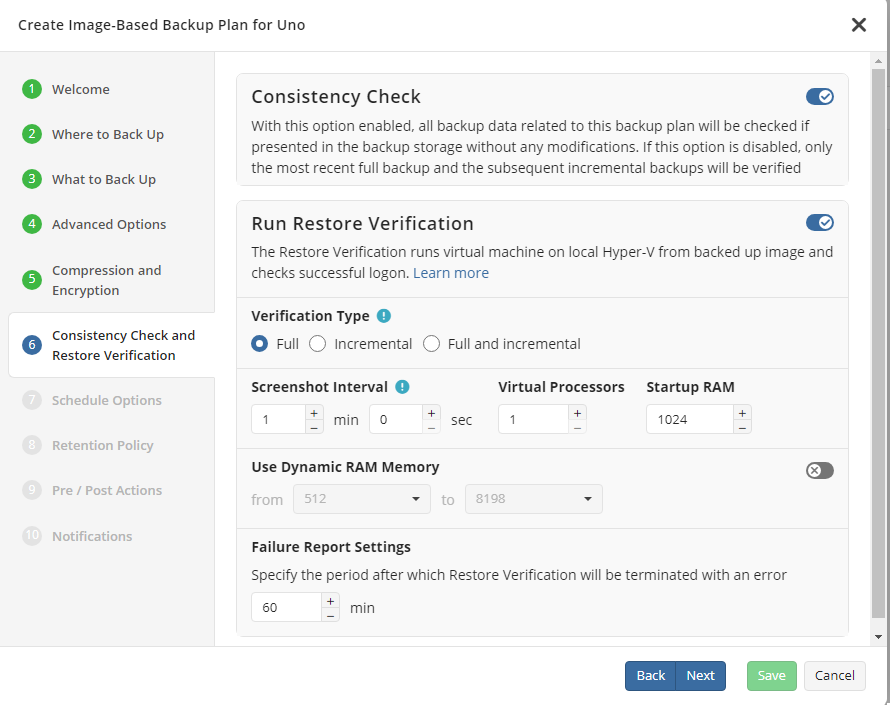
Restore verification is an auxiliary restore plan that retrieves only the necessary backup parts from backup storage, mounts a Hyper-V virtual machine on the fly, then performs a system logon. Enable it if you want to use it.
Since there is no need to download the whole backup dataset to make sure the disk image backup is valid and is guaranteed to be restorable, the restore verification does not take much time.
You can run the Restore Verification for incremental backups only, full backups only, or for all backup runs.
Along with the Restore Verification running mode, customize the Hyper-V auxiliary virtual machine configuration to run the Restore Verification (screenshot interval, number of virtual processors, RAM).
Specify the settings for the auxiliary Hyper-V VM created for Restore Verification.
- In the Screenshot Interval field, specify the frequency of making a screenshot of the Hyper-V VM to check its state visually
- In the Number of virtual processors field, specify the number of virtual CPUs for the Hyper-V VM
- In the Startup RAM field, specify the amount of RAM allocated for the restore verification VM
- Enable Use Dynamic RAM Memory if necessary, and configure the usage parameters.
In Failure Report Settings, specify the period after which Restore Verification will be terminated with an error.
Follow other Backup Wizard steps to save the configuration of this backup plan.
In some cases, if a volume with a temporary folder is full, a restore verification can terminate with the following error: Cannot complete Restore Verification. Not enough space in the temporary folder: c:\temp
Once this error occurs, clean up the temporary folder, or change its location to another volume with more free space. To do this, proceed as follows:
- Connect to the remote computer that produced this error.
- Run Backup Agent.
- In the Tools menu, select Options.
- Switch to the Memory Options tab.
- In the Temporary folder field, specify the new temporary folder location.
- Click OK or Apply.
To learn more about Hyper-V, refer to the Virtualization article at docs.microsoft.com.
Restore Verification in Notifications
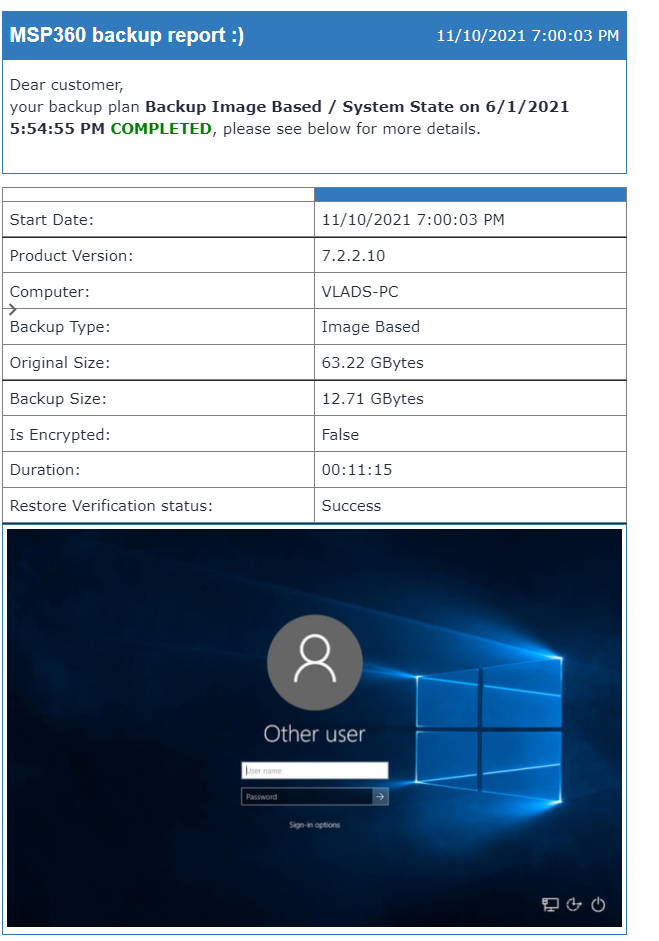
The Restore Verification result is delivered in the notification email messages. To learn how to configure notifications, refer to the Notifications chapter.
Restore Verification in Long-Term Storage
If your storage destination is a long-term one (this can be S3 Glacier Flexible Retrieval, S3 Deep Archive, or Azure Archive storage classes), Restore Verification is disabled.
Since Restore Verification requires downloading parts of data from the cloud, with long-term storage it will take significant time, up to several hours. Additionally, backup data downloads from the cloud are subject to extra retrieval charges.