Image-Based Backup Plan (Legacy)
This chapter covers the following topics:
- Create Image-Based Backup Plan
- Run the Backup Plan
- Force Full Backup
- Edit the Backup Plan
- Clone the Backup Plan
- Delete the Backup Plan
Create an Image-Based Backup Plan
To Create an Image-Based Backup Plan
- Open the Management Console.
- On Computers select Remote Management if you use legacy main menu, or open Backup > Computers page in the new main menu.
- Find the required computer, then click the Configure icon in the Backup Plan Status column.
- On the side panel, click + or +Add New Plan, then select the Image-Based Backup Plan (Legacy) item.
- Follow the backup wizard steps.
Backup Wizard steps:
- Plan Name
- Where to Backup
- What to Backup
- Advanced Options
- Compression & Encryption
- Retention Policy
- Schedule Options
- Pre / Post Actions
- Notifications
Plan Name
Name the backup plan and specify if you want the backup plan configuration to be saved on backup storage. This may be needed in case you want to restore the backup plan configuration on another instance. If having the configuration on the user computer and in the Management Console is enough, leave the Save backup plan configuration to the backup storage check box unselected.

Click Next to proceed.
Where to Backup
Select a target backup storage for the backup plan. If no storage accounts are available, create a new one. Refer to Add New Storage Account to learn how to do it.

It is not recommended to select long-term storage for image-based backups. Note that long-term storages have several limitations: in the case of a restore, data retrieval can take up to several hours, and data retrieval charges may apply. Also, keep in mind that in some cases your backup data can be moved to long-term storage according to the specified lifecycle policy. Learn more about your storage provider lifecycle policies:
Once you selected backup storage, click Next.
What to Backup
Select one of available options for partitions.
Note that the Back up selected partitions only option is not available in case you are creating a plan for configuration using Remote Deploy under Computers
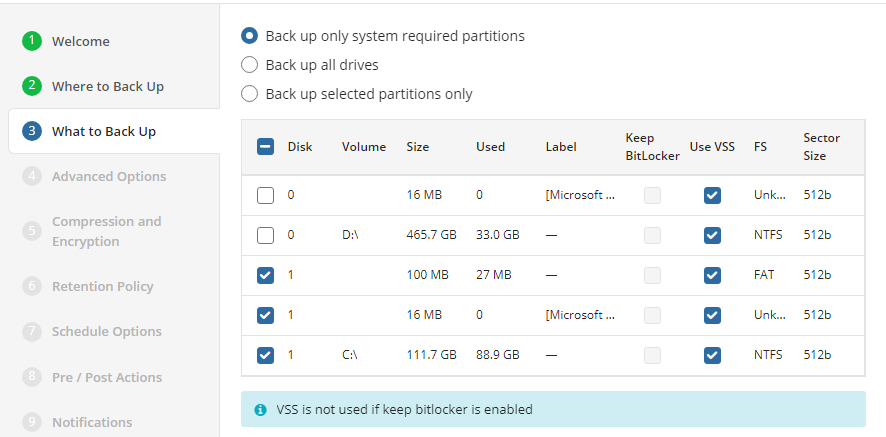
The following options are available:
- Back up only system-required partitions. Select this option to back up only partitions required for the proper functioning of the operating system. The selected partitions must include system volumes as they contain the information which is necessary for loading the operating system. Without backing up these volumes, you will not be able to restore your disk image properly
- Back up all drives. Select this option to include all available partitions/drives in backup
Note that once this option is selected, all connected drives at the moment of the backup plan run will be backed up and the backup plan will be successfully completed. Thus, if some drives were disconnected for some reason, or some drives were added, they will be backed up 'as is' at the moment of a backup plan execution
- Back up selected partitions only. Select this option to configure the partition list manually
Note that selected partitions must include all system volumes as they contain the information which is necessary for loading the operating system. Without backing up these volumes, you will not be able to restore your disk image with subsequent operating system loading
For each partition you can enable or disable two options:
- Use VSS. With this option enabled, a Volume Shadow Copy Service is applied for the volume
- Keep BitLocker. /backup-and-restore/about-backup/bitlocker-encrypted-volumes
Note that if you have system partitions encrypted with BitLocker, it is highly recommended not to use BitLocker encryption to back them up. Instead, you can use the built-in encryption of Backup for Windows.
This recommendation comes because image-based backups can be corrupted if a partition is BitLocker-encrypted. For these partitions, VSS (Volume Shadow Copy) is not available. This can cause the following issues on restore: the operating system may not start properly and result in a BSOD message BAD_SYSTEM_CONFIG_INFO
Click Next.
Advanced Options
By default, advanced options are skipped for the for the backup plan. You should enable them if necessary (not recommended).
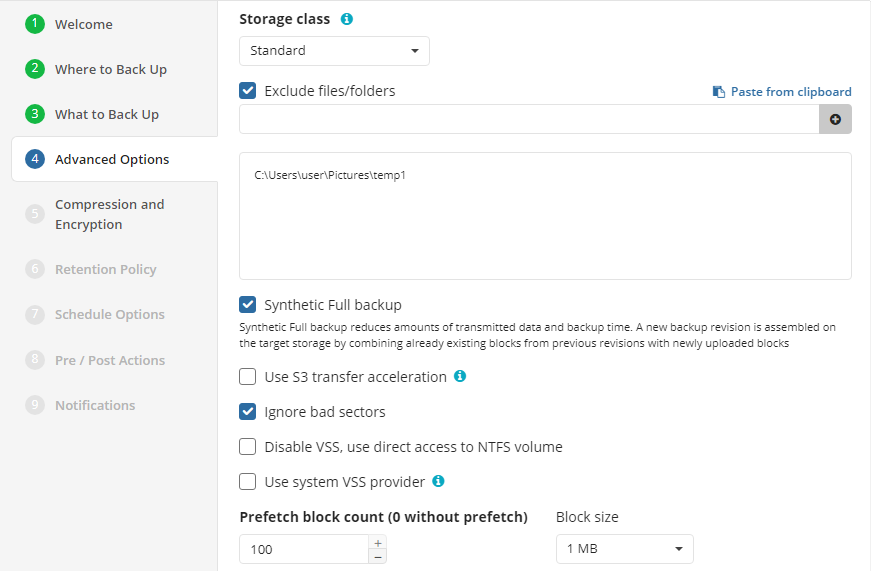
Note: Available advanced options depend on selected backup storage
Ignore bad sectors. Select this check box to bypass any corrupted/damaged sectors on backup source. Once the volume with bad sectors is restored, these sectors will become empty sectors and you will not be able to read any files that were allocated in these sectors.
Disable VSS, use direct access to NTFS volume. Select this check box to disable Volume Shadow Copy Service (VSS). This option may be required when a disk is not used for writing operations and does not have sufficient space to create a VSS snapshot. Basically, this applies to system volumes
Note that the enabled Disable VSS, use direct access to NTFS volume option overrides the Use VSS settings made on the What To Back Up step
Use system VSS provider. Select this check box to use the system default VSS provider. It is recommended to use it in case of the presence of any third-party VSS providers installed that may interfere with the proper processing of VSS snapshots made by Managed Backup
Prefetch block count. Specify the maximum block number stored in memory for each disk volume.
A block is a minimum unit of information that can be processed at a time when preparing a backup.
When you need to perform a block-level backup over a disk containing several terabytes of data, you can speed up the backup processing by increasing the block size.
Block size. Specify the amount of data to process at a time.
- 128 Kb
- 256 Kb
- 512 Kb
- 1 Mb (default).
Use S3 Transfer Acceleration (available only for Amazon S3 storage accounts). Use this option to accelerate file transfer for an extra fee. The target bucket must have this feature enabled. Select this check box if you want to use the data transfer acceleration service provided by Amazon. To learn more, refer to the Amazon S3 Transfer Acceleration documentation.
Select the Amazon S3 storage class to be used in the backup plan in the Storage Class drop-down menu (available only for Amazon storage backup destinations)
Select the S3 storage class for the backup plan (available for Amazon S3 only). You can use different storage classes for different backup needs. Learn more about Amazon S3 storage classes:
Archive Blob Storage (available only for Microsoft Azure storage accounts). . This is a low-cost storage option for infrequently accessed data. As opposed to hot and cool storage tiers, retrieving data from an Archive Blob Storage may take up to several hours
Cool Blob Storage (available only for Microsoft Azure storage accounts).The cool storage tier has lower storage costs and higher access costs compared to hot storage. This tier is intended for data that will remain in the cool tier for at least 30 days.
Note that this feature is only supported for General Purpose v2 Azure accounts. If you are using another account type, you need to upgrade your account to be able to use this feature
Be aware of the additional charges and increased blob access rates after your Azure account upgrade
To learn more about the difference between Azure storage tiers, refer to the Azure Blob Storage - Hot, cool, and archive storage tiers article at docs.microsoft.com.
Compression & Encryption
Specify compression and encryption options for the backup plan.

The following options are available:
Select Enable compression check box to compress backup source contents for optimal backup storage space usage
To protect your backup contents with encryption, select the Enable encryption check box. Application supports AES encryption of 128, 192 and 256 bit key length. Select the appropriate key length in the Algorithm drop-down menu
Specify the strong encryption password in the Password field, then confirm the password in the Confirm field. To display the password, select Display password check box
Use Server Side Encryption (available for Amazon S3 storage only). Select this check box to enable encryption of your backup contents
Note that the encryption password will NOT be stored in the backup plan configuration for security reasons. Keep this password in a safe place to be able to restore the backup contents afterward
Click Next.
Retention Policy
Specify the retention policy for the backup plan.
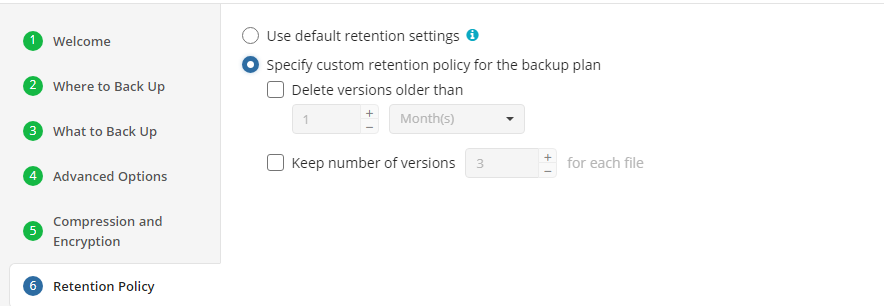
The following options are available:
- Use default retention settings. Select this option to apply the default retention policy settings. You can see them below, but cannot edit if this option is selected
- Specify custom retention policy for backup plan. Select this option if you want to customize the retention policy settings for this backup plan.
Click Next.
Schedule Options
Specify the backup plan schedule settings.
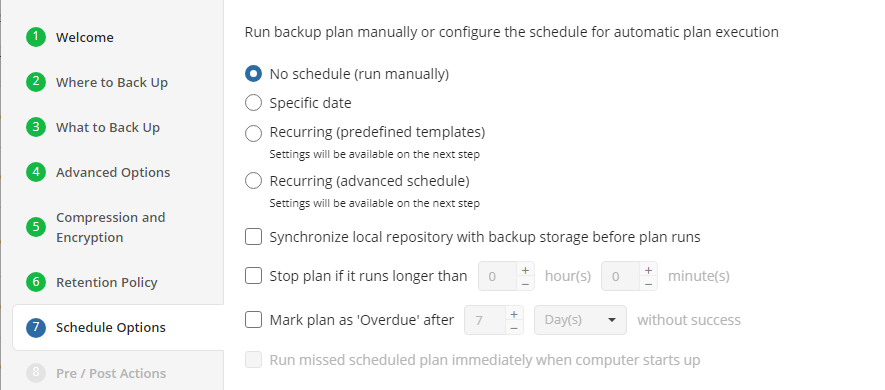
The following options are available:
- If you intend to run the backup plan manually, select the No schedule (run manually) option.
- If you intend the backup plan to run on a particular date and time, select the Specific date option, then specify the date and time you want your backup plan to be run
- If you want the backup plan to run on a constant periodic basis, select the Recurring (predefined templates) option or Recurring (advanced)
- To stop the backup plan in case it continues suspiciously long, select Stop the plan if it runs for check box, then specify the backup plan maximum duration
- To alert the plan as Overdue if the backup plan takes more time than the last successful backup, select the Alert plan as overdue after check box, then specify the time interval.
- Select Run missed scheduled plan immediately when computer starts up option to run missed plans
Click Next.
Simple Schedule Options
The Simple Recurring Options step helps you to configure backup frequency:
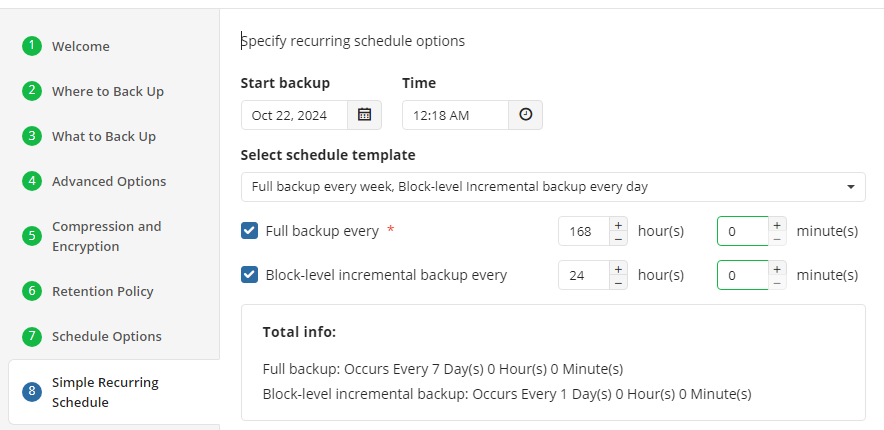
Click Next.
Advanced Schedule Options
The Advanced Schedule step helps you to fine-tune backup frequency:
- Enable the frequency for the selected backup type and configure the schedule. You can use the predefined settings or change them.
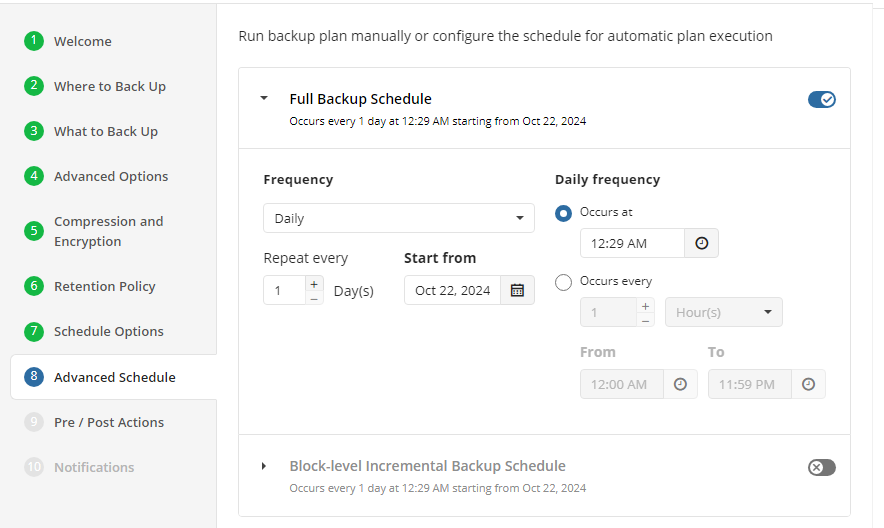
Pre/Post Actions
Specify pre and post-actions for your backup plan. Usually, these are scripts that perform particular jobs before or after your data is backed up. The following settings are available:
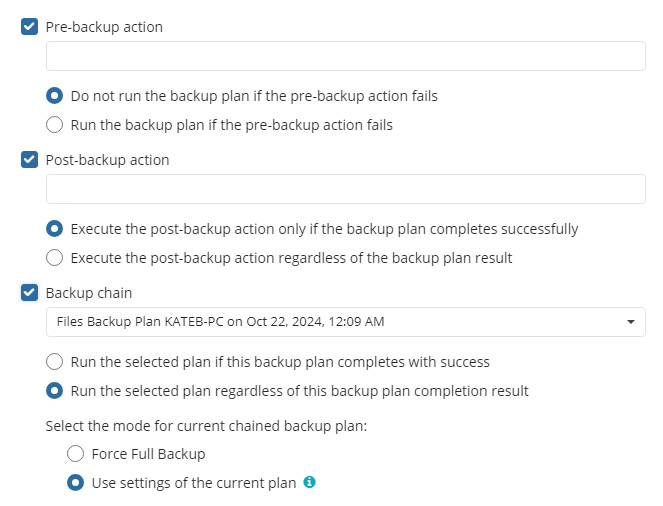
- To specify the action that will be performed before the backup plan starts, select Pre-backup action check box.
- Specify the path to the script to be run as a pre-backup action.
- Specify the conditions of pre-action run:
- Select the Do not run the backup plan if the pre-backup action fails option if you do not want the backup plan to be launched if the pre-backup action fails.
- Select the Run the backup plan if the pre-backup action fails option if you want the backup plan to launched regardless of the pre-backup action result.
- To specify the action that will be performed after the backup is completed, select Post-backup action check box.
- Select the Execute the post-backup action only if the backup plan completes successfully option if you want to run it only if the backup was executed without any errors or warnings.
- Select the Execute the post-backup action regardless of the backup plan result option if you want the post-action to be launched regardless of the backup termination results.
- To chain the backup plan with another plan, select Backup chain check box, then select the plan name in the drop-down menu.
- Select the Run the selected plan if this backup plan completes with success option if you want to run the specified plan only if the backup plan was executed without any errors or warnings.
- Select the Run the selected plan regardless of this backup plan completion result option if you want the chained backup plan to be launched regardless of the backup termination results. Select the mode for the current chained backup plan:
- Force full backup.
- Use settings of the current plan.
Notifications
Specify notification settings for backup plan results. You can use the company notification settings or customize them as needed. You can specify the required recipients and customize the notifications on different backup plan results:
- Success
- Warning
- Failed
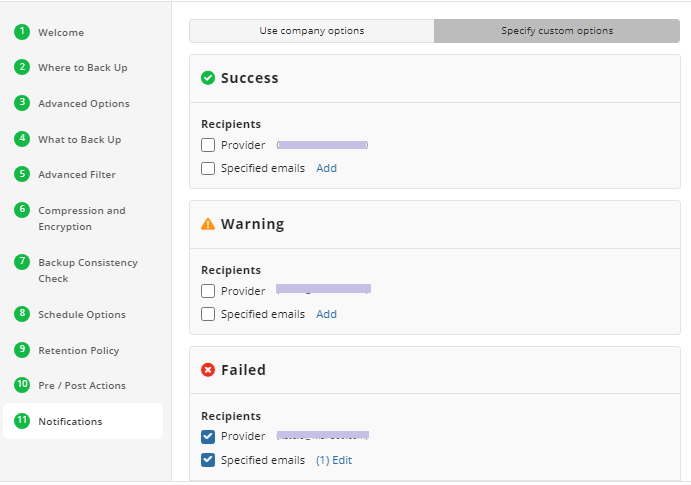
You can configure a notification threshold for Managed Backup alerts, so that notifications are sent only after a specified number of consecutive plan failures
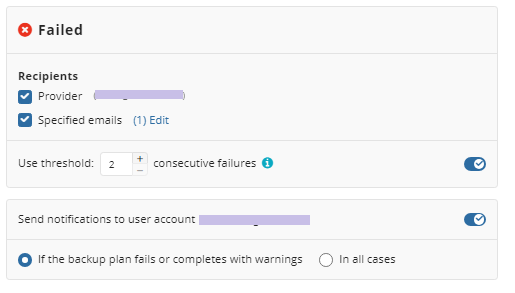
In case you select to customize notifications, select the recipients for different events.
- Select Send notifications to user account... if you want to notify the assosiated user about the backup process.
- Select If the backup plan fails or completes with warnings option if you want to receive the notification message in case of the backup plan failure
- Select In all cases option if you want the entry to be put in Windows Event Log in any case.
Click the Next, then click Save to finish the wizard. The backup plan can be run in the background, but the target computer must be up and running.
Run Backup Plan
To Run the Existing Backup Plan:
- Open Backup > Computers.
- Find the required computer, then click the Configure icon in the Backup Plan Status column.
- On the side panel, navigate to the Backup Plans (Beta) tab
- Find the plan to run.
- Click the Start button to run the backup plan. You can expand this control to use the available options:
- Run Backup
- Force Full Backup

Edit Backup Plan
To Edit the Existing Backup Plan
- Open Backup > Computers.
- Find the required computer, then click the Configure icon in the Backup Plan Status column.
- On the side panel, find the plan you want to edit, then click the edit icon.

- Once you made the required changes, click Save.
Clone Backup Plan
To Clone the Existing Backup Plan
- Open Backup > Computers.
- Find the required computer, then click the Configure icon in the Backup Plan Status column.
- On the side panel, find the plan you want to clone, then click the clone icon.

- Specify the name of the plan clone.
- Click Save.
Delete Backup Plan
To Delete the Existing Backup Plan
- Open Backup > Computers.
- Find the required computer, then click the Configure icon in the Backup Plan Status column.
- On the side panel, find the plan you want to delete, then click the deletion icon.

- In the dialog box, click OK to confirm the deletion.