Proxmox Backup Plans in Backup Agent
Managed Backup now extends its powerful data protection capabilities to Proxmox Virtual Environment (VE) with a new beta version. A VM Server license is required to perform Proxmox virtual machine backup.
Backup Agent provides the following options for selecting VMs and containers within a Proxmox host:
- All existing virtual machines.
- All currently running virtual machines.
- A custom set of pre-selected virtual machines.
Beta version limitations for backups:
- In the initial beta release, all disks attached to a selected VM are included in the backup. Granular disk selection is a planned feature for a future update.
- Synthetic full backup functionality requires Backup Agent for Windows version 8.6.5 and higher.
- Only one Proxmox backup or restore job can run at a time; concurrent execution is not supported.
Features and specifications are based on the initial beta release and are subject to change as the product develops.
Network Configuration
On the Windows computer hosting the agent, inbound traffic on TCP port 8007 must be allowed through the local firewall. If this port is blocked when a backup plan runs for the first time, the operation will fail with error code 1962. The Managed Backup GUI will promptly detect this and provide a solution in the error message to quickly enable the required port.
No configuration is required on the Proxmox host itself. All backup and restore settings are managed entirely within the Backup Agent interface.
It is strongly recommended to use a backup datastore located on physically separate storage from the host's VM disks.
Proxmox User Permissions for Backup
To perform backup and restore operations, the backup service requires a Proxmox user account with specific permissions. It is a security best practice to create a dedicated user for backup purposes rather than using the root account.
The recommended set of privileges can be granted by assigning the following roles to the backup user at the root (/) level of the Proxmox datacenter:
| Role | Purpose |
|---|---|
| PVEVMAdmin | Grants administrative permissions for virtual machines, necessary for snapshot creation and VM configuration access |
| PVESDNUser | Provides read-only access to the Software-Defined Network (SDN) configuration, required for proper operation |
| PVEDatastoreAdmin | Allows reading datastore contents and allocating space, which is essential for backup and restore tasks |
For details on how to add permissions, refer to the following KB article.
Alternative: For simplicity in testing environments, you may assign the user the built-in PVEAdmin or Administrator role, which includes all necessary permissions. However, for production, adhering to the principle of least privilege with the specific roles above is recommended.
Create a Backup Plan
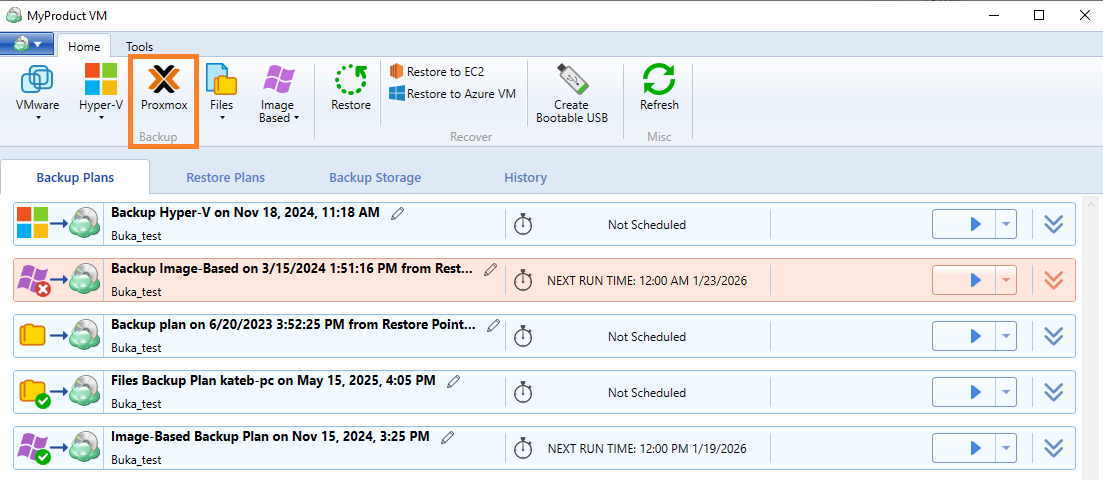
To create a new Proxmox backup plan, click Proxmox in the horizontal menu bar.
The Backup Wizard starts.
Select Backup Storage
- Select a storage account for the backup plan from the list of available backup storage.
- If no storage is available, click Add new Storage Account.
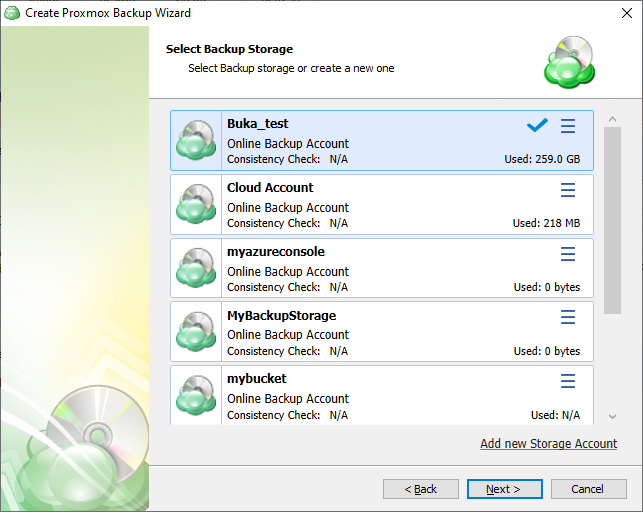
- Once the backup storage is selected, click Next.
Plan Name
Specify the name for the backup plan.
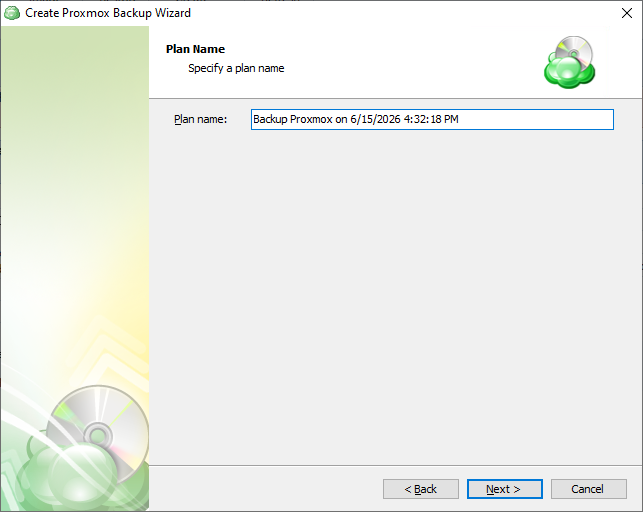
Click Next.
Connect to the Proxmox Host Server
Enter the Proxmox host server access information in the format that is most convenient for you. You can select whether to remember the password for future use.
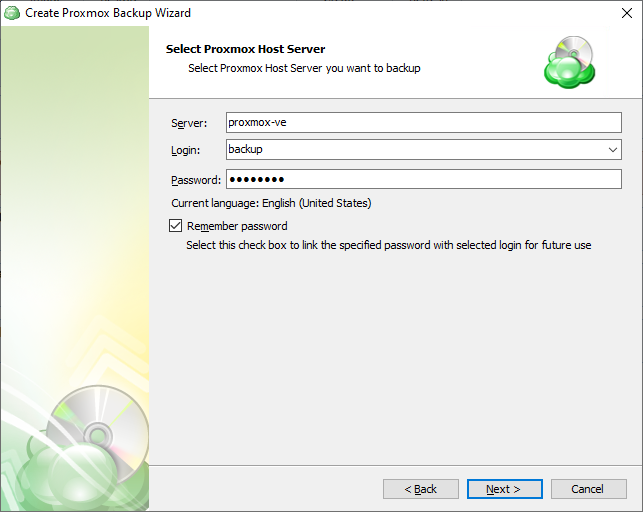
If the credentials are invalid or the Proxmox host server cannot be accessed, you will not be able to proceed to the next Backup Wizard step.
Select Virtual Machines and Containers
Next, select the Virtual Machines and containers you wish to back up.
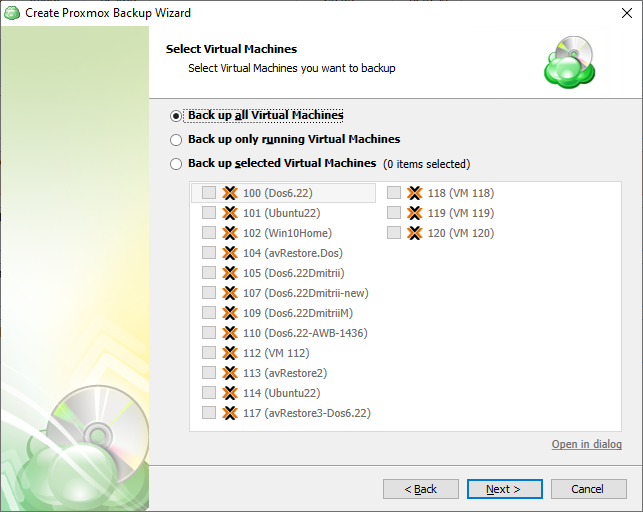
- Back up all Virtual Machines: will back up all VMs and containers regardless of their current state. This is recommended only for small environments.
- Back up only running Virtual Machines: Only backs up VMs currently in “Running” status.
- Back up selected Virtual Machines: Allows you to back up a group of VMs and containers by selecting them from the list below. This allows for greater control of mixed-status VMs and for larger environments where it is beneficial to split the backup into multiple plans.
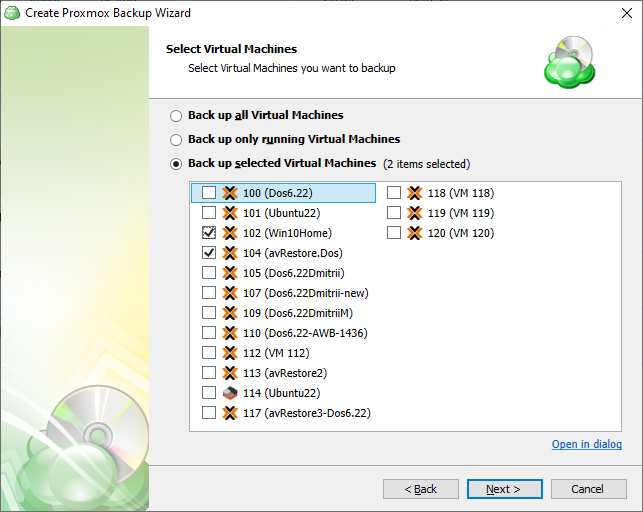
Note that if you switch the backup option from the Back up selected Virtual Machines to any other, the previous selection is kept in case you change your mind and select the Back up selected Virtual Machines option again, but the newly selected option will be applied regardless of the VM selection.
Encryption and Compression
After you have selected which VMs to back up, the next step is to set the encryption options. Although the compression option is not exposed in the Proxmox backup plan user interface, Proxmox backups are compressed automatically.
You can protect your backup by encrypting its contents. Managed Backup supports AES encryption with key sizes of 128, 192, and 256 bits. A larger key size provides stronger encryption but may increase the time required for processing your backup. For more details on AES encryption, refer to the Advanced Encryption Standard.
If you choose to save your backup plan configuration to the destination storage, be aware that the encryption password is not stored in the configuration file for security reasons. Ensure that you save this password securely, as it will be required to restore the backup's contents.
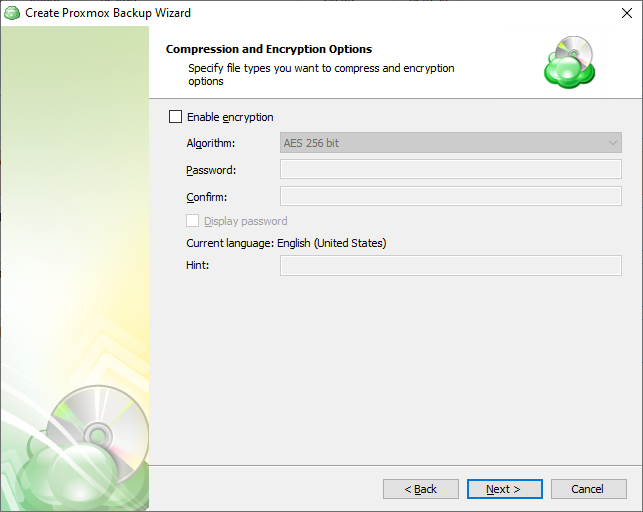
Encrypting the backup adds an additional layer of security to the data at the expense of increased processing resources during the backup process. Several types of encryption are available, with the most secure selected by default.
Consistency Check and Restore Verification
Specify whether a full consistency check is required for this backup plan. A mandatory consistency check will be completed with every backup plan run regardless of this setting.
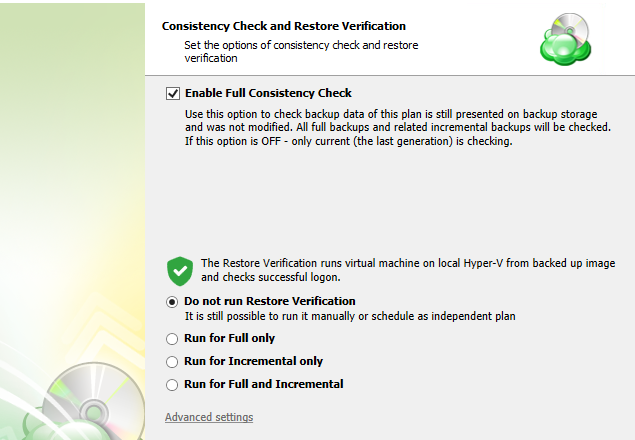
Restore verification is an auxiliary restore plan that retrieves only the necessary backup parts from backup storage, mounts a Hyper-V virtual machine on the fly, then performs a system logon.
To learn more about Restore Verification, refer to the Restore Verification chapter.
Select the restore verification running options:
- Do not Run Restore Verification. Select this option to run restore verification manually
- Run for Full only. Select this option to run restore verification for full backups only. You can manage a schedule for full and incremental backups on the Schedule step of the Backup Wizard
- Run for Incremental only. Select this option to run restore verification for incremental backups only. You can manage a schedule for full and incremental backups on the Schedule step of the Backup Wizard
- Run for Full and Incremental. Select this option to run restore verification for both backup types
You can configure advanced settings for restore verification:
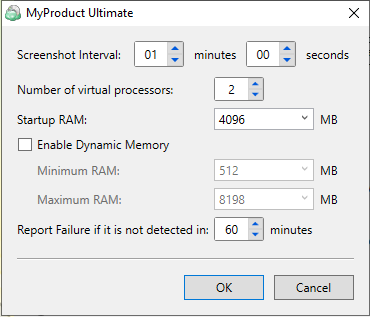
Click Next.
| Top |
Schedule
Specify the backup plan schedule settings.
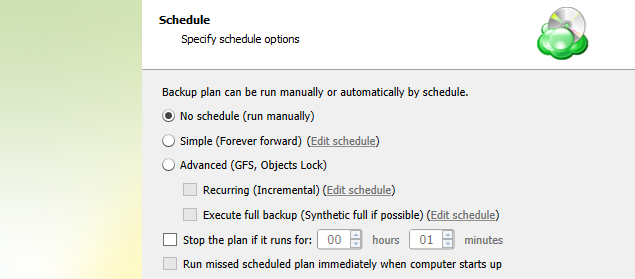
The following options are available:
- Select the No schedule option to run the backup plan manually.
- Select the Simple (Forever Forward) option to apply the Forever Forward Incremental (FFI) schedule.
- Select the Advanced (GFS, Object Lock) option to apply the recurring schedule and, if necessary, use Grandfather-Father-Son and Object Lock (Immutability).
- To set the time limit for plan execution, select the Stop the plan if it runs for checkbox, then specify the backup plan duration limit.
- To run a missed backup plan once the computer is turned on, select the Run missed scheduled backup immediately when computer starts up checkbox.
Click Next.
Simple Schedule
Select the Simple (Forever Forward) option to use the Forever Forward Incremental (FFI) schedule. This schedule offers one full backup followed by a limited number of incrementals. Once the limit is exceeded, a new full backup is created using in-cloud copying (synthetic full backup). Once you select this option, specify the FFI schedule for the backup plan. You can select the Daily or Monthly schedule type, depending on how often the incremental backups will be performed.
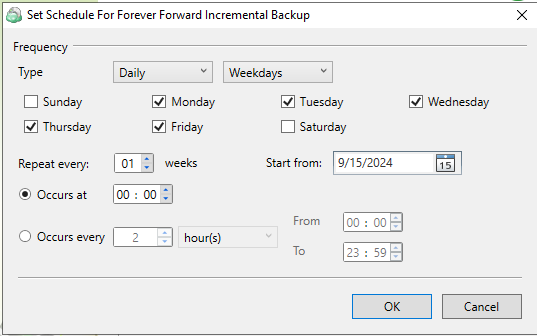
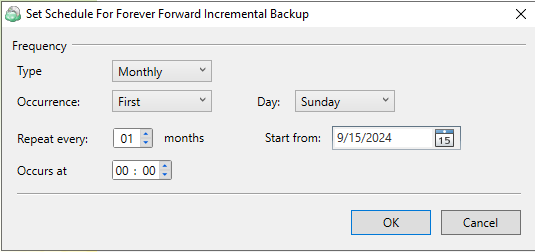
This schedule is unavailable if the selected storage account does not support synthetic full backups.
Advanced Schedule
Select the Advanced (GFS, Object Lock) option to set up a flexible, recurring schedule with generations. Every generation contains one full backup followed by incrementals.
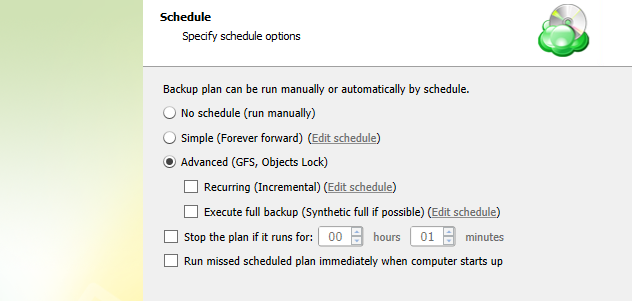
The advanced schedule allows configuring a flexible schedule according to your requirements. To use this schedule, add schedules for full and incremental backup runs:
- To create incremental backups on schedule, select the Recurring (Incremental) checkbox, then configure the schedule for incremental backups on a daily or monthly basis.
- To create full backups on schedule, select the Execute full backup (Synthetic full if possible) checkbox, then configure the schedule for full backups on a daily or monthly basis.
It is recommended to schedule a full backup at least once every 3 months for the selected schedule.
Retention Policy, GFS and Object Lock for GFS backups
Specify the retention policy settings for the backup plan. The retention policy depends on the schedule selected on the previous step.
Retention Policy with Simple Schedule
If you selected the Simple (Forever Forward Incremental) schedule, the Retention Policy step offers the following settings:
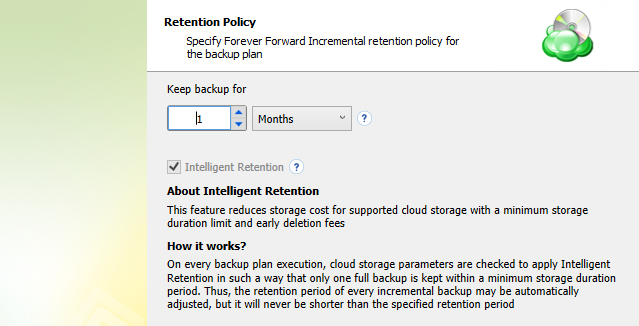
- Keep backup for. Select this option to limit the number of restore points. The Keep backup for value defines the period for which restore points with the Forever Forward Incremental schedule are kept. If their retention period expires, these restore points are merged into a full backup (with Forever Forward Incremental, only one full backup is kept in the backup storage).
For backup storages with a minimum storage duration limit and early deletion fees, this value can be exceeded to avoid the fees.
- Intelligent Retention: Each time the backup plan is executed, the backup storage parameters are analyzed automatically, setting the retention period based on the storage provider's data deletion conditions. This feature is enabled by default.
Learn more about the retention policy in the Retention Policy chapter.
Retention Policy with Advanced Schedule / No Schedule
If you selected the Advanced (GFS, Object Lock) schedule or chose to run the backup manually without a schedule, the Retention Policy step offers the following settings:
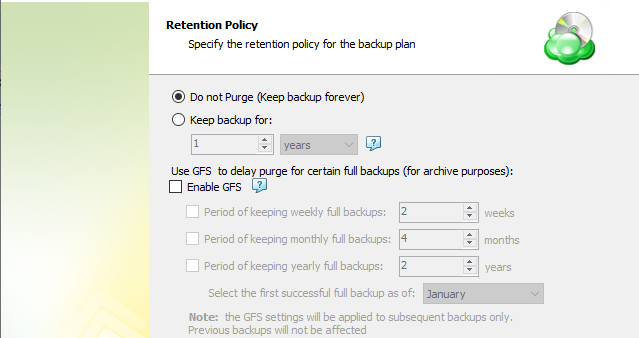
- Do not purge (Keep backup forever). Select this option to keep all your backup runs.
- Keep backup for. Select this option to limit the period during which backup contents are kept in the backup storage, then specify the period.
Learn more about the retention policy in the Retention Policy chapter.
To apply the GFS retention policy for the backup plan, select the Enable GFS checkbox, then customize the GFS retention policy by enabling the required retention periods (weekly, monthly and yearly purge delays).
To learn more about the GFS retention policy, refer to the About GFS chapter.
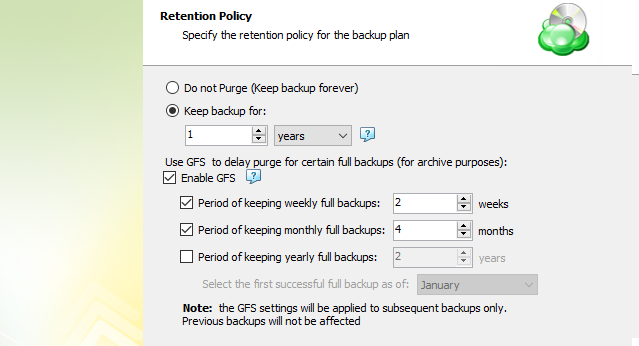
If backup data is required to be locked, enable the Enable Object Lock for GFS backups checkbox. Before enabling Object Lock, you need to allow this feature for the backup destination.
To learn more about Object Lock for GFS backups, refer to the Object Lock (Immutability) chapter.
Click Next.
Pre / Post Actions
Pre- or post- actions for Backup Agents can be restricted by the provider. To learn more about the pre-/post action settings, refer to the Global Agent Options and Companies chapters.
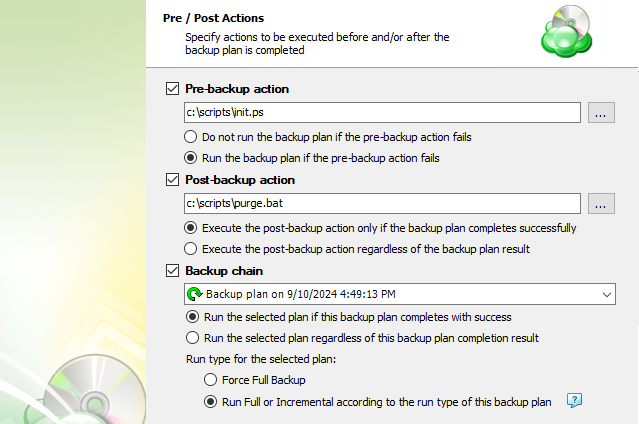
Customize actions before and/or after the backup plan run.
Custom Scripts
You can execute custom scripts before or after running the backup plan.
- To specify the script execution before the backup plan starts, select the Pre-backup action checkbox, then specify the path to the script in the field below. To open a standard Windows dialog box, click the ... button
- Select the pre-backup script execution options:
- Exit backup plan if pre-backup action failed. Select this option to cancel the backup plan if the specified script fails
- Continue backup plan if pre-backup action failed. Select this option to run the backup plan regardless of the specified script execution results
- To specify the script execution after the backup plan terminates, select the Post-backup action checkbox, then specify the path to the script in the field below. To open a standard Windows dialog box, click the ... button
- Select the post-backup script execution options:
- Execute post-backup action only if backup plan has been successfully completed. Select this option to execute the post-backup script only if the backup plan succeeds
- Execute post-backup action regardless of the backup result. Select this option to execute the post-backup script in any case
Note that an absolute path to a script is required, i.e. if you specify the path to a script, it should be as follows:
c:\scripts\prebackup-script.bat
If the absolute path to a script file is not specified, the default directory for the script is "C:\Windows\System32".
The following script formats are supported: EXE, COM, BAT, CMD, or PIF.
Note that Backup Agent supports EXE files with several restrictions: EXE files must not use a GUI and must close automatically upon termination.
For example, the following script will not succeed:
cmd.exe /F:ON
In this case, this command must be used with the /C parameter, as shown below:
cmd.exe /F:ON /C
The same restriction applies to applications executed by PowerShell scripts:
PowerShell.exe Start-Process cmd.exe exit
It is highly recommended to perform a test run for the created backup plan to ensure that Backup Agent properly executes the specified scripts.
Backup Plan Chains
If you need to run another backup or restore plan once the backup plan is finished, use the Backup Chain feature. To create a backup chain, select the Backup chain checkbox, then select a backup or restore plan to be chained.
- Execute the specified backup plan only if backup plan has been successfully completed. Select this option to execute the chained backup plan only if the backup plan succeeds
- Execute the specified backup plan regardless of the backup result. Select this option to execute the chained backup plan in any case
- If you chained a backup plan, you can enable the full backup for it regardless of the contents in the backup storage. To do this, select the Force full backup for the chained plan.
Click Next.
Notification and Logging
Specify notification settings.
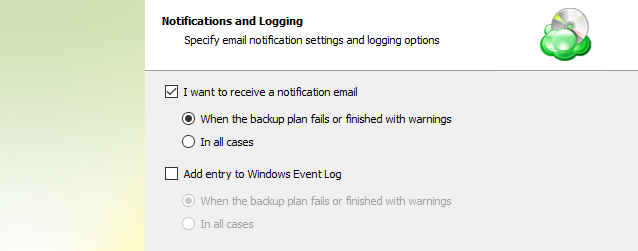
- To receive the notification after the backup plan completion, select the I want to receive notification email when backup completes checkbox.
- Select the When backup fails option if you want to receive the notification message only if the backup plan fails
- Select the In all cases option if you want to receive the notification message in any case.
- In the Username, Email, and Email subject fields, specify the notification email details. You can specify one or more email recipients. Separate them with a semicolon or comma, and specify the recipient name (one for all of them). The email subject can also contain any of the following variables:
- %COMPUTER_NAME% Indicates the name of a computer on which the routine was running
- %RESULT% Indicates whether the routine was finished successfully or failed
%RESULT% variable has the following values:
- Completed. This value is assigned when the plan is terminated with success
- Completed with warnings. This value is assigned when the plan is terminated with errors, warnings or has been interrupted
- %PLAN_NAME% Indicates the backup plan's name.
- If you want to use your own SMTP server for notification emails, select the I want to use my SMTP server for email notifications checkbox, then specify the settings for the SMTP server
- If you want the backup plan record to be added to the Windows Event Log, select the Add entry to Windows Event Log when backup completes checkbox.
- Select the When backup fails option if you want to receive the notification message only if the backup plan fails
- Select the In all cases option if you want the entry to be put in the Windows Event Log in any case.
Click Next.
Summary
Review the configuration of the backup plan.
Click Next to proceed to the last wizard page.
Select the Run backup now checkbox to run the backup plan immediately.
If you want to run the backup plan later, leave the Run backup now checkbox cleared, then click Finish.