Hyper-V Backup in Backup Agent (NBF)
Backup Agent supports Hyper-V virtual machine backup and restore.
To perform Hyper-V machine backups, you need a special license. Learn more about license in the Licenses section
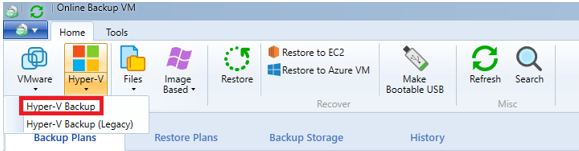
Step 1
Within the Backup Agent, click on Hyper-V, then select Hyper-V Backup.
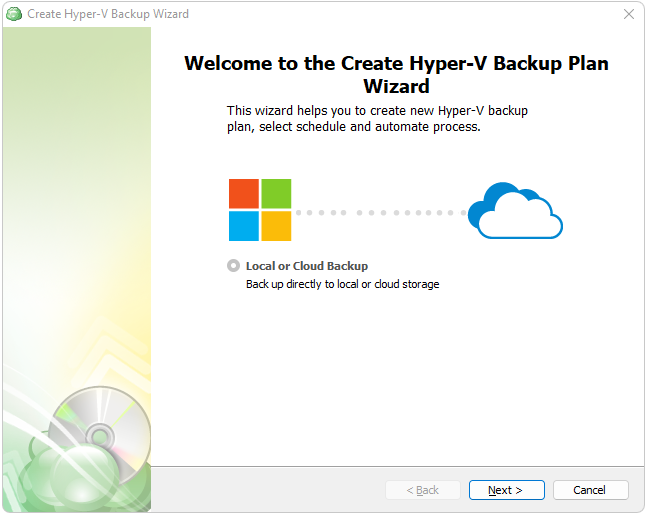
Step 2
You will then be prompted to start the backup wizard.
Step 3
The next step will prompt you to select the destination for the backup.
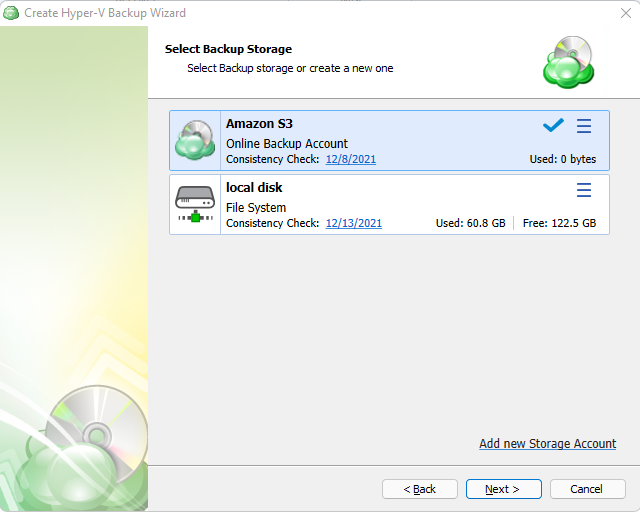
If the desired destination is not in the list, you can click “Add new Storage Account” to add it.
Step 4
Next, you will be prompted to name the plan.
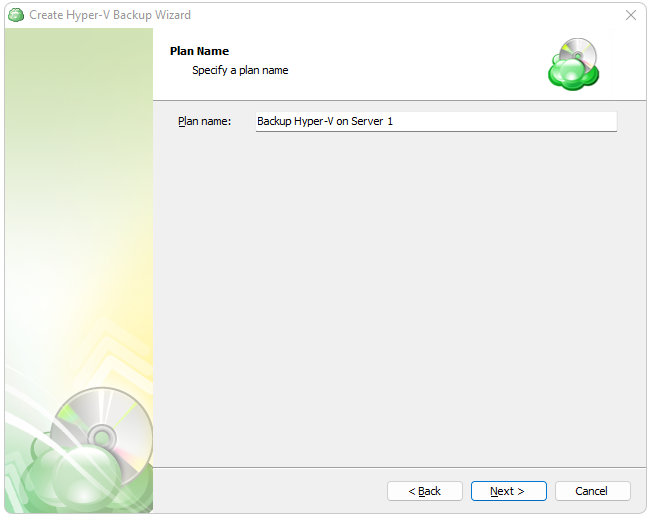
It is recommended to use a descriptive name which will distinguish the backup from others
Connect to a Hyper-V Cluster (optional)
If there is one of the hosts of Hyper-V cluster, you will be prompted to connect the cluster. As a minimum requirement, the backup user should be a member of the following groups on every Hyper-V cluster node: the "Domain Users" group and the local "Administrators" group.
This step appears in the backup wizard only if a Hyper-V cluster is present and detected
Select to back up: a local Hyper-V host only or a Hyper-V cluster.
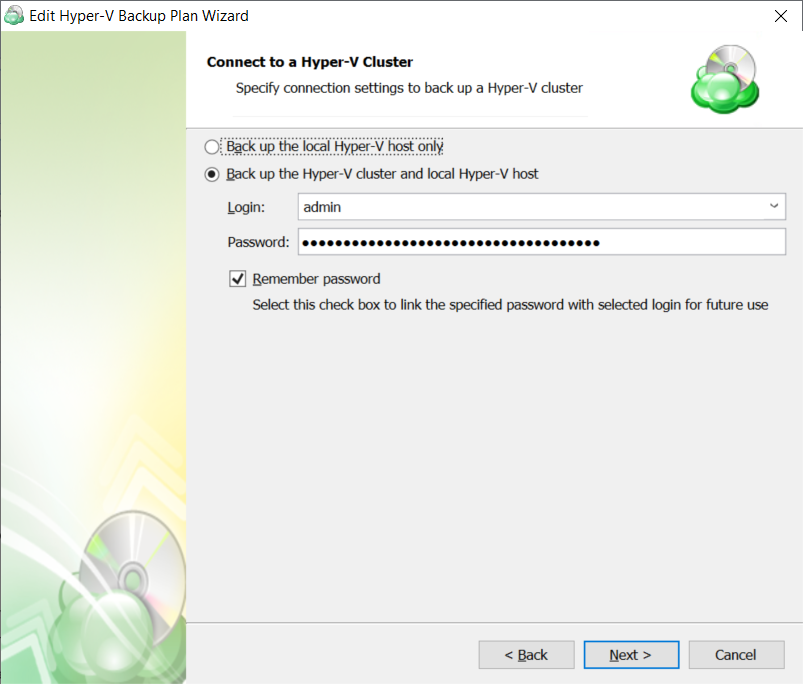
The following options are available:
- Select the Back up the local Hyper-V host only option to back up a local Hyper-V host
- Select the Back up the Hyper-V cluster and local Hyper-V host option to back up VMs of a Hyper-V Failover Cluster, then specify the cluster access credentials
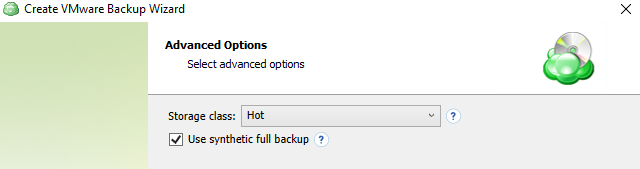
Step 5
Next, you are presented with the Advanced Options. Specify advanced options for the backup plan. Advanced option set depends on the selected backup storage.

The following options are available:
- Use synthetic full backup. Select this option for cloud storages to enable the synthetic full backup usage for the backup plan. If a long-term storage class is selected as the backup destination, this will result in high storage costs.
Additional Advanced Options for Amazon S3
- If your backup storage destination is Amazon S3, select the S3 storage class for the backup plan:
- Standard
- Intelligent-Tiering
- Standard-IA
- One Zone-IA
- Glacier Instant Retrieval
- Glacier Flexible Retrieval (formerly S3 Glacier)
- Glacier Deep Archive
Usage of different storage classes for different backups helps optimize your storage costs.
Learn more about Amazon S3 storage classes here
- Select Use S3 Transfer Acceleration to accelerate file transfer for an extra fee. The target bucket must have this feature enabled. Select this checkbox if you want to use the data transfer acceleration service provided by Amazon. To learn more, refer to the Amazon S3 Transfer Acceleration.
Additional Advanced Options for Microsoft Azure
If your backup storage destination is Microsoft Azure, and you have the General Purpose v2 Azure account, select the required storage class (access tier).
The following options are available:
- Hot tier. An online tier optimized for storing data that is accessed or modified frequently. The hot tier has the highest storage costs, but the lowest access costs.
- Cool tier. An online tier optimized for storing data that is infrequently accessed or modified. Data in the cool tier should be stored for a minimum of 30 days. The cool tier has lower storage costs and higher access costs compared to the hot tier.
- Cold tier. An online tier optimized for storing data that is rarely accessed or modified, but still requires fast retrieval. Data in the cold tier should be stored for a minimum of 90 days. The cold tier has lower storage costs and higher access costs compared to the cool tier.
- Archive tier. An offline tier optimized for storing data that is rarely accessed, and that has flexible latency requirements, on the order of hours. Data in the archive tier should be stored for a minimum of 180 days.
Note that this feature is only supported for General Purpose v2 Azure accounts. If you are using another kind of account, you need to upgrade your account to be able to use this feature
Be aware of the additional charges and increased blob access rates after your Azure account upgrade
To learn more about the difference between Azure storage tiers, refer to the Azure Blob Storage - Hot, cool, cold, and archive storage tiers article at docs.microsoft.com.
Step 6
Next, select the Virtual Machines you wish to back up.
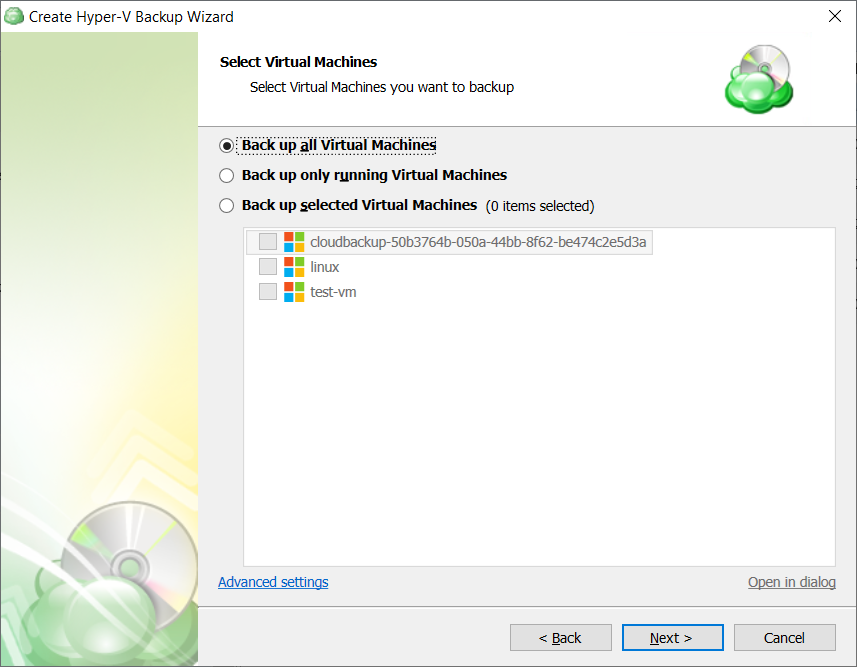
The following options are available:
- Back up all Virtual Machines. Select this option to include all virtual machines of the Hyper-V server to the backup plan
- Back up only running Virtual Machines. Select this option to include running virtual machines of the Hyper-V server to the backup plan
- Back up selected Virtual Machines. Select this option to include specified virtual machines of the Hyper-V server to the backup plan
Note that if you switch the backup option from the Back up selected Virtual Machines to any other, the previously made selection is kept for the case if you change your mind and select back the Back up selected Virtual Machines option, but the selected option will be applied regardless of the virtual machine selection.
As of version 7.4, you can customize checkpoints to back up. To configure the checkpoint backup, click Advanced Settings. Select Back up current Hyper-V checkpoint only check box to back up the latest checkpoint only. Otherwise all existing checkpoints for the selected virtual machines will be backed up.
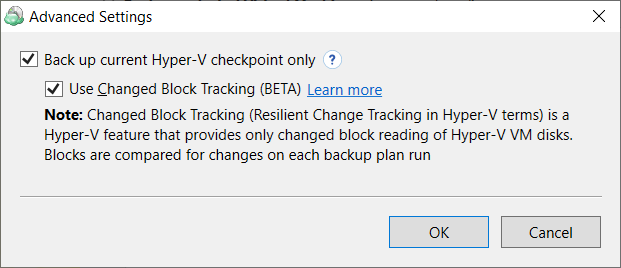
Along with the Back up current Hyper-V checkpoint only option, you can enable the Changed Block Tracking (Resilient Change Tracking) feature. Read more about the Changed Block Tracking in the Changed Block Tracking for Hyper-V paragraph.
Step 7
Now you’ll need to select the application processing options
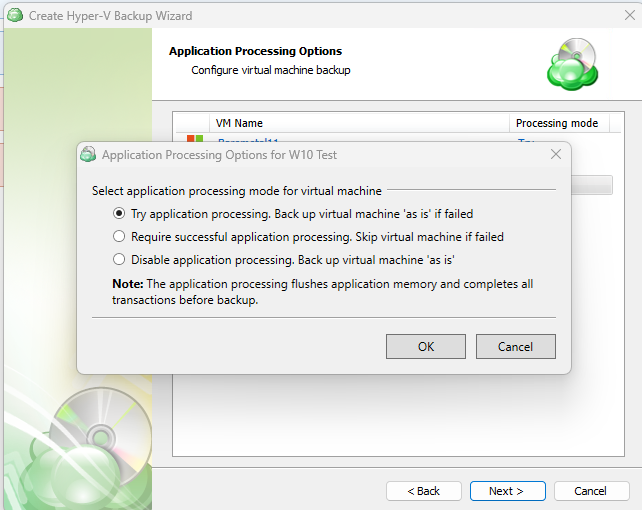
- Try application processing. Backup will perform whether or not the application-consistent process fails. If the processing fails, the backup will be done “as is”, but data consistency is not guaranteed.
- Require successful application processing. Skip the virtual machine if processing fails. If processing is successful, it ensures that applications running in the VM, such as databases, are taken into consideration and the backup will ensure data consistency is maintained.
- Disable application processing. Backup virtual machine “as is” and does not perform any application processing. The VM is backed up in its current state, which may cause data inconsistencies.
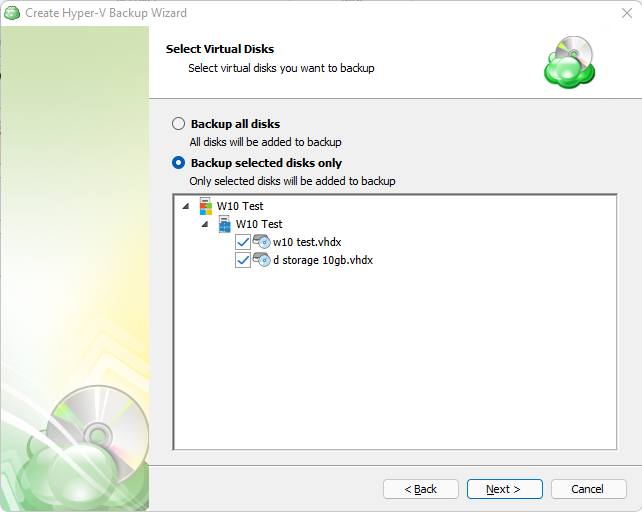
Step 8
Once you have selected which VMs to back up, the application allows you to then choose whether to back up all virtual disks on the selected VMs or to only back up selected virtual disks.
Step 9
After you have selected which VMs and disks to back up, the next step is to set the compression or encryption options.
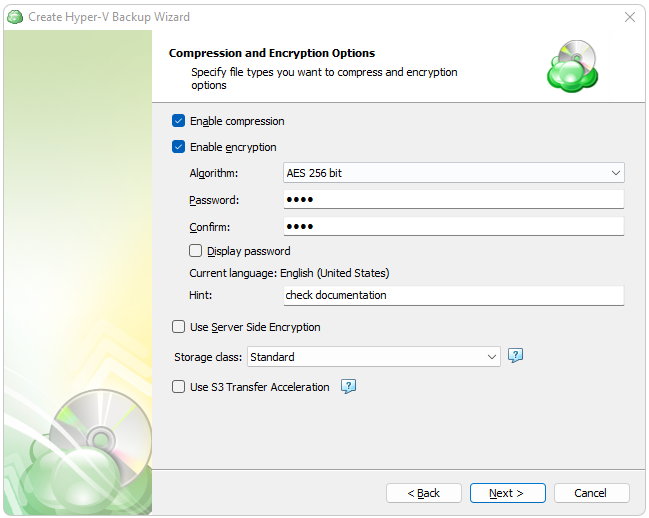
Other features may appear here which are specific to the selected backup destination. Some of these options may incur additional costs with the storage provider.
Enabling compression will reduce the size of the backup, reduce the time to upload it, both of which may decrease the cost of the backup
Encrypting the backup adds an additional layer of security to the data at the expense of increased processing resources during the backup process. Several types of encryption are available, with the most secure selected by default
It is important to remember that MSP360 Support is not able to retrieve or reset the encryption password. It is recommended that you store the password in a secure place and enable the Password Recovery Service
Step 10
Next you are presented with an option for the type of Backup Consistency Check to use with the plan. It is recommended that you leave “Enable Full Consistency Check” enabled.
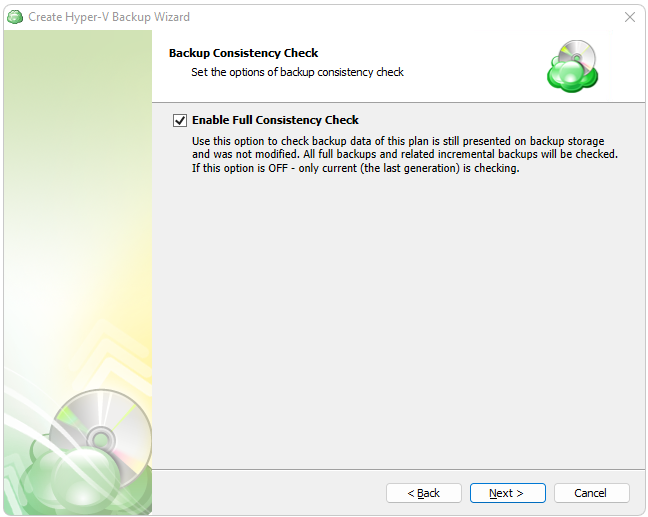
It is recommended to leave the Consistency Check enabled to ensure the integrity of your backed up data
Step 11
Specify the backup plan schedule settings.
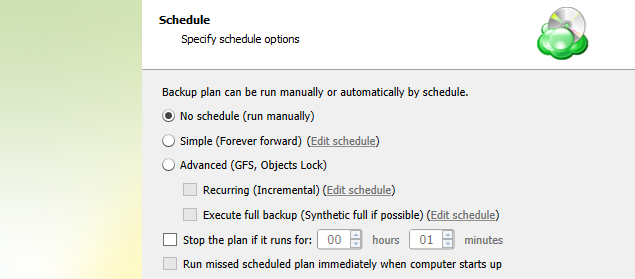
The following options are available:
- Select the No schedule option to run the backup plan manually.
- Select the Simple (Forever Forward) option to apply the Forever Forward Incremental (FFI) schedule.
- Select the Advanced (GFS, Object Lock) option to apply the recurring schedule and, if necessary, use Grandfather-Father-Son and Object Lock (Immutability).
- To set the time limit for plan execution, select the Stop the plan if it runs for checkbox, then specify the backup plan duration limit.
- To run the backup plan after the computer is on in case the backup plan run has been missed, select the Run missed scheduled backup immediately when computer starts up checkbox.
Simple Schedule
Select the Simple (Forever Forward) option to use the Forever Forward Incremental (FFI). This schedule offers one full backup followed by a limited number of incrementals. Once the limit is exceeded, a new full backup is created using in-cloud copying (synthetic full backup. Once you select this option, specify the FFI schedule for the backup plan. You can select the Daily or Monthly schedule type, depending on how often the incremental backups will be performed.

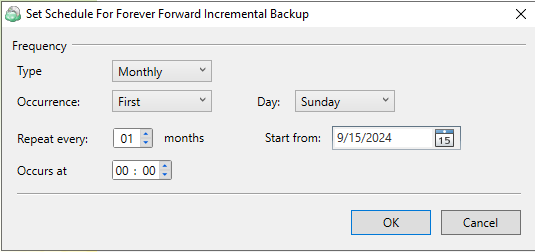
This schedule is unavailable if the selected storage account does not support synthetic full backups.
It is recommended to schedule full backup at least once every 3 months for selected schedule
Forever Forward backups are only supported by a limited number of cloud storage providers. For more information, refer to Forever Forward Incremental
The Simple (Forever forward) schedule is recommended for retention up to 100 restore points which do not require Object Lock for legal compliance
It is not recommended to select the Simple (Forever forward) schedule for long-term storage and archival purposes. The Advanced Schedule is recommended for all storage needs over 100 restore points
Advanced Schedule
Select the Advanced (GFS, Object Lock) option to set up a flexible, recurring schedule with generations. Every generation contains one full backup followed by incrementals.
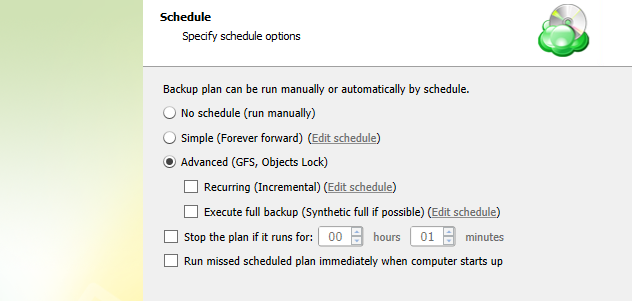
The advanced schedule allows configuring a flexible schedule according to your requirements. To use this schedule you should add schedules for full and incremental backup runs:
- To create incremental backups by schedule, select the Recurring (Incremental) checkbox, then configure the schedule for incremental backups on a daily or monthly basis.
- To create full backups by schedule, select the Execute full backup (Synthetic full if possible) checkbox, then configure the schedule for full backups on a daily or monthly basis.
Select the Advanced option to set up a flexible, recurring schedule with generations. Every generation contains one full backup followed by incrementals.
Clicking on Edit Schedule next to Incremental and Full backups allow you to configure the frequency they will be created. If both a Full and Incremental are scheduled for the same day, the application will perform the Full only.
It is recommended to use the Advanced (GFS, Object Lock) option and regularly scheduled full backups for long-term storage (longer than 6 months) or backups that must comply with legal or industry requirements
Enabling the Run missed scheduled backup immediately when computer starts up option will ensure that the backup process begins automatically upon startup if the last backup was not able to start at the scheduled time for any reason. This option is recommended for Desktops and Laptops
Do not use the “Stop the plan if it runs for:” option if you have a slow or unstable internet connection. The first full backup can take a long time to upload, and it can be unexpectedly interrupted if this option is enabled
Synthetic Full Backups allow the system to merge a series of incremental backups together to form a new full backup, greatly reducing the time and bandwidth needed to perform full backups after the initial full. If the storage destination does not support Synthetic full, then a traditional full will be made instead
The Advanced Schedule and GFS retention policies will only perform properly with regularly scheduled full backups
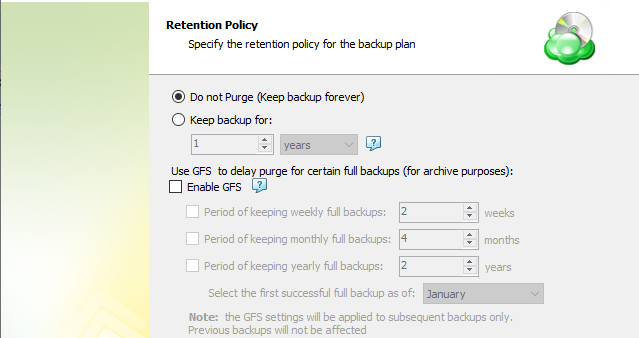
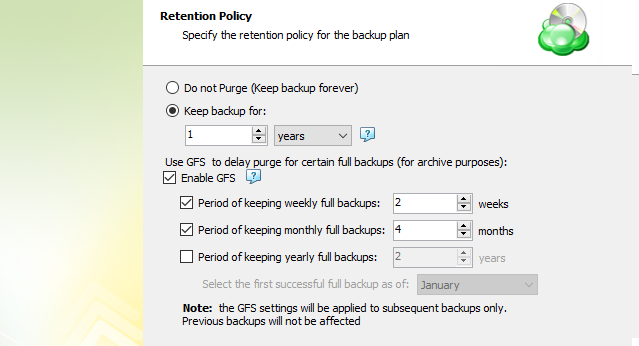
Step 12
Specify the retention policy settings for the backup plan. The retention policy depends on the schedule selected on the previous step.
Retention Policy with Simple Schedule
If you selected the Simple (Forever Forward Incremental) schedule, the Retention Policy step offers the following settings:
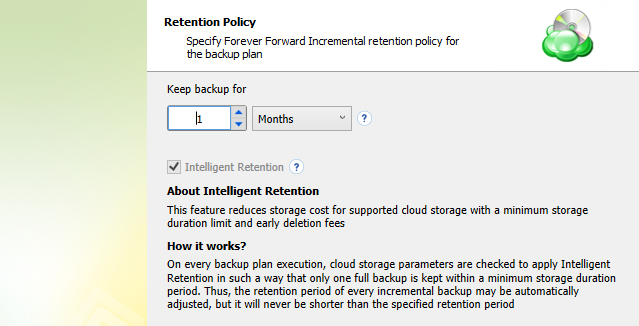
- Keep backup for. Select this option to limit the number of restore points. The Keep backup for value defines the period Restore Points with the Forever Forward Incremental schedule are kept. If their retention period expires, these restore points are merged into a full backup (with Forever Forward Incremental only one full backup is kept on the backup storage).
For backup storages with a minimum storage duration limit and early deletion fees, this value can be exceeded to avoid the fees
- Intelligent Retention: Each time the backup plan is executed, the backup storage parameters are analyzed automatically, setting the retention period based on storage provider data deletion conditions. This feature is enabled by default.
Learn more about the retention policy in the Retention Policy chapter chapter
Retention Policy with Advanced Schedule
If you selected the Advanced (GFS, Object Lock) schedule or to run backup manually without the schedule, the Retention Policy step offers the following settings:
- Do not purge (Keep backup forever). Select this option to keep all your backup runs.
- Keep backup for. Select this option to limit the period while backup contents are kept in the backup storage, then specify the period.
Learn more about the retention policy in the Retention Policy chapter chapter
To apply the GFS retention policy for the backup plan, select the Enable GFS checkbox, then customize the GFS retention policy by enabling the required retention periods (weekly, monthly and yearly purge delays).
To learn more about the GFS retention policy, refer to the About GFS chapter
If backup data is required to be locked, enable the Object Lock (Immutability) checkbox. Before enabling Object Lock, you need to allow this feature for the backup destination.

To learn more about the Object Lock (Immutability) feature, refer to the Object Lock (Immutability) chapter
Generations will not be deleted until the youngest point in the chain has met the retention criteria
GFS Retention provides an excellent way to efficiently archive data for compliance. Additional information can be found in GFS Policy topics in the MBS Documentation
Restore Points will not be deleted until the youngest point in the chain has met the retention criteria
GFS Retention provides an excellent way to efficiently archive data for compliance. Additional information can be found in GFS Policy topics in the MBS Documentation
Step 13
Next, you can specify Pre- and Post- backup actions (optional)
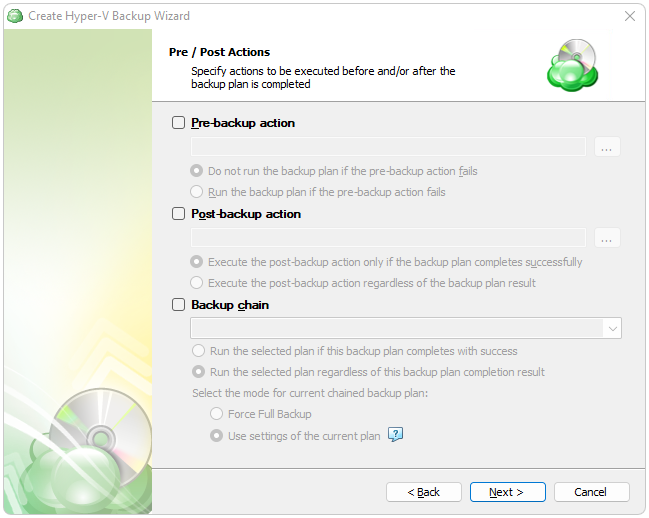 You can execute custom scripts before or after running the backup plan.
- To specify the script execution before the backup plan starts, select the Pre-backup action check box, then specify the path to the script in the field below. To open a standard Windows dialog box, click the ... button
- Select the pre-backup script execution options:
- Exit backup plan if pre-backup action failed. Select this option to cancel the backup plan if the specified script fails
- Continue backup plan if pre-backup action failed. Select this option to run the backup plan regardless of the specified script execution results
- To specify the script execution after the backup plan terminates, select the Post-backup action check box, then specify the path to the script in the field below. To open a standard Windows dialog box, click the ... button
- Select the post-backup script execution options:
- Execute post-backup action only if backup plan has been successfully completed. Select this option to execute the post-backup script only in case of a backup plan success
- Execute post-backup action regardless of the backup result. Select this option to execute the post-backup script in any case
Note that an absolute path to a script is required, i.e. if you specify the path to a script, it should be as follows:
c:\scripts\prebackup-script.bat
If the absolute path to a script file is not specified, the default directory for scripts is "C:\Windows\System32"
The following script formats are supported: EXE, COM, BAT, CMD, or PIF
Mind that Backup Agent supports EXE files with several restrictions: EXE files must not use GUI and must close automatically upon termination.
For example, the following script will not succeed:
cmd.exe /F:ON
In this case, this command must be used with the /C parameter, as shown below:
cmd.exe /F:ON /C
The same restriction applies to applications executed by PowerShell scripts:
PowerShell.exe Start-Process cmd.exe exit
It is highly recommended to perform a test run for the created backup plan to ensure that Backup Agent properly executes specified scripts
Backup Plan Chains
If you need to run another backup or restore plan once the backup plan is finished, use the Backup Chain feature. To create a backup chain, select the Backup chain check box, then select a backup or restore plan to be chained.
- Execute the specified backup plan only if backup plan has been successfully completed. Select this option to execute the chained backup plan only in case of a backup plan success
- Execute the specified backup plan regardless of the backup result. Select this option to execute the chained backup plan in any case
- If you chained a backup plan, you can enable the full backup for it regardless of the contents in the backup storage. To do this, select the Force full backup for the chained plan.
Step 14
Specify notification settings.
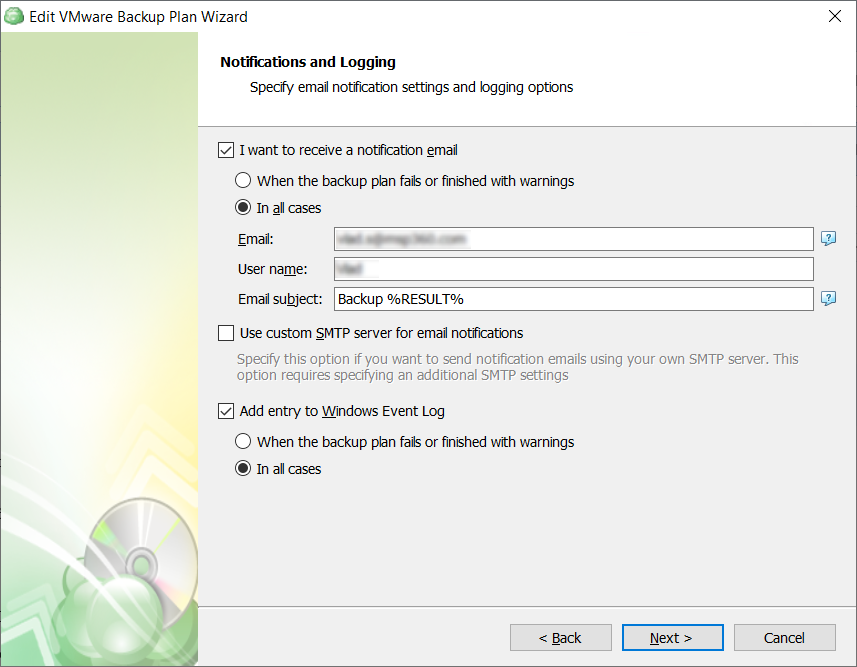
- To receive the notification after the backup plan completion, select the I want to receive notification email when backup completes check box.
- Select When backup fails option if you want to receive the notification message only in case of the backup plan failure
- Select In all cases option if you want to receive the notification message in any case.
- In the fields Username, Email, Email subject specify the notification email details. You can specify one or more email recipients. Separate them by semicolon or comma, the recipient name (one for all of them). The email subject can also contain any of the following variables:
- %COMPUTER_NAME% Indicates the name of a computer on which the routine was running
- %RESULT% Indicates whether the routine was finished successfully or failed
%RESULT% variable has the following values:
- Completed. This value is assigned when the plan is terminated with success
- Completed with warnings. This value is assigned when the plan is terminated with errors, warnings or has been interrupted
- %PLAN_NAME% Indicates the backup plan's name.
- If you want to use own SMTP server for notification emails, select the I want to use my SMTP server for email notifications check box, then specify the settings for the SMTP server
- If you want the backup plan record to be added to Windows Event Log, select Add entry to Windows Event Log when backup completes check box
- Select When backup fails option if you want to receive the notification message only in case of the backup plan failure
- Select In all cases option if you want the entry to be put in Windows Event Log in any case.
Step 15
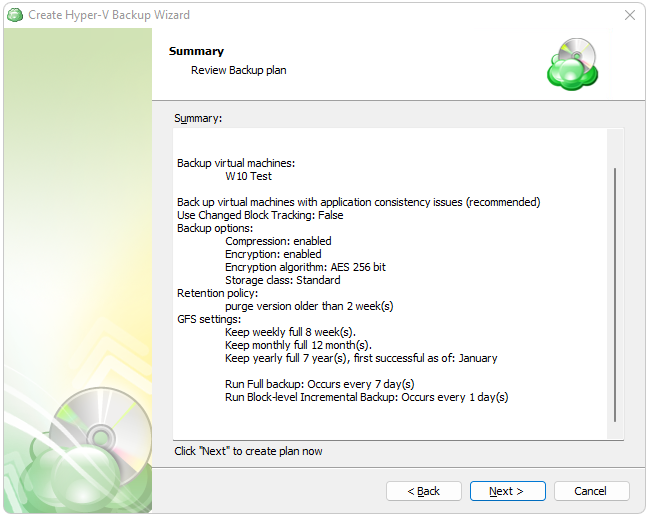
Check a summary of the selected options.
Step 15
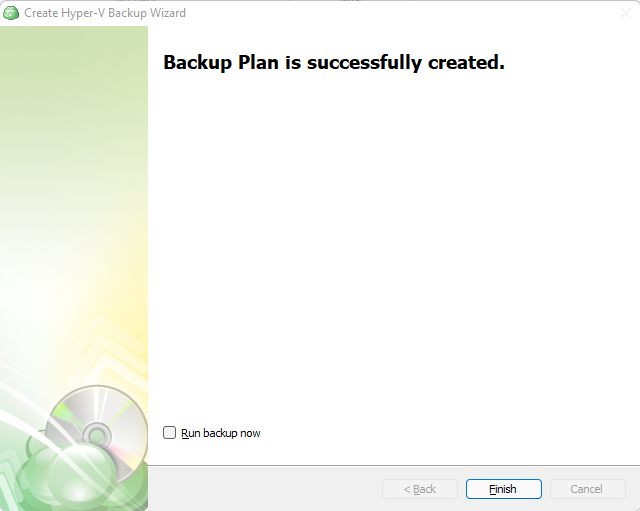
The final step of the wizard will confirm that the Backup Plan was successfully created. If you select the “Run backup now” box, the application will initiate it immediately upon exiting the wizard, otherwise it will run at the next scheduled time.
| Top |
Edit a Backup Plan
To edit the backup plan, proceed as follows:
- Switch to the Backup Plans tab.
- Open the backup plan you want to edit by expanding it, then click Edit.
- Proceed through the Backup Wizard steps to adjust settings as needed.
- If the plan is currently running, you'll need to select one of the following options:
- Apply changes after the backup plan completes
- Stop the plan and apply changes.
- After choosing the desired option for the running backup plan, click Apply.
- Save the edited plan configuration.
You can edit certain backup plan parameters directly, without using the backup wizard, as long as the backup plan is not currently running. Editable parameters are marked with a pencil icon. To make a quick edit, simply click the pencil icon next to the parameter
Delete a Backup Plan
To delete the backup plan, proceed as follows:
- Switch to the Backup Plans tab.
- Open the plan to delete, expand it, then click Delete.
- Click Yes to confirm the backup plan deletion.