Hyper-V Backup Plan (legacy wizard) in Management Console
Managed Backup features Hyper-V virtual machine backup and restore.
This chapter covers the following topics:
- Create Hyper-V Backup Plan
- Plan Name
- Cloud Storage
- Virtual Machines
- Compression and Encryption Options
- Retention Policy
- Schedule Options
- Pre / Post Actions
- Notification
- Create Backup Plan
- Run Backup Plan
- Edit Backup Plan
- Clone Backup Plan
- Delete Backup Plan
Hyper-V Backup Overview
Note that only local server can be configured for Hyper-V backup plan
Features:
- Ability to customize virtual machine selection
- Block-level Backup
- Compression and Encryption
- Scheduling and Real-Time Backup
- Exclude Disks, Files or Folders from Hyper-V backup (coming soon)
- Item-Level Restore
- Restore Hyper-V VMs to Amazon EC2 and MS Azure VM
Supported for:
- Windows 8/8.1/10/11 (Pro, Enterprise) Windows Server 2008R2/2012/2012R2/2016 with Hyper-V role (SCVMM is not supported, Failover Cluster backup is supported only in Backup Agent as of version 7.4)
License: VM Server (contains 2 sockets) required. If your virtual environment has more than 2 sockets, you need to buy an additional VM Server Socket license.
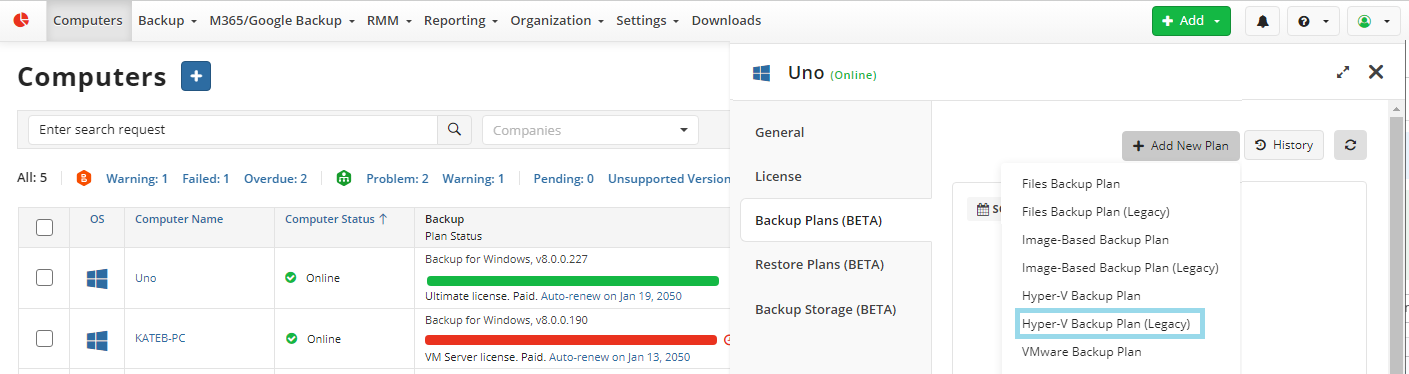
Create Hyper-V Backup Plan
- Open Management Console
- On Computers select Remote Management if you use legacy main menu, or open Backup > Computers page in the new main menu.
- Find the required computer, then click the Configure icon in the Backup Plan Status column.
- On the side panel, click + or +Add New Plan.
- Select the Hyper-V Backup Plan (Legacy) item.
Plan Name
To expand the Plan Name section, click the Plan Name bar.
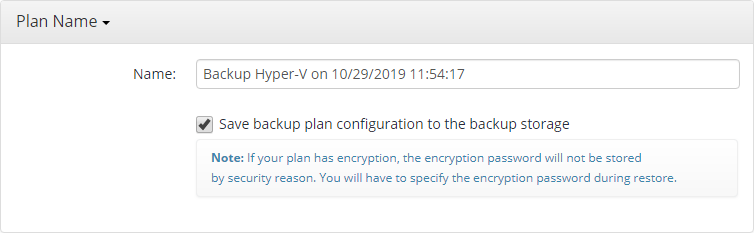
Specify the backup plan name.
- To keep your backup plan configuration in backup storage, select the Save backup plan configuration to the backup storage check box
To collapse the Plan Name settings, click the Plan Name bar again.
Cloud Storage
To expand the Cloud Storage section, click the Cloud Storage bar.
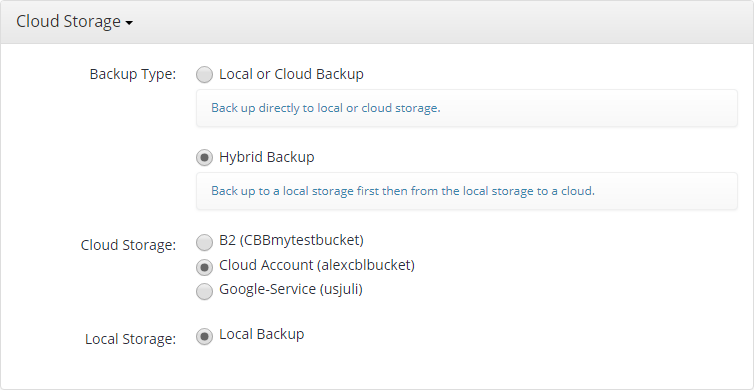
- Select backup type:
- To use a local or cloud backup storage, select the Local or Cloud Backup option
- To use a hybrid backup, select the Hybrid Backup option
- In the storage list, select storage accounts to be used in the backup plan.
To collapse the Cloud Storage settings, click the Cloud Storage bar again.
Virtual Machines
To expand the Virtual Machines section, click the Virtual Machines bar.
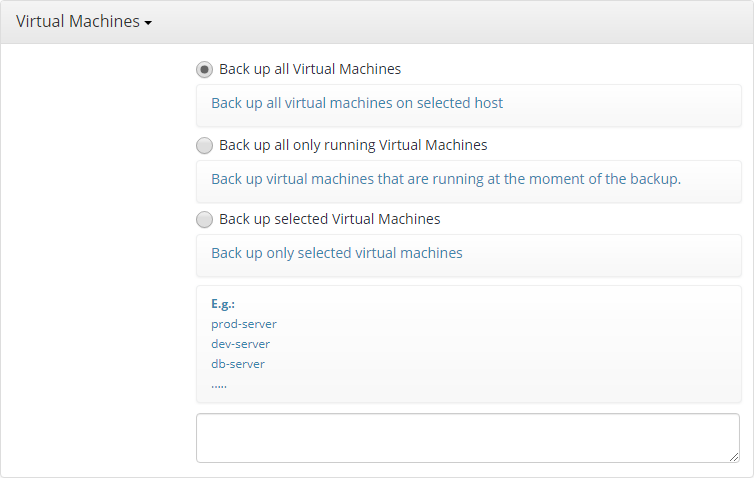
Specify virtual machines to be included in the backup plan. The following options are available:
- Back up all Virtual Machines. Select this option to include all virtual machines in the backup plan regardless of their state at the moment of the backup plan run
- Back up only running Virtual Machines. Select this option to back up virtual machines that are running at the moment of the backup plan run
- Back up selected Virtual Machines. Select this option to specify virtual machines to be included in the backup plan manually. In the field below, specify virtual machines.
Every virtual machine must be specified on a separate line
To collapse the Virtual Machines settings, click the Virtual Machines bar again.
Compression and Encryption Options
To expand the Compression and Encryption Options section, click the Compression and Encryption Options bar.
Specify compression and encryption options for the backup plan. The following options are available:
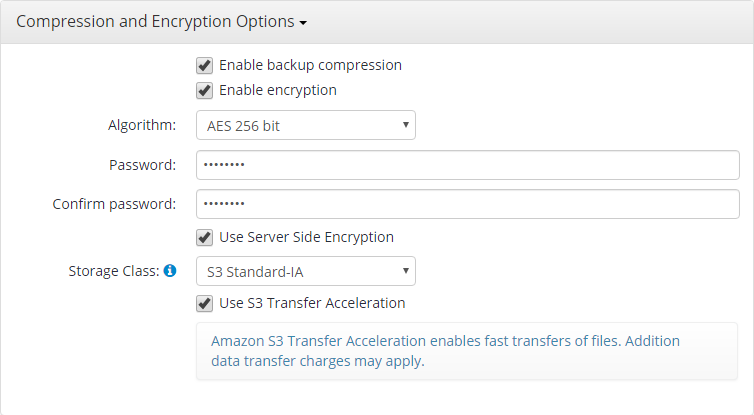
- Enable backup compression. Select this option if you want all objects in the backup plan to be compressed. This may reduce the backup size significantly
- Enable encryption. Select this option to use AES encryption for the backup plan.
- If you enabled encryption, select the encryption algorithm in the Algorithm drop-down menu. The following key lengths are available:
- 128 bit
- 192 bit
- 256 bit
- In the Password field, specify the encryption password, then confirm it in the Confirm password field. Mind to keep the encryption password in a safe place
If the storage destination is Amazon S3, the following options are available:
- Use Server Side Encryption. Select this check box if you want to use the server-side encryption provided by AWS. To learn more, refer to the Protecting Data Using Server-Side Encryption with Amazon S3-Managed Encryption Keys (SSE-S3) article
- In the Storage Class drop-down list, select the required Amazon S3 storage class for your backup plan. To learn more about S3 storage classes, refer to the Amazon S3 Storage Classes chapter.
To collapse the Compression and Encryption Options settings, click the Compression and Encryption Options bar again.
Retention Policy
To expand the Retention Policy section, click the Retention Policy bar.
Specify the retention policy settings. The following settings are available:
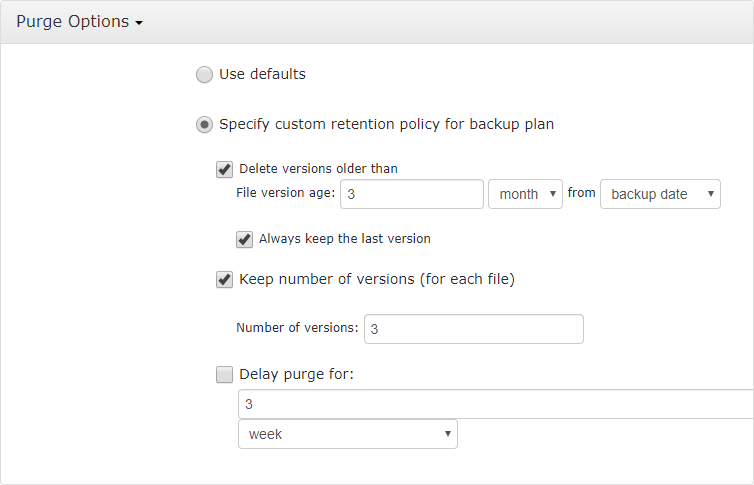
- Use defaults. Select this option to apply the default retention policy to the backup plan
- Specify custom retention policy for backup plan. Select this option if you want to keep the custom retention settings for this backup plan
- Delete versions older than. Select this check box if you want to keep the restricted number of DB versions in backup storage. In the fields below, specify the criteria for deletion of old versions
- Always keep the last version. Select this check box if you want to keep the last DB version in backup storage regardless of whether it is deleted in a backup source. It is highly recommended to keep this check box selected for backup plans with sensitive data
- Keep number of versions (for each file). Select this check box to specify the number of DB versions to be kept in backup storage, then specify the number of versions
To collapse the Retention Policy settings, click the Retention Policy bar again.
To learn more about the retention policy, refer to the Retention Policy chapter.
Schedule Options
To expand the Schedule Options section, click the Schedule Options bar.
Specify the schedule settings for the backup plan. The following settings are available:
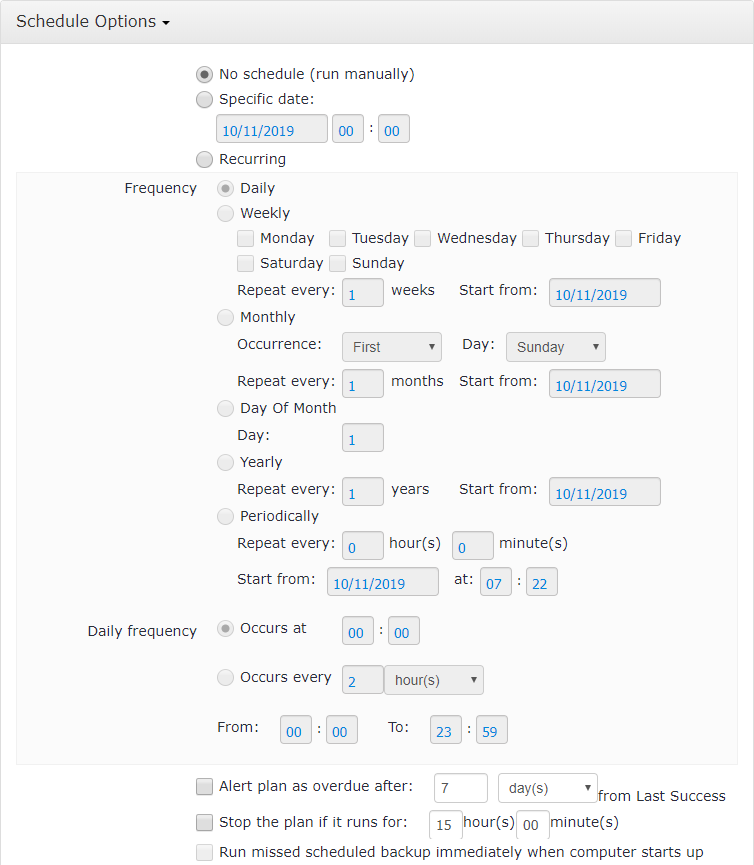
- If you want to run the backup plan manually, select No schedule option.
- If you want your backup to be run on a constant periodic basis, select Recurring option, then specify the period (-s) your backup plan will run.
- If you want to receive an alert if the backup plan fails to run, select Alert plan as overdue after check box, then specify the alert delay period.
- To stop the backup plan if it continues suspiciously long, select Stop the plan if it runs for check box, then specify the backup plan maximum duration.
- To run the backup plan after the computer is on in case the backup plan run has been missed, select Run missed scheduled backup immediately when computer starts up check box.
The schedule settings for full backup are specified separately.
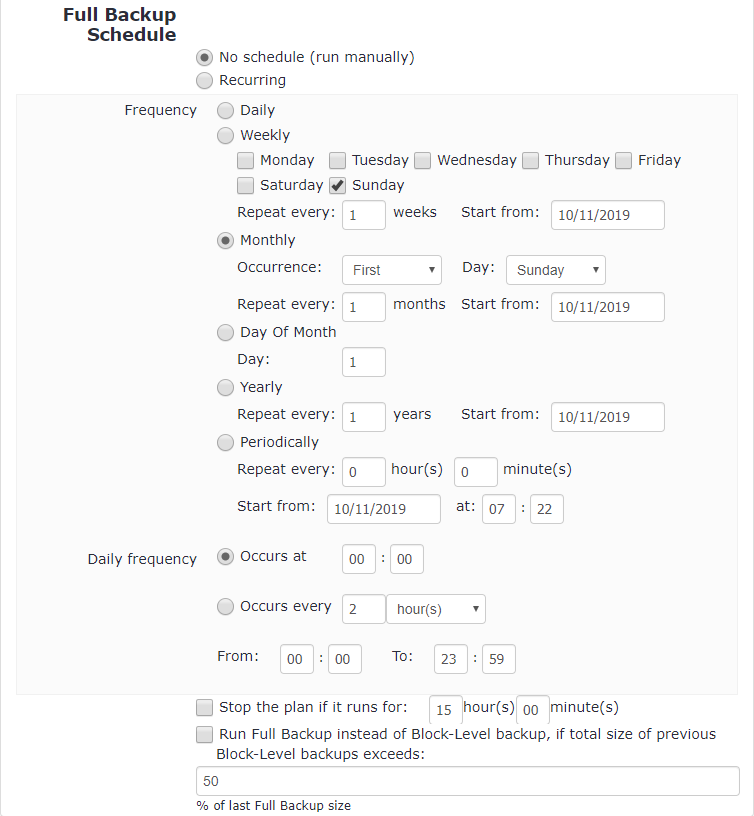
- If you want to run the full backup manually, select No schedule option.
- If you want your full backup to be run on a constant periodic basis, select Recurring option, then specify the period (-s) your full backup will run.
- To stop the full backup if it continues suspiciously long, select Stop the plan if it runs for check box, then specify the full backup maximum duration.
- If you want to specify the criteria for the full backup instead of block-level, select Run Full Backup instead of Block-Level backup, if total size of previous Block-Level backups exceeds: check box, then specify the threshold value of a last full backup size (specified in percents).
To collapse the Schedule Options settings, click the Schedule Options bar again.
Pre / Post Actions
To expand the Pre / Post Actions section, click the Pre / Post Actions bar.
Specify pre and post actions for your backup plan. Usually, these are scripts that perform particular jobs before or after your data is backed up. The following settings are available:
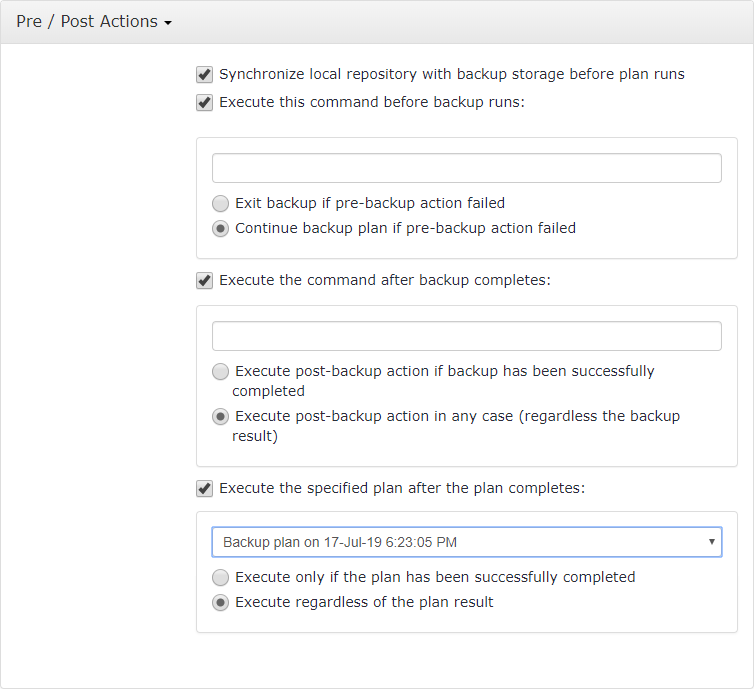
- Select Synchronize local repository with backup storage before plan runs check box. To learn more about a repository and how to manage it, refer to the Repository and Consistency chapter
- To specify the action that will be performed before the backup plan starts, select Execute this command before backup runs: check box.
- Specify the path to the script to be run as a pre-backup action.
- Specify the conditions of pre-action run:
- Exit backup if pre-backup action failed option if you do not want the backup plan to be launched if the pre-backup action fails.
- Select Continue backup plan if pre-backup action failed option if you want the backup plan to be launched regardless of the pre-backup action result.
- To specify the action that will be performed after the backup is completed, select Execute the command after backup completes: check box.
- Select Execute post-backup action if backup has been successfully completed option if you want to run it only if the backup has been successfully completed.
- Select Execute post-backup action in any case (regardless of the backup result) option if you want the post-action to be launched regardless of the backup termination results.
- To chain the backup plan with another plan, select Execute the specified plan after the plan completes: check box, then select the plan name in the drop-down menu.
- Select Execute only if the plan has been successfully completed option if you want to run the specified plan only if the backup plan has been successfully completed.
- Select Execute regardless of the plan result option if you want the chained backup plan to be launched regardless of the backup termination results.
To collapse the Pre / Post Actions settings, click the Pre / Post Actions bar again.
Notification
To expand the Notification section, click the Notification bar.
Specify notification settings.
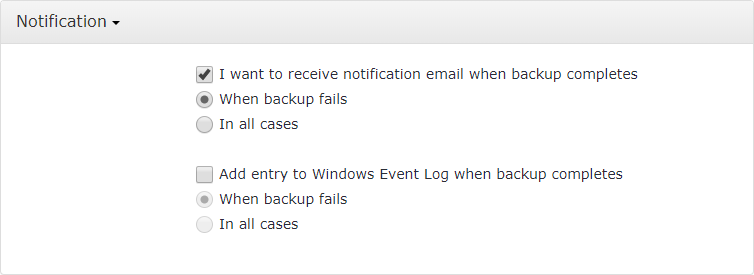
- To receive the notification after the backup plan completion, select I want to receive notification email when backup completes check box.
- Select When backup fails option if you want to receive the notification message only in case of the backup plan failure
- Select In all cases option if you want to receive the notification message in any case.
- If you want the backup plan record to be added to Windows Event Log, select Add entry to Windows Event Log when backup completes check box.
- Select When backup fails option if you want to receive the notification message only in case of the backup plan failure
- Select In all cases option if you want the entry to be put in Windows Event Log in any case.
To collapse the Notification settings, click the Notification bar again.
Run Backup Plan
To Run the Existing Backup Plan:
- Open Backup > Computers.
- Find the required computer, then click the Configure icon in the Backup Plan Status column.
- On the side panel, navigate to the Backup Plans (Beta) tab
- Find the plan to run.
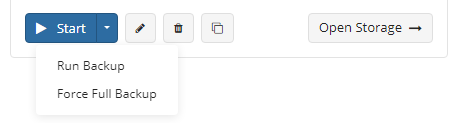
- Click the Start button to run the backup plan. You can expand this control to use the available options:
- Run Backup
- Force Full Backup
Edit Backup Plan
To Edit the Existing Backup Plan
- Open Backup > Computers.
- Find the required computer, then click the Configure icon in the Backup Plan Status column.
- On the side panel, find the plan you want to edit, then click the edit icon.

- Once you have made the required changes, click Save.
Clone Backup Plan
To Clone the Existing Backup Plan
- Open Backup > Computers.
- Find the required computer, then click the Configure icon in the Backup Plan Status column.
- On the side panel, find the plan you want to clone, then click the clone icon.

- Specify the name of the plan clone.
- Click Save.
Delete Backup Plan
To Delete the Existing Backup Plan
- Open Backup > Computers.
- Find the required computer, then click the Configure icon in the Backup Plan Status column.
- On the side panel, find the plan you want to delete, then click the deletion icon.

- In the dialog box, click OK to confirm the deletion.