Restore Image-Based Backup as EC2 Instance in Management Console
This functionality requires the Restore to EC2/Azure license.
The Management Console offers cloud restore functionality that enables restoring disk image backups as Amazon EC2 instances.
The Restore as EC2 Instance feature is currently provided as-is and enabled by request only. Due to limitations imposed by AWS/Azure and the unique characteristics of each cloud provider, we do not have complete control over the system stability and performance in all scenarios. If you intend to utilize this feature for real disaster recovery restores, we strongly recommend conducting thorough testing beforehand. Make sure you verify its functionality in your environment, specifically under presumed disaster recovery scenarios, and ensure that the results align with your and your customers' Recovery Time Objectives (RTO) before initiating the production restore.
Note that the procedure varies depending on the type of data source (disk image backup or VM snapshot).
This chapter describes the disk image restore as an EC2 instance in the Management Console, including preparation and related technical details.
Before You Begin
This procedure is based on the AWS VM Import/Export ability. It requires IAM permissions for EC2 operations for the AWS credentials or AWS IAM role used. There is no need to allow all EC2 actions: the scope of the needed permissions can be configured using the Policy Designer.
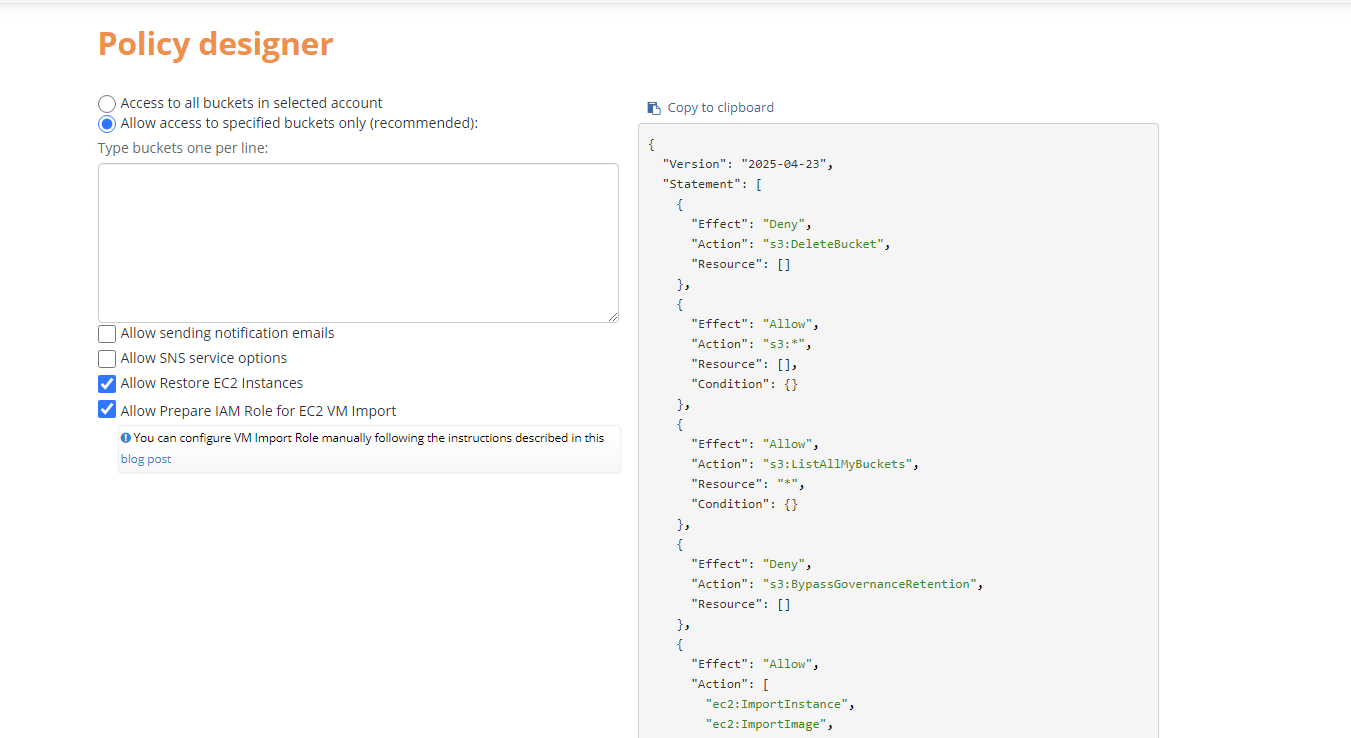
When adding a new S3 Account, we strongly recommend that you use an IAM role with a policy that grants the minimum permissions required for the proper functioning of MSP360 (CloudBerry) Backup.
The IAM role should have the following permissions to be able to successfully use EC2 services:
- ImportInstance
- ImportImage
- DescribeInstances
- MonitorInstances
- RequestSpotInstances
- RunInstances
- StartInstances
- TerminateInstances
- ModifyInstanceAttribute
- CreateTags
- CancelImportTask
- StartInstances
- DescribeConversionTasks
- DescribeImportImageTasks
- ImportVolume
- DescribeAvailabilityZones
- DescribeSecurityGroups
- DescribeSubnets
- StopInstances
- DescribeKeyPairs
- ImportSnapshot
- DescribeImportSnapshotTasks
- CreateVolume
- DescribeImages
You can use MSP360 (CloudBerry) Explorer to create an IAM role and grant it the required permissions, or manually create a new user role using the AWS Management Console. See the following articles for more information:
- How to Use an External ID When Granting Access to Your AWS Resources to a Third Party
- How To Setup a VMimport Role
The special vmimport role must be created in the AWS account before the import starts. This allows the AWS import service to access the customer's data. This role is one for all the AWS accounts and regardless of
To create the AMI (Amazon Machine Image), you need to configure an IAM role that has the required permissions to perform actions within EC2 (recommended). Alternatively, you have to configure a specific vmimport role.
Note: With the Create AMI (Amazon Machine Image) option, you can restore desktop operating systems only.
Without the Create AMI (Amazon Machine Image) option, you will have a restored EC2 instance, but there will be no image on Amazon. For the restored EC2 instance, you will have to configure a public IP address (Elastic IP) manually in the AWS EC2 Management Console.
Create a Restore Plan
- Open the Management Console.
- In the Backup menu, select Restore to Cloud.
- Click the Amazon EC2 Restore option.
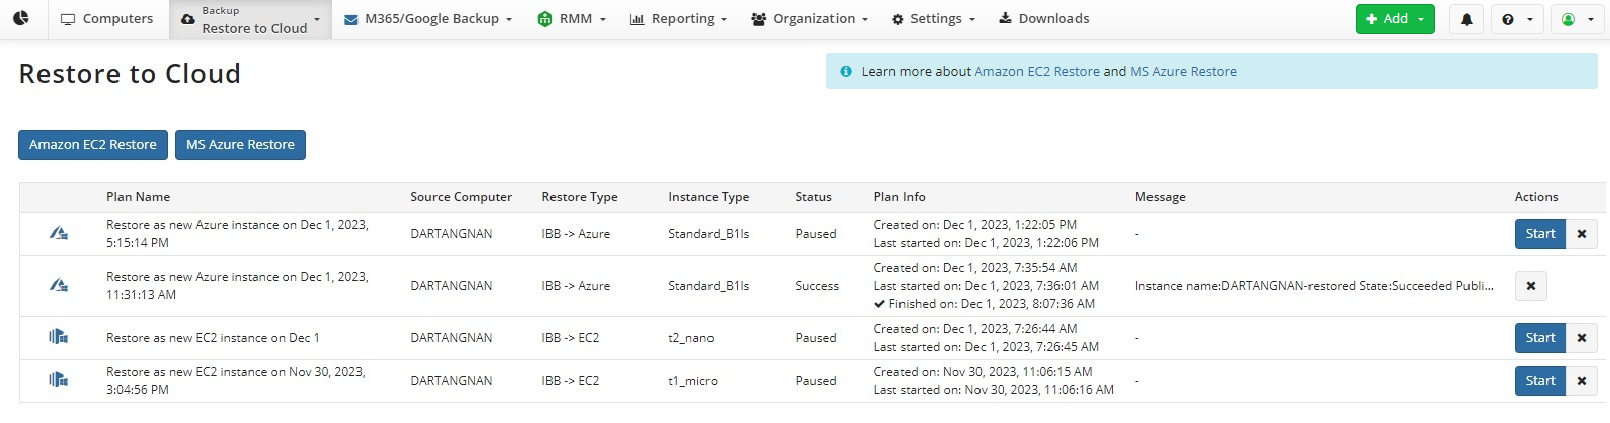
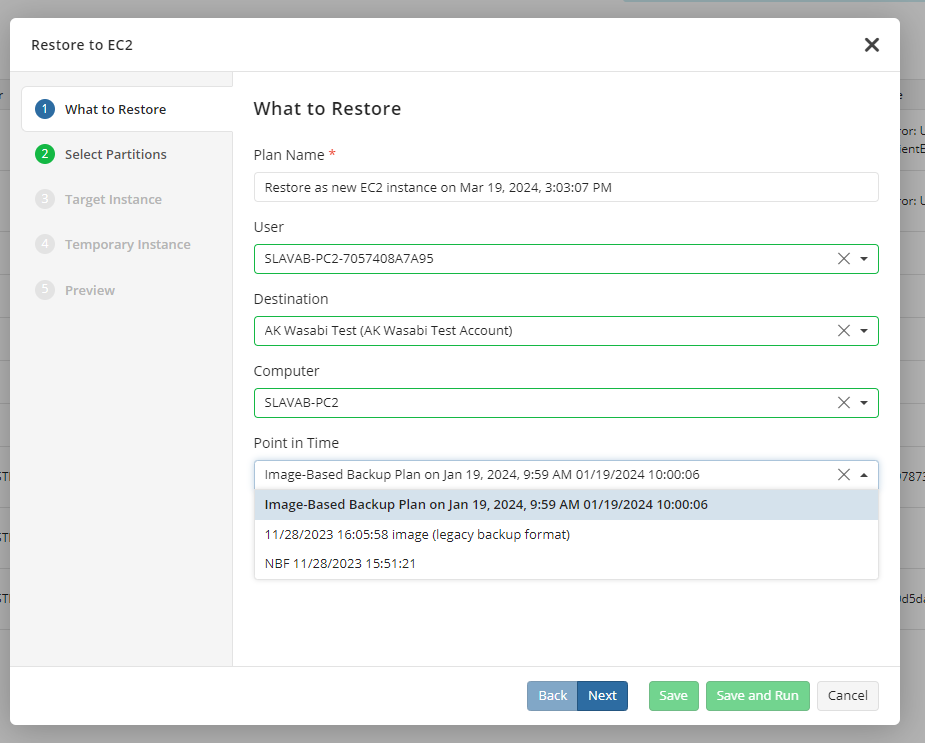
- As the restore wizard opens, specify the data source parameters:
- Plan Name. The plan name is displayed on the Restore to cloud dashboard.
- User. Select the user with backup data (disk image) to restore.
- Destination. Select the backup destination that contains the required backup data.
- Computer. Select the computer (prefix) containing the data to be restored.
- Point in Time. Select the backup version that is to be restored.
Note that for the following backup destinations: any local or shared folders, LAN-only Minio, FTP, SFTP, S3-Compatible, and OpenStack applications for NAS, intranet OpenStack clusters, restore via a temporary instance is impossible.
Click Next.
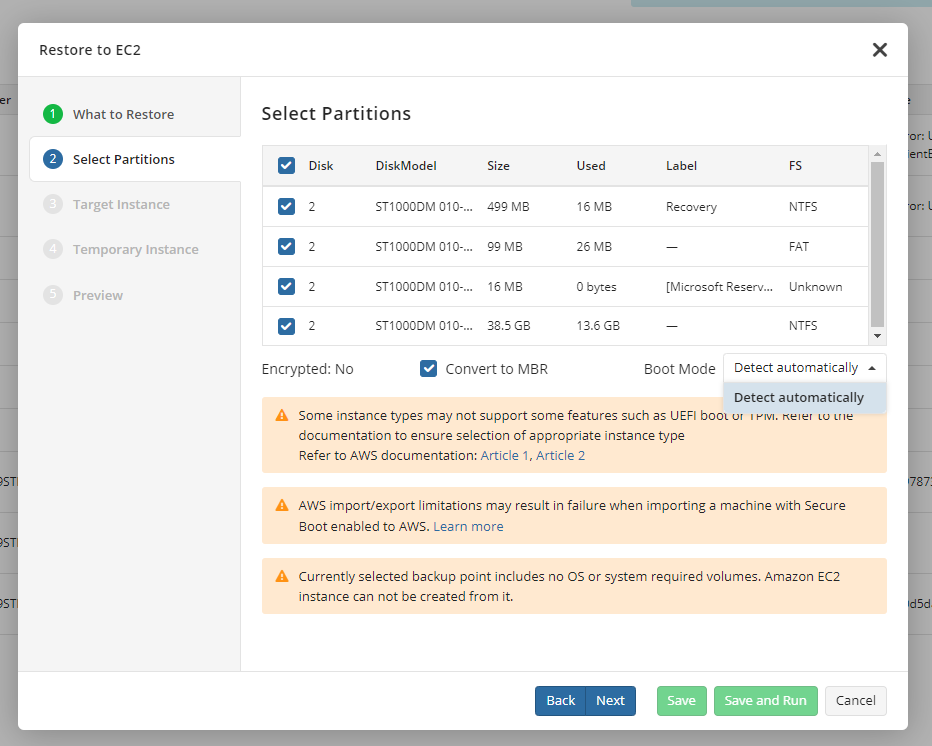
Specify the disk partitions to restore. Once you are done, click Next.
- GPT
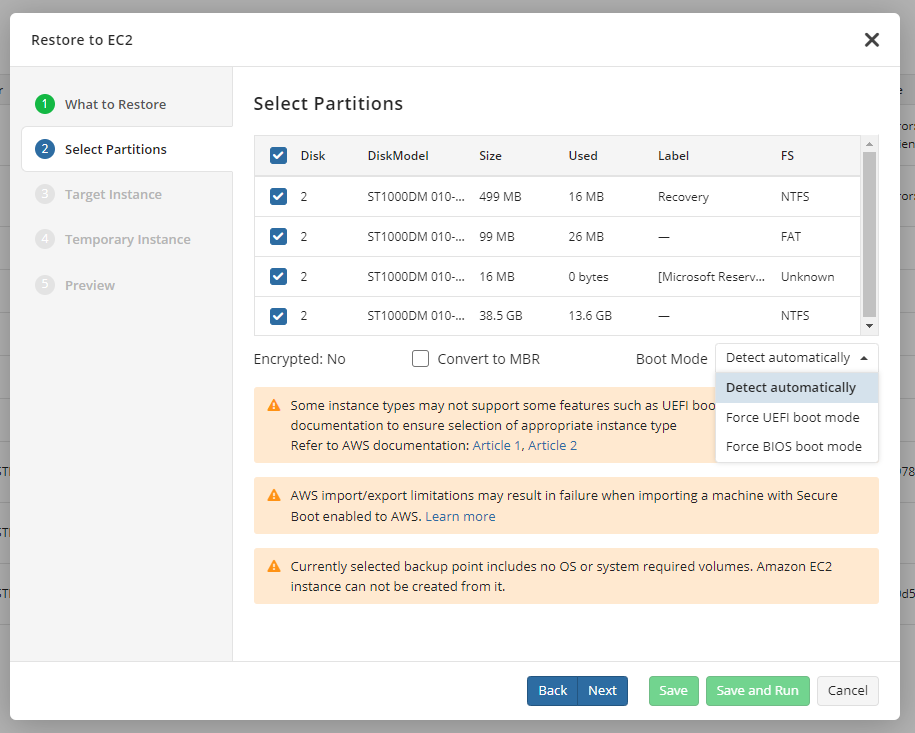
* Convert to MBR enabled
- Specify the target instance parameters:
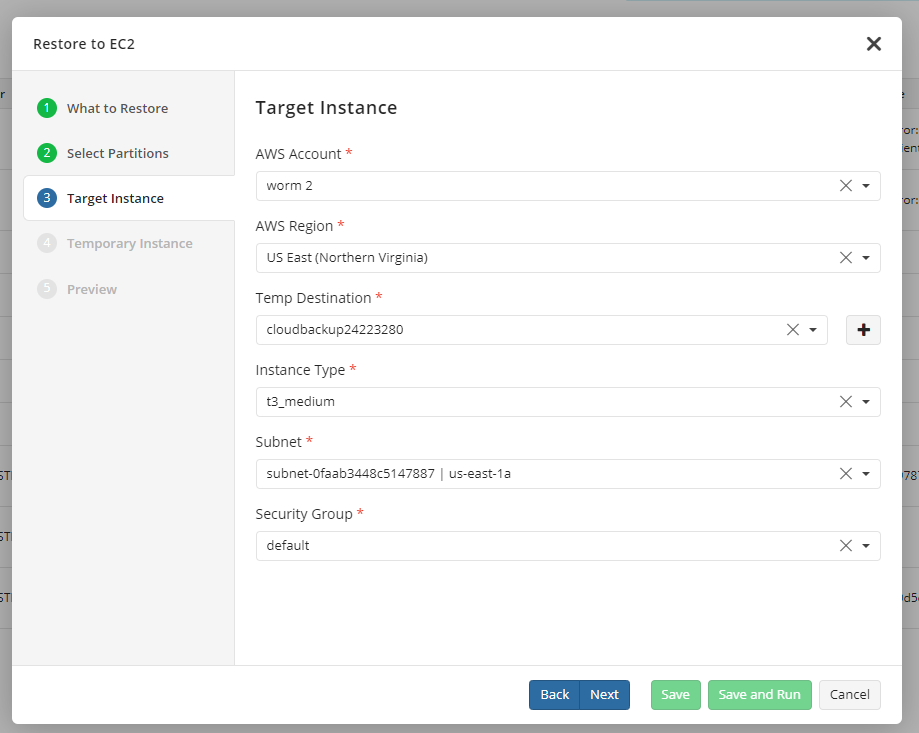
* **AWS Account**. The account under which a new EC2 instance will be stored.
* **AWS Region**. The region that is to store the newly created EC2 instance.
* **Temp Destination**. Storage destination to store the temporary disk for VM import. Use + to create a new bucket, if necessary.
* **Instance Type**. The type of instance required. Learn more about EC2 instance types [here](https://aws.amazon.com/ec2/instance-types/).
* **Subnet**. Select one of the subnets available. Learn more about EC2 subnets [here](https://docs.aws.amazon.com/vpc/latest/userguide/VPC_Subnets.html).
* **Security Group**. Select the default security group or the custom one you created yourself.
Click Next.
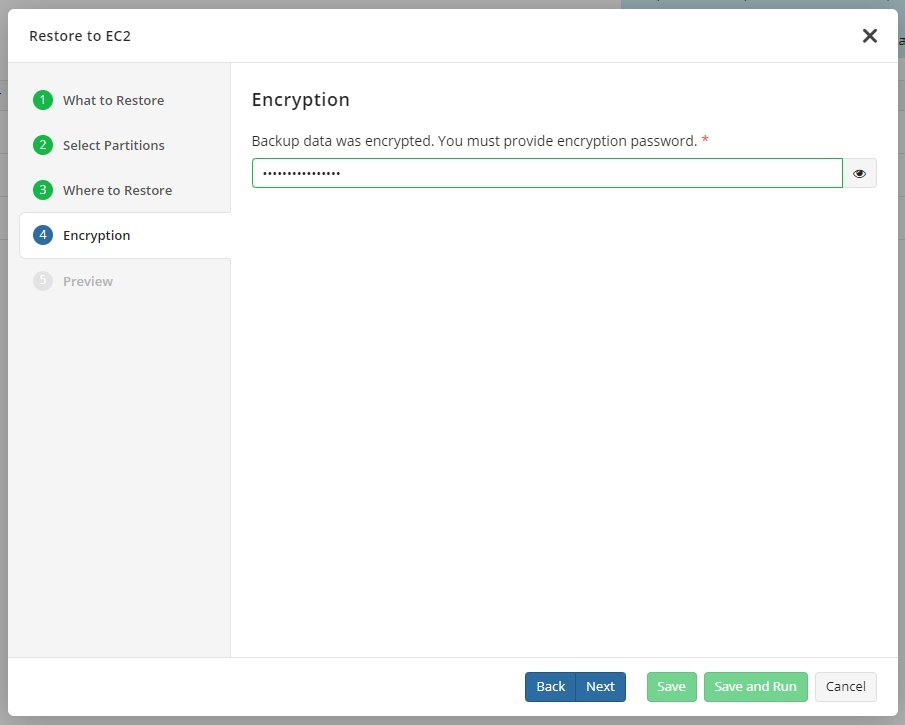
- Specify the encryption password if you have encrypted objects. Note that there is no password validation at this step. If the password is wrong, the restore will fail.
- Specify the temporary instance parameters:
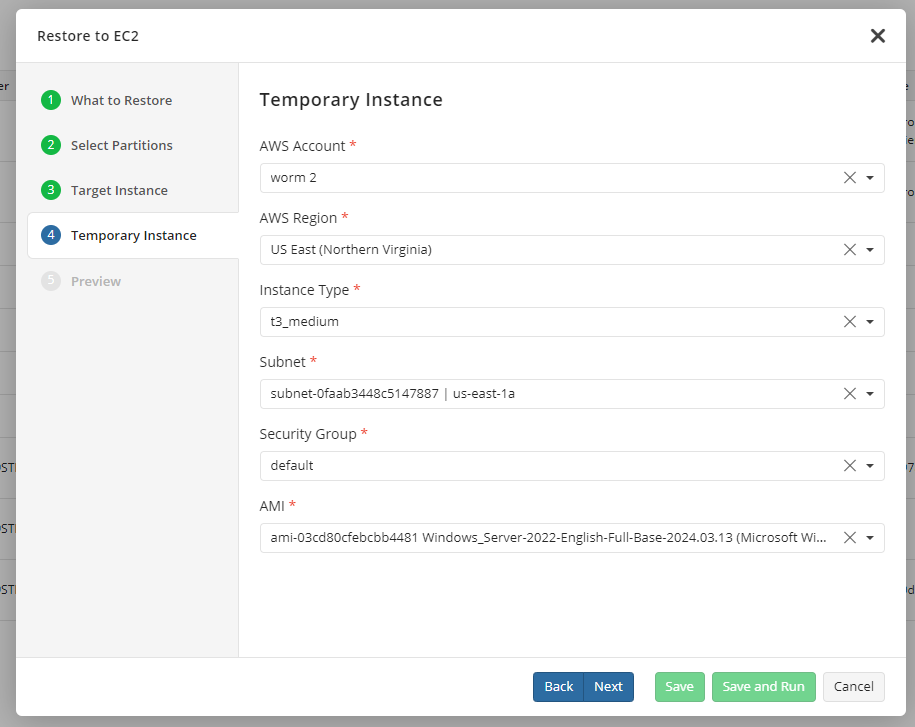
* **AWS Account**. The account under which a new EC2 instance will be stored.
* **AWS Region**. The region that is to store the newly created EC2 instance.
* **Temp Destination**. Storage destination to store the temporary disk for VM import. Use + to create a new bucket, if necessary.
* **Instance Type**. The type of instance required. Learn more about EC2 instance types [here](https://aws.amazon.com/ec2/instance-types/).
* **Subnet**. Select one of the subnets available. Learn more about EC2 subnets [here](https://docs.aws.amazon.com/vpc/latest/userguide/VPC_Subnets.html).
* **Security Group**. Select the default security group or the custom one you created yourself.
* **AMI**. AMI (Amazon Machine Image) allows you to create an Amazon machine image (based on your image backup configuration) in addition to a restored EC2 instance. The restored EC2 instance will run automatically, and it will have a public IP address. The created Amazon machine image can be used for setting up other EC2 instances in the future. You can find Amazon machine images in the IMAGES section of the AWS EC2 Management Console.
- Review all settings specified across the restore wizard and ensure that they are accurate. Click Save and Run to execute the restore to an EC2 instance.
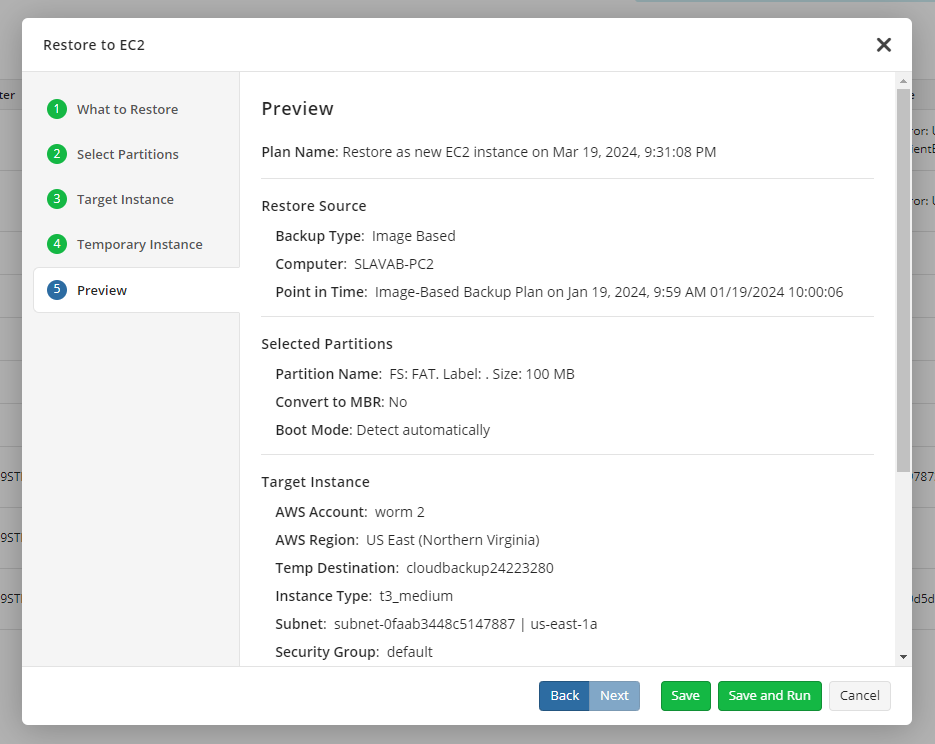
If you click Save, the plan will be saved on the main dashboard, from where you'll be able to execute it manually.
Restore Progress
During plan execution, you can follow the progress on the Restore to cloud dashboard.
Manage EC2 Instance
You can access and manage the instance from the Amazon web console.
If you have Backup or Restore Agent on the restored EC2 instance, you can also use the Remote Management or Backup > Computers tab in the same way you usually manage your regular computers.