File Backup (legacy)
Managed Backup provides the ability to back up specific files and folders on your users' computers using remote management tools.
This chapter covers the following topics:
- File-Level Backup Plan Overview
- Create New File-Level Backup Plan
- Run the Backup Plan
- Edit the Backup Plan
- Clone the Backup Plan
- Delete the Backup Plan
File Backup Overview
Features:
- Local and network files
- Block-level backup
- Back up NTFS permissions (Windows only)
- Advanced file filter
- Compression and Encryption
- Retention Policy
- Filename encryption
- Pre/post-backup actions
File backup is supported for:
- Windows: Windows Server 2008/2008 R2/2012/2012 R2/2016/2019, Windows 7/8/10/11
- Linux: Ubuntu 12/14/16/17/18, Debian 7.11/8.10/9.3, SUSE Enterprise 11/12, openSUSE 42.2/42.3, Red Hat 6.x/7.x, Fedora 25/26/27, CentOS 6.x/7.x, Oracle Linux 6.x/7.x, Amazon Linux 2
- macOS: macOS 10.8 or later
Required License: Any (To learn more, refer to Backup Agent License Types)
Create New File-Level Backup Plan
- Open the Management Console.
- In the Computers menu, select Remote Management if you use the legacy main menu, or open the Backup > Computers page in the new main menu.
- Find the required computer, then click the Configure icon in the Backup Plan Status column.
- On the side panel, click + or +Add New Plan.
- In the drop-down menu, select Files Backup Plan (Legacy).
- Once you are finished with the plan settings, click Save.
Plan Name
Name the backup plan and specify whether you want the backup plan configuration to be saved in backup storage. This may be needed if you want to restore the backup plan configuration on another instance. If having the configuration on the user computer and in the Management Console is enough, leave the Save backup plan configuration to the backup storage check box unselected.
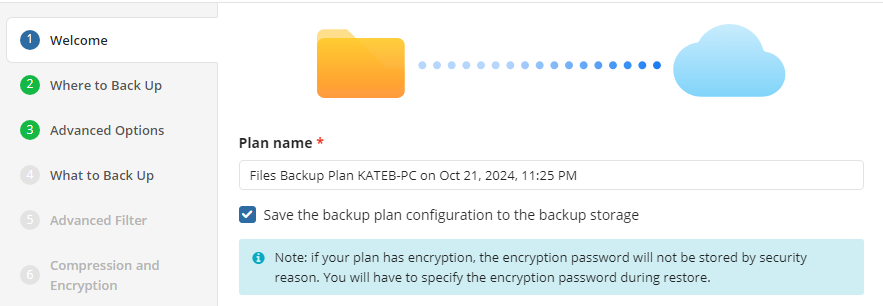
Click Next to proceed.
Where to Back Up
Select a target backup storage for the backup plan. If no storage accounts are available, create a new one. Refer to Add New Storage Account to learn how to do it.
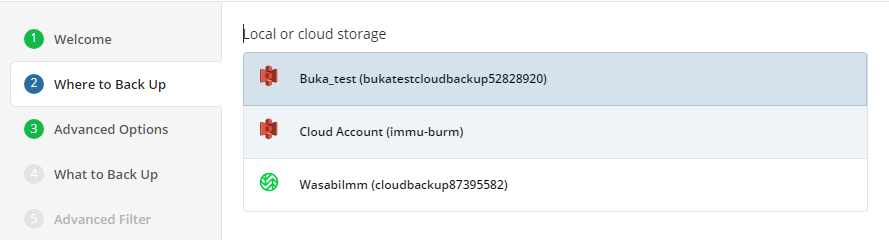
Once you have selected the backup storage, click Next.
Advanced Options
By default, advanced options are skipped for the backup plan. You should enable them if necessary (not recommended).
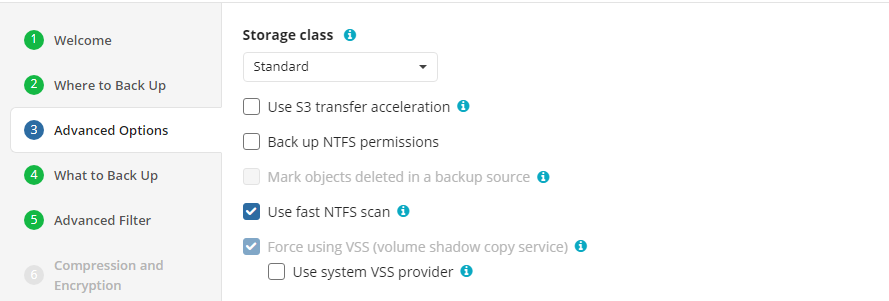
The Back up NTFS permissions, Mark objects deleted in a backup source, and File name encryption advanced options are no longer available. These options are still valid for the existing plans, but if these plans are edited, these advanced options are no longer available.
Use fast NTFS scan. Select this check box to enable the MSP360 proprietary file scanning and search mechanism. This mechanism is based on file tree generation, which allows faster data reading and a faster backup procedure. It is not recommended to enable this feature for small numbers of files and folders to back up.
Use system VSS provider. Select this check box if you experience issues with a third-party VSS provider. Once the backup plan is run, Backup Agent will use the system VSS provider forcibly.
Particular Options for Amazon S3
If your backup storage destination is Amazon S3, the following particular options are available in this step.
Use S3 Transfer Acceleration. Use this option to accelerate file transfer for an extra fee. The target bucket must have this feature enabled.
Select the S3 storage class for the backup plan:
Using different storage classes for different backup needs helps you optimize your storage costs.
Learn more about Amazon S3 storage classes here.
Particular Options for Microsoft Azure
If your backup storage destination is Microsoft Azure, select the required Azure Blob Storage.
The following options are available:
- Archive Blob Storage. This is a low-cost storage option for infrequently accessed data. As opposed to hot and cool storage tiers, retrieving data from Archive Blob Storage may take up to several hours
- Cool Blob Storage. The cool storage tier has lower storage costs and higher access costs compared to hot storage. This tier is intended for data that will remain in the cool tier for at least 30 days.
Note that this feature is only supported for General Purpose v2 Azure accounts. If you are using another kind of account, you need to upgrade your account to be able to use this feature.
Be aware of the additional charges and increased blob access rates after upgrading your Azure account.
To learn more about the difference between Azure storage tiers, refer to the Azure Blob Storage - Hot, cool, and archive storage tiers article at docs.microsoft.com.
What to Back Up
Specify files and folders to be included in the backup plan.
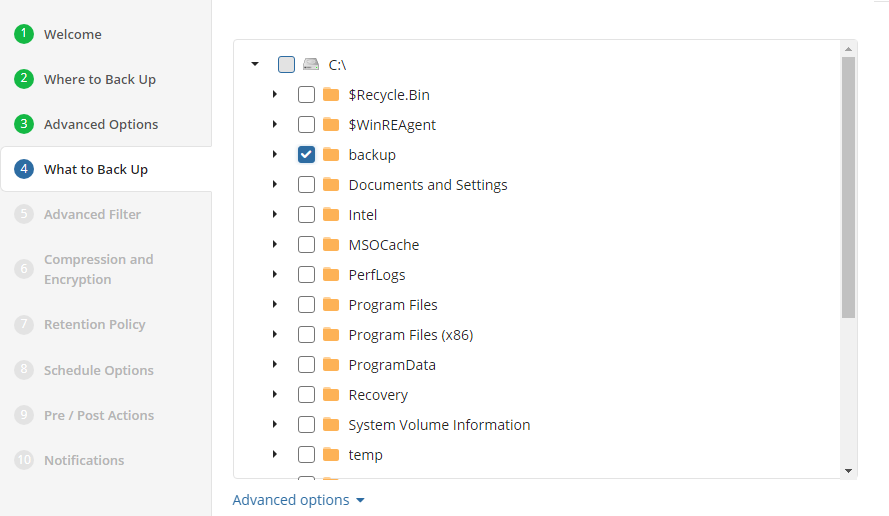
You can use Advanced options to add a network share to include its content in the backup scope:
- Expand Advanced options and click Add network share.
- Provide the path to the network share in the following format:
\\<server name>\<share name>
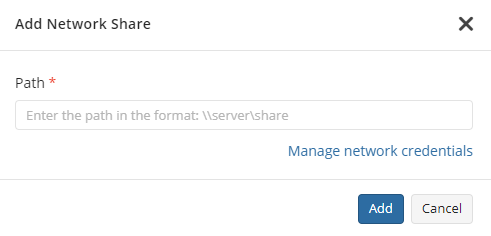
- Click Manage credentials and provide the credentials of an account with backup operator permissions on the network share.
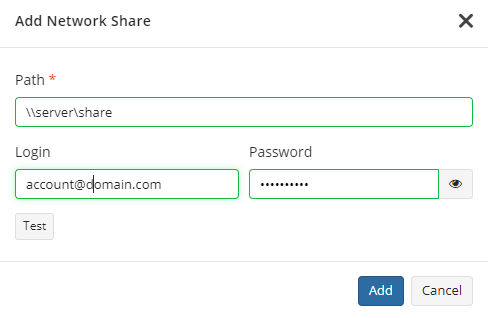
- Click Test to check whether the network share is accessible.
- Click Add.
- Select files to back up on the added network share.
Click Next.
Advanced Filter
Specify the advanced backup settings. The following settings are available:
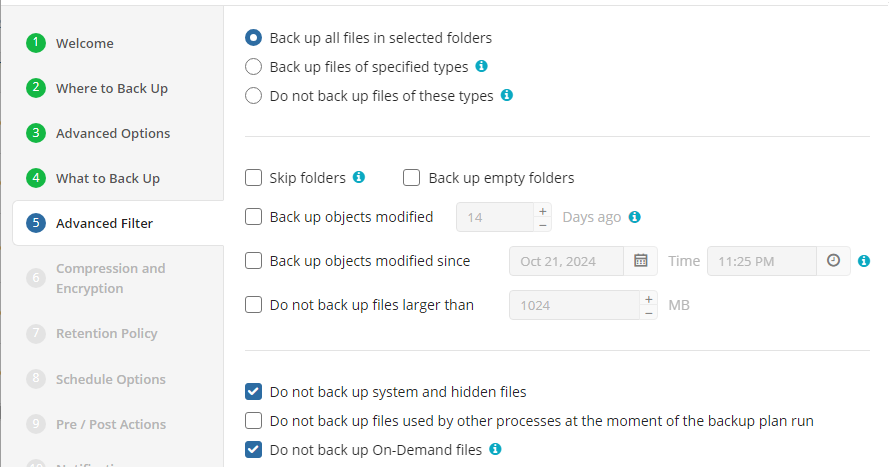
- Back up all files in selected folders. Select this option to back up all files in folders specified in the Backup Source section
- Back up files of specified types. Select this option to back up files of certain types. The file type is detected by the file extension. In the field below, specify the required file extensions
- Do not back up files of these types. Select this option to exclude files of certain types from the backup plan. The file type is detected by the file extension. In the field below, specify the required file extensions
- Skip folders. In this field, specify folders to be excluded from the backup plan. Separate them with semicolons
- Back up empty folders. Select this check box to include empty folders in the backup plan
- Back up files modified (days ago). Select this check box if you want to back up files modified on a specific day. In the field below, specify the number of days from the last modification
- Back up files modified since. Select this check box if you want to include in the backup plan all files that have been modified after a point in time. In the fields below, specify the date and the time of file modification
- Do not back up files larger than (MB). Select this check box to limit the size of files for the backup plan. In the field below, specify the maximum file size
- Do not back up system and hidden files. Select this option to exclude files that have 'system' and/or 'hidden' attributes from the backup plan. Refer to System and Hidden Files Backup for details
- Do not back up files used by other processes at the moment of the backup plan run. Select this check box if you want to exclude from the backup plan files that will be opened at the moment of the backup plan run
- Do not back up On-Demand files (selected by default). Select this check box to exclude On-Demand files from the backup plan. Refer to OneDrive Backup if you want to add this type of On-Demand files to backup
To learn more about On-Demand files, refer to the OneDrive Files On-Demand For The Enterprise article at techcommunity.microsoft.com.
Click Next.
Compression and Encryption Options
Specify compression and encryption options for the backup plan.
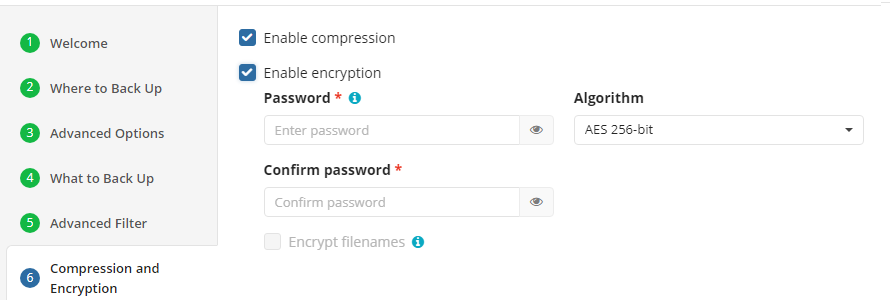
The following options are available:
- Select the Enable compression check box to compress backup contents to reduce the backup size on storage
- To protect your backup contents with encryption, select the Enable encryption check box. The following AES encryption bit key lengths are supported: 128, 192, and 256. Select the appropriate key length in the Algorithm drop-down menu
- Specify a strong encryption password in the Password field, then confirm the password in the Confirm field.
- Select the Encrypt filenames check box to encrypt your backup source filenames along with their contents
Note that detailed reporting is not available when the Encrypt Filenames option is enabled.
Note that the encryption password will not be stored in the backup plan configuration for security reasons. Keep this password in a safe place to be able to restore the backup contents afterward.
Click Next.
Retention Policy
Specify the retention policy for the backup plan.
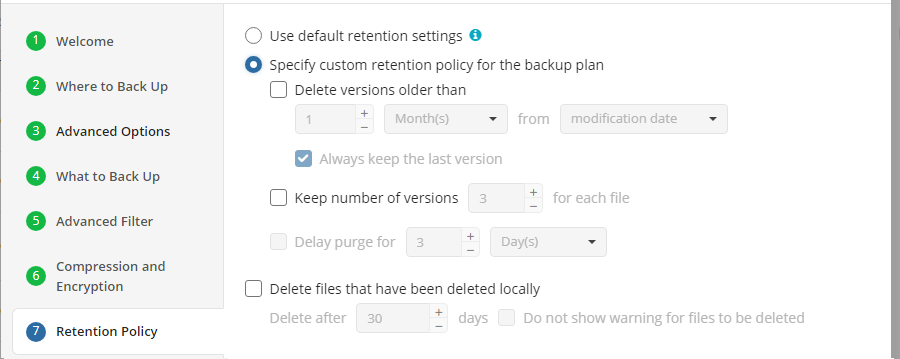
The following options are available:
- Use default retention settings. Select this option to apply the default retention policy settings. You can see them below, but you cannot edit them if this option is selected
- Specify custom retention policy for backup plan. Select this option if you want to customize the retention policy settings for this backup plan
- Delete versions older than. Select this check box if you want to keep a limited number of file versions in backup storage. In the fields below, specify the criteria for the deletion of old file versions
- Always keep the last version. Select this check box if you want to keep the last file version in backup storage regardless of whether it is deleted in a backup source. It is highly recommended to keep this check box selected for backup plans with sensitive data
- Keep number of versions (for each file). Select this check box to specify the number of file versions to be kept in backup storage, then specify the number of versions
- Delay purge for. Select this option if you want to keep objects in backup storage after you delete them in a backup source, then specify the delay period
- Delete files that have been deleted locally. Select this option if you want to delete an object from backup storage after it is deleted in a backup source. Then specify the period after which objects will be deleted automatically.
- Do not show warning for files to be deleted. Select this option to avoid file deletion warnings
If your backup plan is a hybrid one, you can specify a custom retention policy for the local backup. To do this, select the Use different retention policy for local backup check box.
Note that if you specify Delete versions older than and Keep number of versions (for each file) in one retention policy, file versions will be deleted according to any of the specified conditions.
Thus, if a file version is outdated by the file age criteria, this will override the Keep number of versions (for each file) setting, and the version will be deleted even if there are fewer file versions than specified in this field.
If the file version is not outdated by the file age criteria, but there are more versions than specified in the Keep number of versions (for each file) field, the file version will be deleted as well.
To learn more about the retention policy, refer to the Retention Policy chapter.
Click Next.
Schedule Options
Specify the backup plan schedule settings.
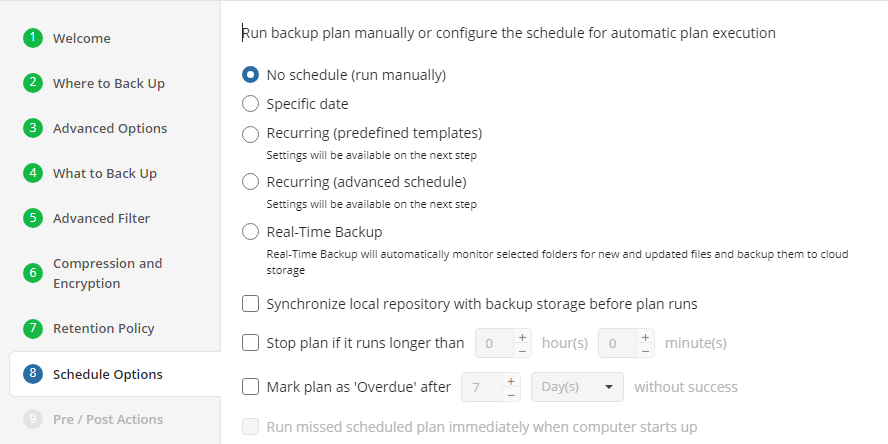
The following options are available:
- If you intend to run the backup plan manually, select the No schedule option
- If you intend the backup plan to run on a particular date and time, select the Specific date option, then specify the date and time you want your backup plan to be run
- If you want the backup plan to run on a constant periodic basis, select the Recurring (predefined templates) option or the Recurring (advanced) option
- To stop the backup plan if it runs suspiciously long, select the Stop the plan if it runs for check box, then specify the backup plan maximum duration
- To mark the plan as overdue if the backup plan takes more time than the last successful backup, select the Alert plan as overdue after check box, then specify the time interval.
- Select the Run missed scheduled plan immediately when computer starts up option to run the plan that was not executed while the computer was down
Click Next.
Simple Schedule Options
The Simple Recurring Options step helps you to configure backup frequency:
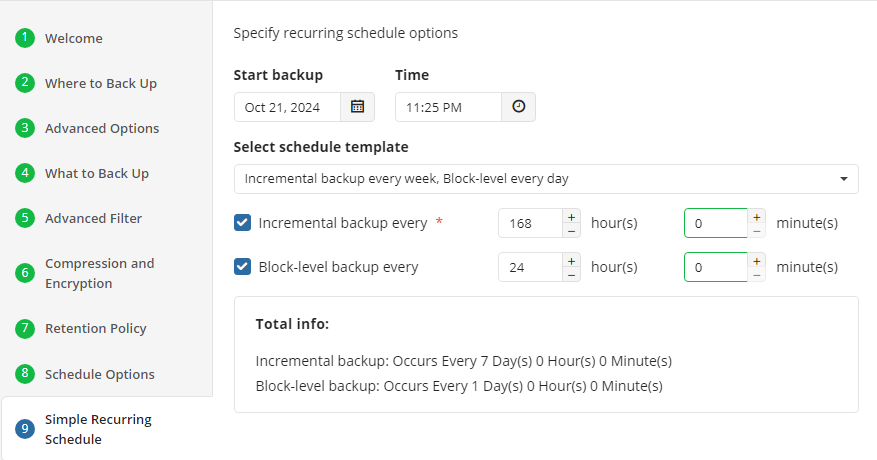
Click Next.
Advanced Schedule Options
The Advanced Schedule step helps you to customize backup frequency flexibly:
- Enable the frequency for the selected backup type and configure the schedule. You can use the predefined settings or change them.
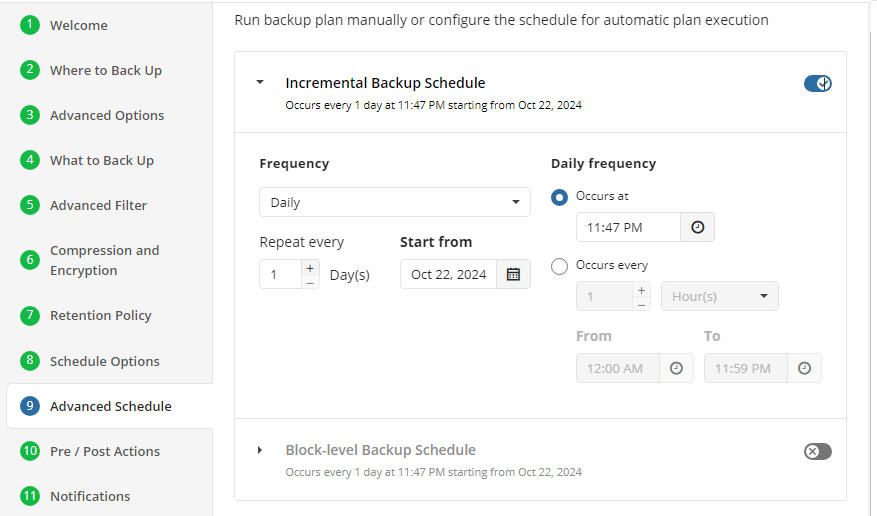
Click Next.
Pre / Post Actions
Specify pre- and post-actions for your backup plan. Usually, these are scripts that perform particular jobs before or after your data is backed up. The following settings are available:
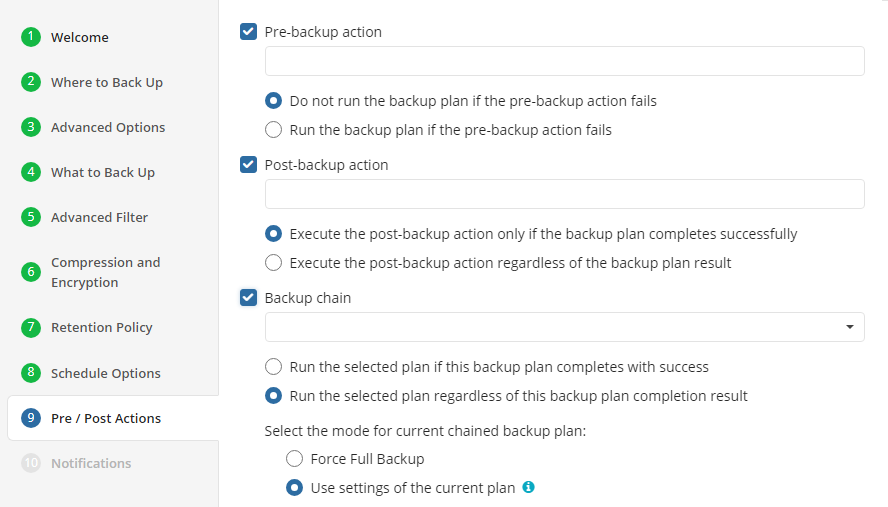
- To specify the action that will be performed before the backup plan starts, select the Pre-backup action check box.
- Specify the path to the script to be run as a pre-backup action.
- Specify the conditions of the pre-action run:
- Select the Do not run the backup plan if the pre-backup action fails option if you do not want the backup plan to be launched if the pre-backup action fails.
- Select the Run the backup plan if the pre-backup action fails option if you want the backup plan to be launched regardless of the pre-backup action result.
- To specify the action that will be performed after the backup is completed, select the Post-backup action check box.
- Select the Execute the post-backup action only if the backup plan completes successfully option if you want to run it only if the backup was executed without any errors or warnings.
- Select the Execute the post-backup action regardless of the backup plan result option if you want the post-action to be launched regardless of the backup termination results.
- To chain the backup plan with another plan, select the Backup chain check box, then select the plan name in the drop-down menu.
- Select the Run the selected plan if this backup plan completes with success option if you want to run the specified plan only if the backup plan was executed without any errors or warnings.
- Select the Run the selected plan regardless of this backup plan completion result option if you want the chained backup plan to be launched regardless of the backup termination results. Select the mode for the current chained backup plan:
- Force full backup.
- Use settings of the current plan.
Click Next.
Notification (macOS, Linux)
Specify notification settings. You can use the default settings or customize them.
Select the Specified Email check box to add stakeholder notification details. You can specify one or more email recipients. Separate them with a semicolon or a comma, and specify the recipient name (one for all of them). The email subject can also contain any of the following variables:
- %COMPUTER_NAME%. Displays the instance name on which the backup plan was executed
- %RESULT%. Displays the result of the backup plan. Possible values: Success, Finished with warnings, Failed
- %PLAN_NAME%. Displays the name of the backup plan.
You are about to create a file backup plan. You can return to review the configuration of the backup plan, if necessary. Click Next.
Notifications (Windows)
Specify notification settings for backup plan results. You can use the company notification settings or customize them as needed. You can specify the required recipients and customize the notifications for different backup plan results:
- Success
- Warning
- Failed
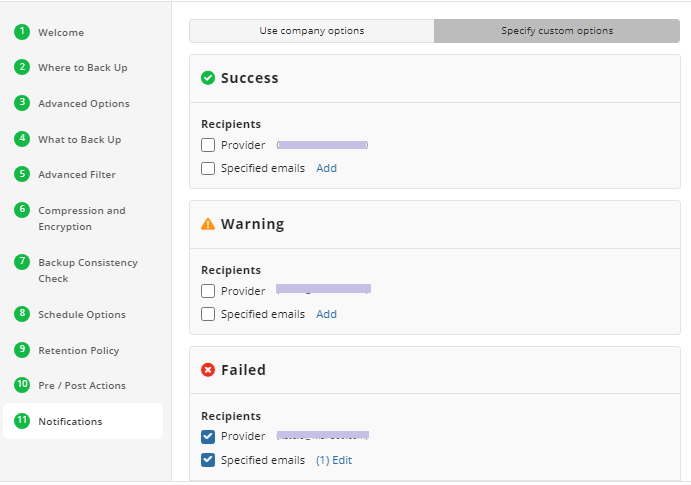
You can configure a notification threshold for Managed Backup alerts, so that notifications are sent only after a specified number of consecutive plan failures.
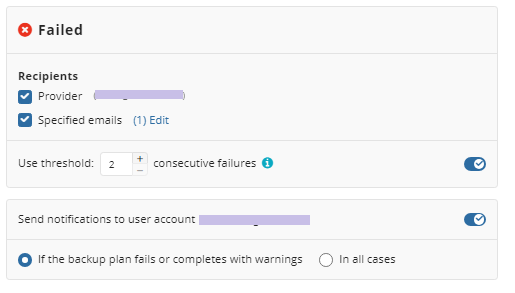
If you choose to customize notifications, select the recipients for different events.
- Select Send notifications to user account... if you want to notify the associated user about the backup process.
- Select the If the backup plan fails or completes with warnings option if you want to receive the notification message if the backup plan fails
- Select the In all cases option if you want the entry to be put in the Windows Event Log in any case.
If you want the backup plan record to be added to the Windows Event Log, select the Add entry to Windows Event Log when backup completes check box.
- Select the When backup fails option if you want to receive the notification message if the backup plan fails
- Select the In all cases option if you want the entry to be put in the Windows Event Log in any case.
Click Next, then click Save to finish the wizard.
Finishing the Wizard
Click Save to finish the wizard.
This backup plan will be started automatically if scheduled, or you can start it manually. The backup agent service can work in the background, but the machine where the agent is installed should be running. It is not necessary to run the backup agent to execute the backup job as scheduled.
Run Backup Plan
To Run the Existing Backup Plan:
- Open Backup > Computers.
- Find the required computer, then click the Configure icon in the Backup Plan Status column.
- On the side panel, navigate to the Backup Plans (Beta) tab.
- Find the plan to run.
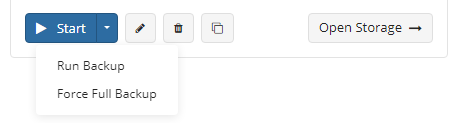
- Click the Start button to run the backup plan. You can expand this control to use the available options:
- Run Backup
- Force Full Backup
Edit Backup Plan
To Edit the Existing Backup Plan
- Open Backup > Computers.
- Find the required computer, then click the Configure icon in the Backup Plan Status column.
- On the side panel, find the plan you want to edit, then click the edit icon.

- Once you have made the required changes, click Save.
Clone Backup Plan
To Clone the Existing Backup Plan
- Open Backup > Computers.
- Find the required computer, then click the Configure icon in the Backup Plan Status column.
- On the side panel, find the plan you want to clone, then click the clone icon.

- Specify the name of the plan clone.
- Click Save.
Delete Backup Plan
To Delete the Existing Backup Plan
- Open Backup > Computers.
- Find the required computer, then click the Configure icon in the Backup Plan Status column.
- On the side panel, find the plan you want to delete, then click the deletion icon.

- In the dialog box, click OK to confirm the deletion.