VMware Backup Plan
This chapter covers the following topics:
- Create VMware Backup Plan
- Run Backup Plan
- Force Full Backup
- Edit Backup Plan
- Clone Backup Plan
- Delete Backup Plan
Create VMware Backup Plan
Step 1
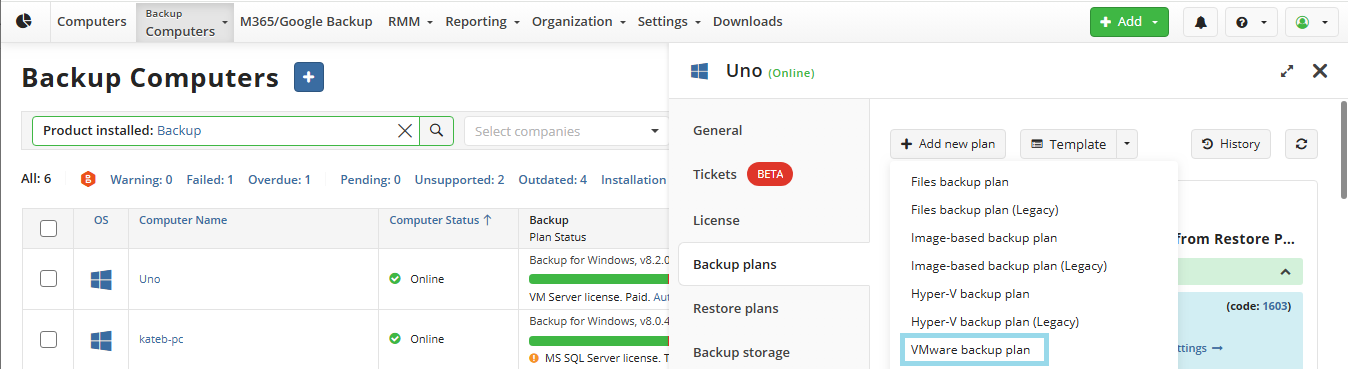
Open Backup > Computers in the Management Console.

Step 2
Locate the computer you wish to backup from the list and open the current list of plans by either clicking on the name of the computer, or the Configure icon in the Backup Plan Status column.
To create a new VMWare Backup Plan, click on “Add New Plan” then click on “VMWare backup plan”
Step 3
The first step when creating a new VMware backup plan is to give the plan a name.
It is recommended to use a descriptive name which will distinguish the backup from others
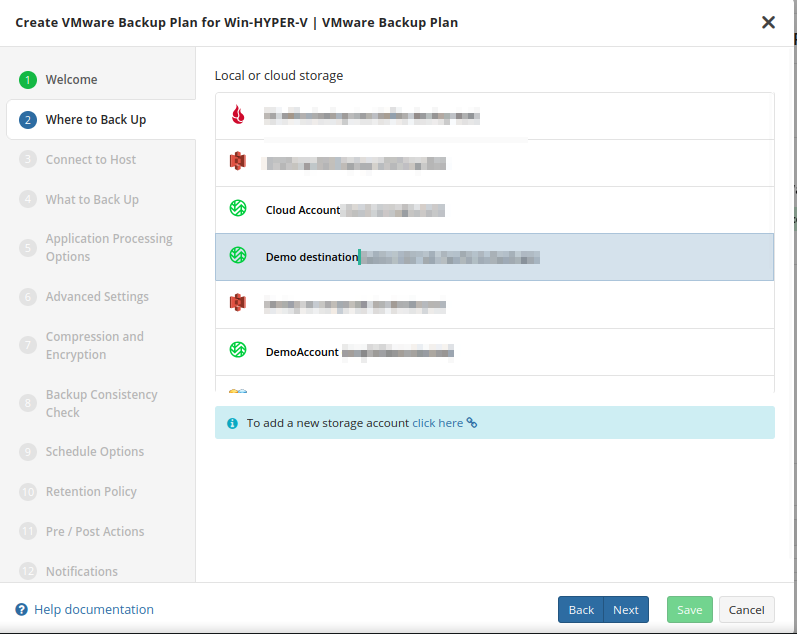
Step 4
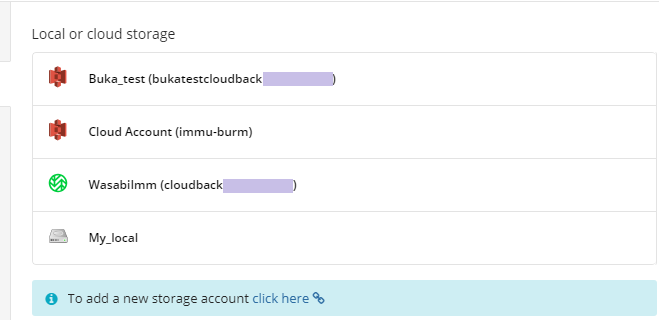
In the next section, you are prompted to select the backup destination.
Step 5
Connect to the vCenter or ESXi by using the FQDN or IP address.
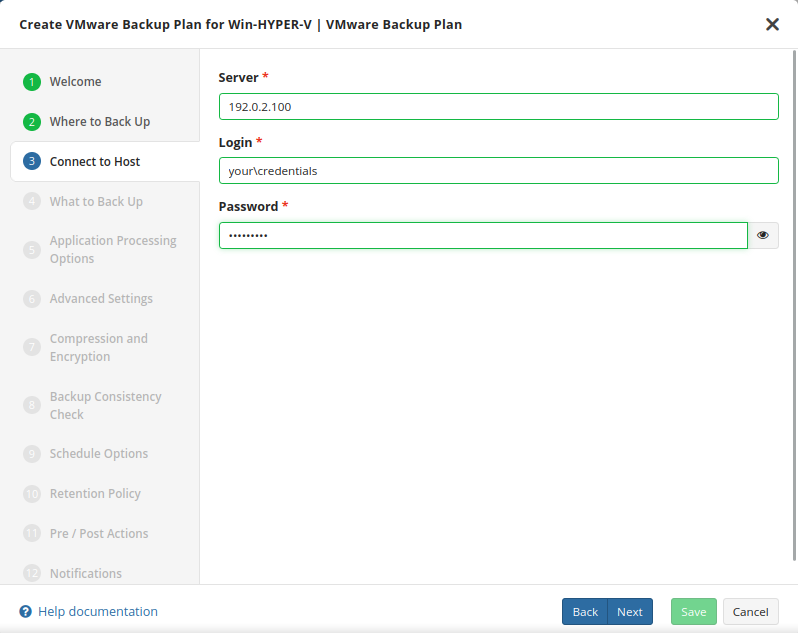
It is important to determine whether FQDN or IP addresses will be used for all future plan configurations. The application will consider each to be unique hosts, even if the target machine is the same
Step 6
Next, select the virtual machines you wish to back up.
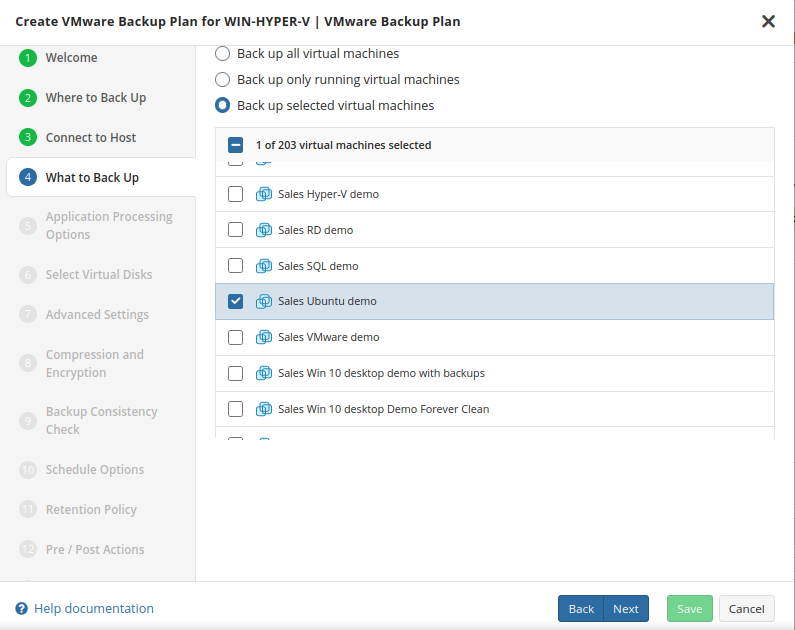
- Back up all Virtual Machines: will backup all VMs regardless of current state. This is recommended only for small environments.
- Back up only running Virtual Machines: Only backs up VMs currently in “Running” status and is recommended for clustered environments where backup servers planned for failover procedures are not required to be selected.
- Backup up selected Virtual Machines: Select which VMs to include with this plan. This allows for greater control of mixed status VMs and for larger environments where it is beneficial to split the backup into multiple plans.
Step 7
You can configure the Application processing options after the Select Virtual Machines step of the VMware backup wizard. These options can be configured separately for each virtual machine.
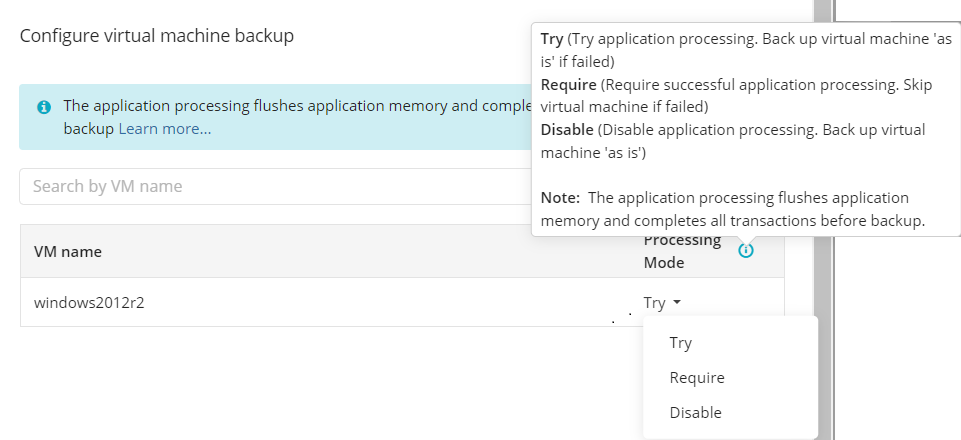
By default, the Try application processing setting is set. you can change it, if necessary.
The following options are available:
- Try application processing. Back up virtual machines 'as is' if failed. Once this option is selected, virtual machines are backed up one by one. Using the installed VMware Tools, the state of applications running on virtual machines is checked, then a snapshot is made and an application-consistent backup is performed. In case an application-consistent snapshot is not made for some reason, a regular snapshot is done for this virtual machine.
- Require successful application processing. Skip virtual machines if failed. Once this option is selected, virtual machines with applications that did not flush pending I/O operations from memory to disks, are skipped and an appropriate warning is displayed for a user.
- Disable application processing. Back up virtual machines 'as is'. Once this option is selected, regular VM snapshots are done without quiescing.
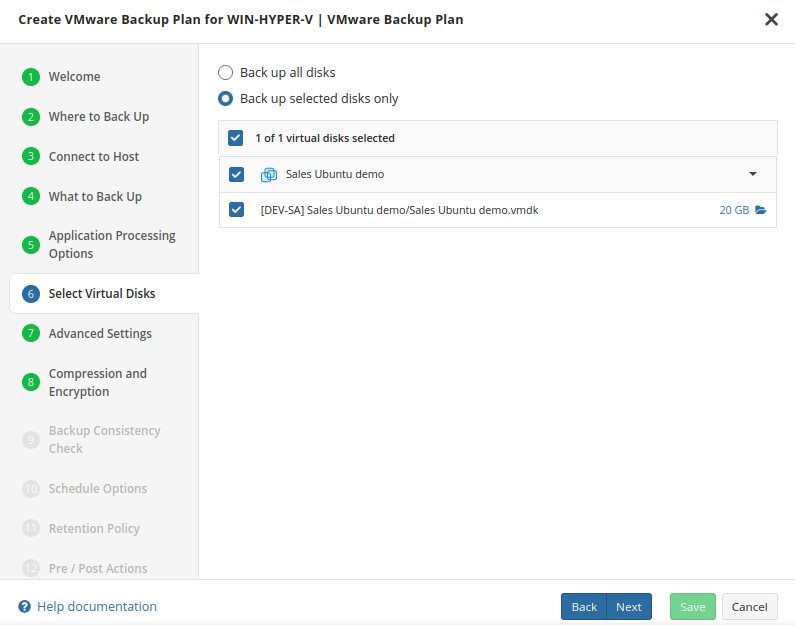
Step 8
Next you are prompted to select which virtual disks should be backed up in each VM.
Step 9
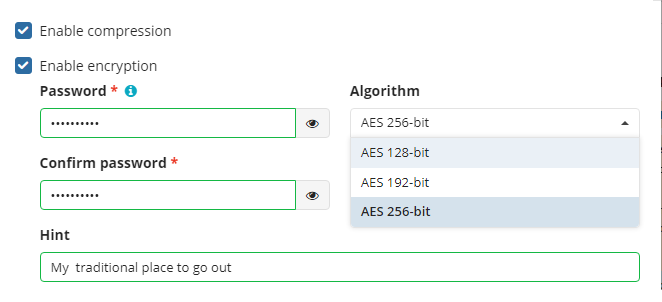
After configuring the parameters for what and how to perform the backup, you are able to set the encryption and compression options.
Compression
Managed Backup offers compression to reduce the storage space required for your backup and to speed up the upload process to the target storage.
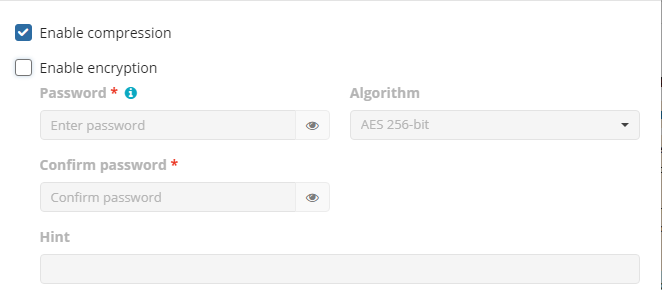
Enabling compression will reduce the size of the backup, reduce the time to upload it, both of which may decrease the cost of the backup
Encryption
You can protect your backup by encrypting its contents. Managed Backup supports AES encryption with key sizes of 128, 192, and 256 bits. A larger key size provides stronger encryption but may increase the time required for processing your backup. For more details on AES encryption, refer to the Advanced Encryption Standard.
To protect your backup contents with encryption, select the Enable encryption checkbox. Application supports AES encryption of 128, 192 and 256 bit key length. Select the appropriate key length in the Algorithm drop-down menu
- Specify the encryption password in the Password field, then confirm the password in the Confirm field. Mind to keep the encryption password in a safe place. Pay attention, if Password Recovery Service is not enabled in the Management Console, then if the encryption password is lost or forgotten, the encrypted backup cannot be restored. Password recovery Service requires the Two-factor Authentication (2FA) enabled.
- In the Hint field, specify some information that could help to recall the password in case you forget it.
If you change any encryption settings (algorithm or password) for an existing backup plan, a full backup will be executed the next time the backup plan runs.
Note that the encryption password will NOT be stored in the backup plan configuration for security reasons. Keep this password in a safe place to be able to restore the backup contents afterwards
Encrypting the backup adds an additional layer of security to the data at the expense of increased processing resources during the backup process. Several types of encryption are available, with the most secure selected by default
It is important to remember that MSP360 Support is not able to retrieve or reset the encryption password. It is recommended that you store the password in a secure place and enable the Password Recovery Service
Step 10
Select if you’re going to use the full consistency check

It is recommended that you leave Enable Full Consistency Check enabled
Step 11
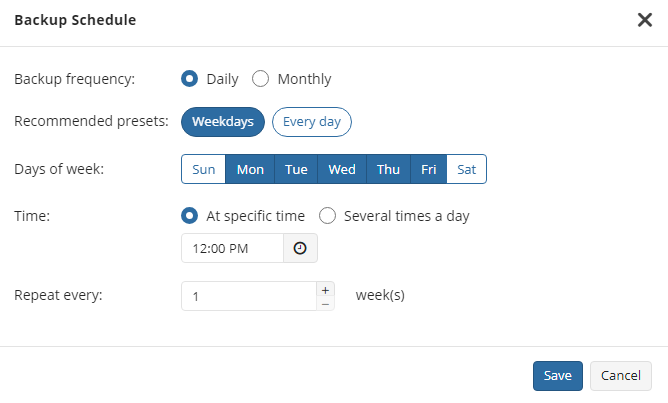
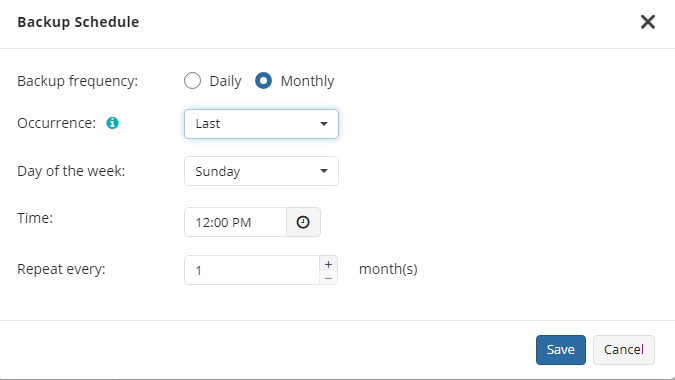
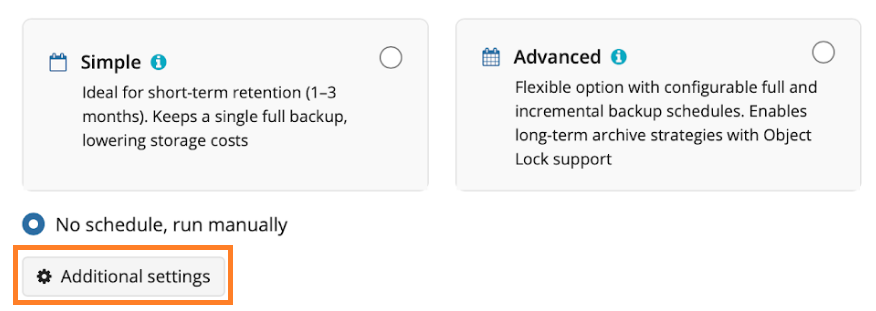
Specify the backup plan schedule settings.
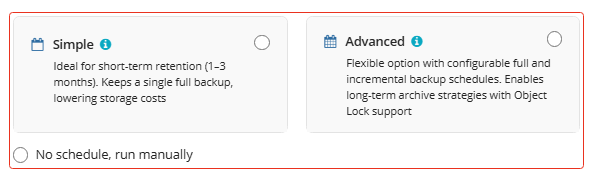
The following options are available:
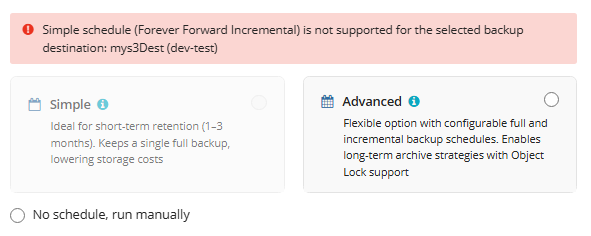
- Select the Simple option to apply the Forever Forward Incremental (FFI) schedule.
- Select the Advanced option to apply the recurring schedule and, if necessary, use Grandfather-Father-Son and Object Lock (Immutability).
- Select the No schedule, run manually option to run the backup plan manually. Retention policy will not work for this option.
The simple schedule is unavailable if the selected storage account does not support synthetic full backups.
For more guidelines on schedule selection, refer to the following article.
Simple Schedule
Select the Simple (Forever Forward) option to use the Forever Forward Incremental (FFI). This schedule offers one full backup followed by a limited number of incrementals. Once the limit is exceeded, a new full backup is created using in-cloud copying (synthetic full backup.
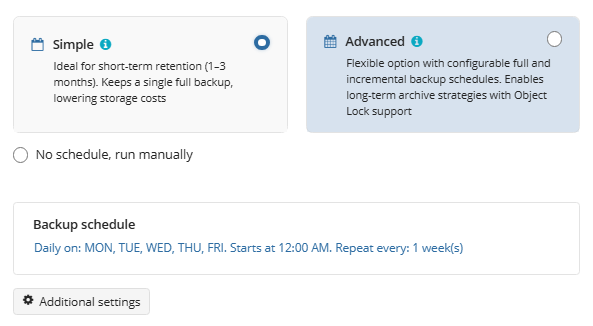
Once you select this option, the predefined schedule will appear. You can edit this schedule, if necessary. You can select the Daily or Monthly schedule type, depending on how often the incremental backups will be performed.
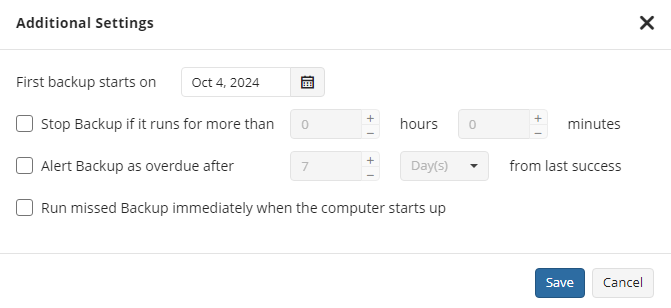
Use the Additional Settings to configure the following:
- First backup start date
- Stop condition for the long backup
- Overdue alert condition
- Missed backup handling
Advanced Schedule
Select the Advanced option to set up a flexible, recurring schedule with generations. Every generation contains one full backup followed by incrementals.
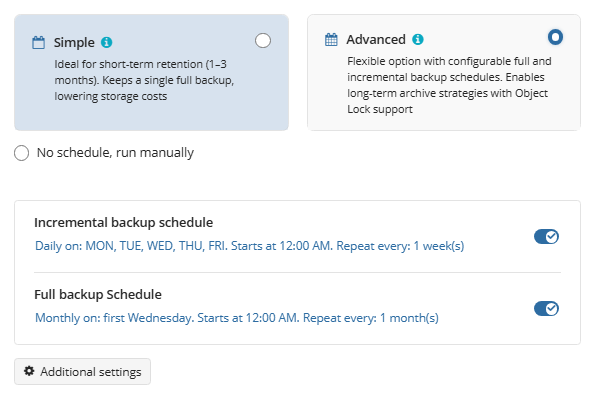
Once you select this option, the predefined schedule for full and incremental backup will appear. You can edit this schedule, if necessary.
The advanced schedule allows you to configure a flexible backup plan according to your requirements. To modify the schedule, use the edit icon next to the selected schedule. If needed, you can disable the incremental backup schedule to run only full backups.
You can select the Daily or Monthly schedule type, depending on how often the incremental backups will be performed.
It is recommended to schedule full backup at least once every 3 months for selected schedule
It is recommended to use the Advanced (GFS, Object Lock) option and regularly scheduled full backups for long-term storage (longer than 6 months), archival, and legal purposes
The most common setup for the Advanced Schedule is daily Incremental backups with either weekly or monthly Full backups
The retention policy will only perform properly with regular scheduled full backups
Use the Additional Settings to configure the following:
- Stop condition for the long backup
- Overdue alert condition
- Missed backup handling
Enabling the Run missed scheduled backup immediately when computer starts up option will ensure that the backup process begins automatically upon startup if the last backup was not able to start at the scheduled time for any reason. This option is recommended for Desktops and Laptops
Do not use the Stop the plan if it runs for: option if you have a slow or unstable internet connection. The first full backup can take a long time to upload, and it can be unexpectedly interrupted if this option is enabled
Step 12
Retention Policy for Advanced Schedule, GFS, and Object Lock (Immutability)
If the Advanced schedule was selected, specify the retention period for the backup plan.
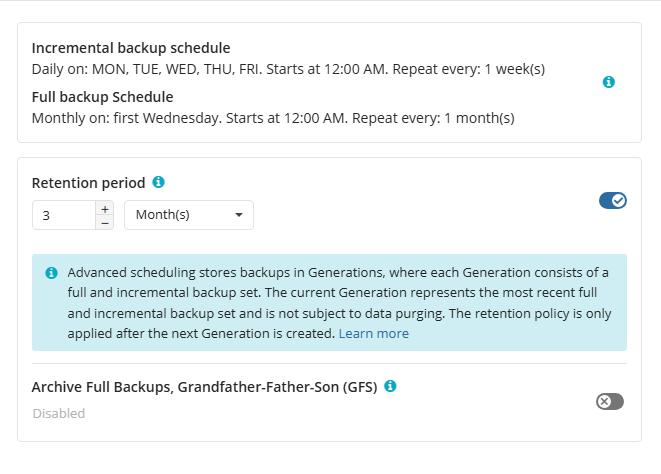
GFS Settings
To apply the GFS retention policy, enable the Archive Full Backups, Grandfather-Father-Son (GFS) feature, then specify the GFS retention settings.
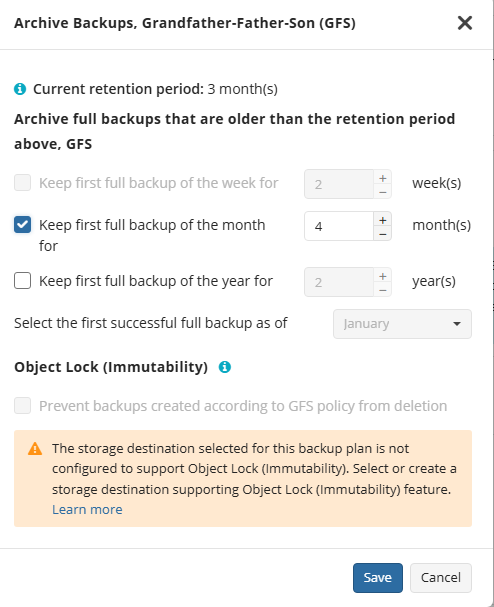
Learn more about GFS retention settings in the GFS Examples chapter
Object Lock (Immutability)
Object Lock (Immutability) is linked to the GFS retention policy. If the Object Lock (Immutability) is applied along with GFS settings, full backups that are subject to the GFS retention policy become immutable for the GFS keeping period.
Select the Prevent backups created according to GFS policy from deletion checkbox, then confirm the use of this feature.

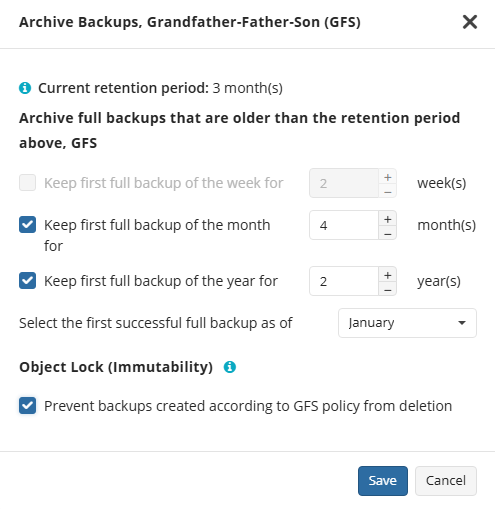
Use the Immutability feature with extreme caution. Once a backup data becomes immutable in Compliance mode, there is no way to delete them from the storage until the specified GFS keeping period expires except for the storage account termination. Incorrect settings can cause high storage bills.
To find more information about the Object Lock feature, supported storage providers, and required permissions, refer to this article.
Retention Policy for Simple Schedule
If on the Schedule options step you selected the Simple schedule, the Retention Policy step has different settings.
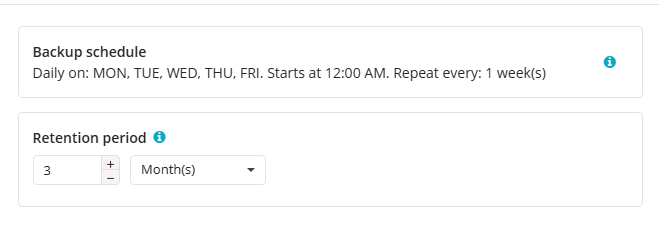
The Retention period value defines how long restore points are kept. Restore points with an expired retention period are merged into a full backup. (With Forever Forward Incremental, only one full backup is kept on the backup storage). If your storage has a minimum retention period, the creation of a new full backup will be postponed to avoid early deletion fees.
Step 13
Next you are prompted to set pre and post actions (optional).
Specify pre and post-actions for your backup plan. Usually, these are scripts that perform particular jobs before or after your data is backed up. The following settings are available:
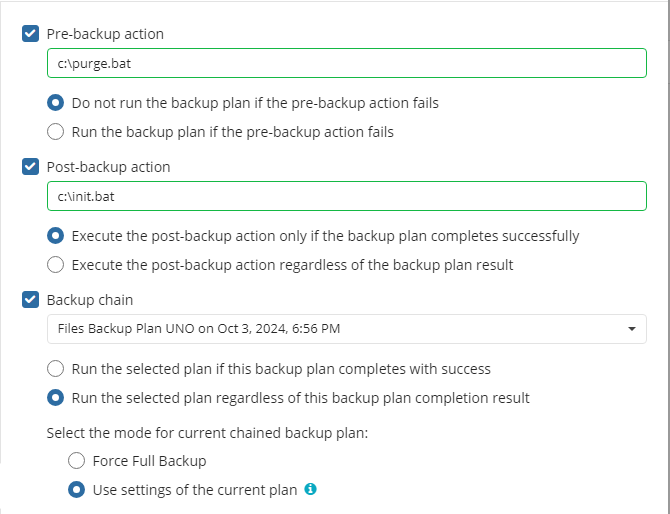
- To specify the action that will be performed before the backup plan starts, select the Pre-backup action checkbox.
- Specify the path to the script to be run as a pre-backup action.
- Specify the conditions of pre-action run:
- Select the Do not run the backup plan if the pre-backup action fails option if you do not want the backup plan to be launched if the pre-backup action fails.
- Select the Run the backup plan if the pre-backup action fails option if you want the backup plan to launch regardless of the pre-backup action result.
- To specify the action that will be performed after the backup is completed, select the Post-backup action checkbox.
- Select the Execute the post-backup action only if the backup plan completes successfully option if you want to run it only if the backup was executed without any errors or warnings.
- Select the Execute the post-backup action regardless of the backup plan result option if you want the post-action to be launched regardless of the backup termination results.
- To chain the backup plan with another plan, select Backup chain checkbox, then select the backup or restore plan name in the drop-down menu.
- Select the Run the selected plan if this backup plan completes with success option if you want to run the specified plan only if the backup plan was executed without any errors or warnings.
- Select the Run the selected plan regardless of this backup plan completion result option if you want the chained backup plan to be launched regardless of the backup termination results. Select the mode for the current chained backup plan:
- Force full backup. Full backup will be forced for the chained backup plan.
- Use settings of the current backup plan. Chained backup plan will be run as full or incremental, according to this backup plan run.
Step 14
Specify notification settings for backup plan results. You can use the company notification settings or customize them as needed. You can specify the required recipients and customize the notifications on different backup plan results:
- Success
- Warning
- Failed
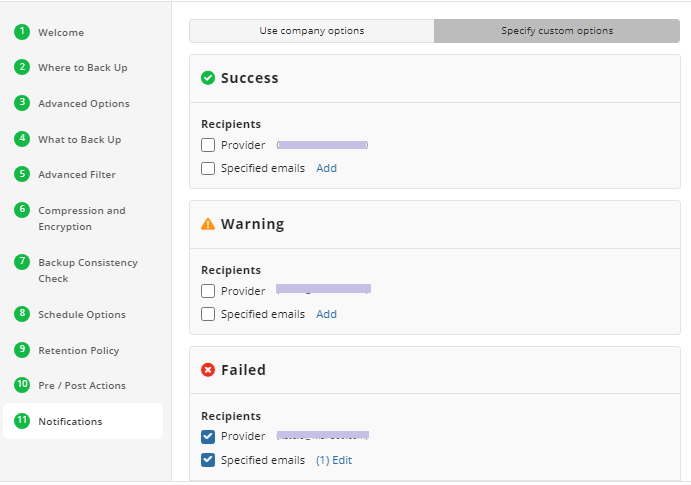
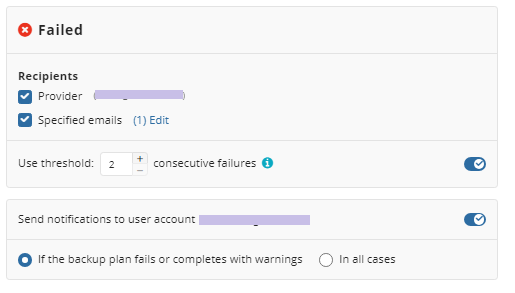
You can configure a notification threshold for Managed Backup alerts, so that notifications are sent only after a specified number of consecutive plan failures
In case you select to customize notifications, select the recipients for different events.
- Select Send notifications to user account... if you want to notify the assosiated user about the backup process.
- Select If the backup plan fails or completes with warnings option if you want to receive the notification message in case of the backup plan failure
- Select In all cases option if you want the entry to be put in Windows Event Log in any case.
Step 15
Once you are satisfied with the plan configuration, click on “Save” to finish.
Run Backup Plan
To Run the Existing Backup Plan:
- Open Backup > Computers.
- Find the required computer, then click the Configure icon in the Backup Plan Status column.
- On the side panel, navigate to the Backup Plans (Beta) tab
- Find the plan to run.
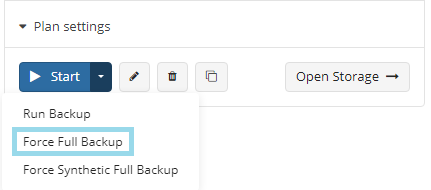
- Click the Start button to run the backup plan. You can expand this control to use the following options:
- Run Backup
- Force Full Backup
- Force Synthetic Full Backup

Force Full Backup
To Force Full Backup 1.1. Open Backup > Computers. 2. Find the required computer, then click the Configure icon in the Backup Plan Status column. 3. On the side panel, navigate to the Backup Plans (Beta) tab 4. Find the plan to force. 5. Expand the Start control and click Force Full Backup.
To configure regular full backup settings, refer to the Schedule step of the backup wizard
Edit Backup Plan
To Edit the Existing Backup Plan
- Open Backup > Computers.
- Find the required computer, then click the Configure icon in the Backup Plan Status column.
- On the side panel, find the plan you want to edit, then click the edit icon.

- Once you made the required changes, click Save.
Clone Backup Plan
To Clone the Existing Backup Plan
- Open Backup > Computers.
- Find the required computer, then click the Configure icon in the Backup Plan Status column.
- On the side panel, find the plan you want to clone, then click the clone icon.

- Specify the name of the plan clone.
- Click Save.
Delete Backup Plan
To Delete the Existing Backup Plan
- Open Backup > Computers.
- Find the required computer, then click the Configure icon in the Backup Plan Status column.
- On the side panel, find the plan you want to delete, then click the deletion icon.

- In the dialog box, click OK to confirm the deletion.
| Top |