File Backup (new backup format)(BETA)
The file backup is the most common type of backup and is designed to ensure that your sensitive and important information is regularly backed up and not vulnerable to hardware malfunctions or ransomware attacks. This backup type allows you to back up selected files from your computer to any backup destination (local or cloud storage). File backup is best for backing up important project files, source code, personal documents, photos, etc.
The new backup format introduces the following features for macOS-based environments:
- Client-Side Deduplication
- Consistency Checks
- Restore on Restore Points
- Optimized operations with storage, resulting in fewer requests, faster synchronization, and faster purge
- Continued data upload in case of network issues
- Object size up to 256TB to any storage destination
- Optimized performance and storage usage for a large number of small files
- Improved incremental backup performance.
File backups are configured using the backup wizard. To start it, click Backup in the horizontal menu bar or press CMD+B on the keyboard.
- Cloud Storage
- Plan Name
- Backup Source
- Advanced Filter
- Compression and Encryption
- Backup Consistency Check
- Schedule
- Full Schedule
- Retention Policy
- Pre-/Post Actions
- Notifications
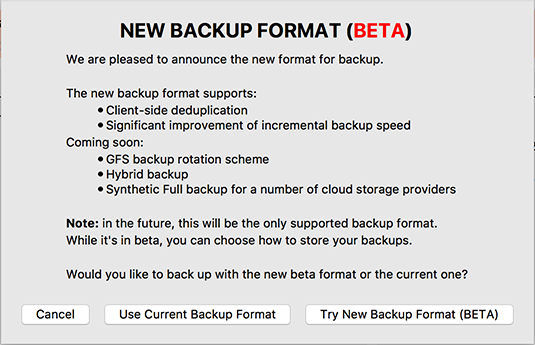
To create a backup plan in the new backup format, select the Try New Backup Format (BETA) option.
Backup Plan: Cloud Storage
Select the backup storage from the list of available storages. You can add a new storage by clicking +, select a backup prefix by clicking the gear icon, or enable the Secure Sockets Layer (SSL) protocol.
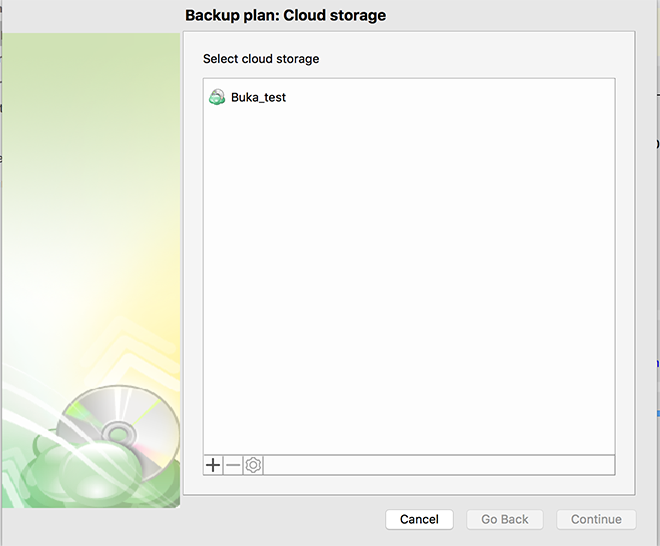
To delete the existing cloud storage account, click the - icon, then confirm the deletion in the dialog box.
Click Continue.
| Top |
Plan Name
Specify the backup plan name. Choose a name that will help you to figure out the backup dataset, e.g. "Jones accounting files backup". This simplifies the plan search among a large number of plans.
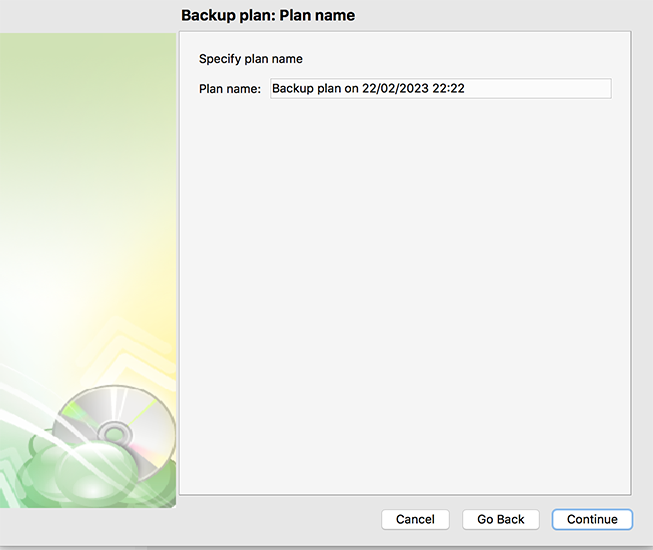
In the new backup format, the backup plan configuration is always backed up and kept in storage.
Click Continue.
| Top |
Backup Source
Select files and directories to back up.
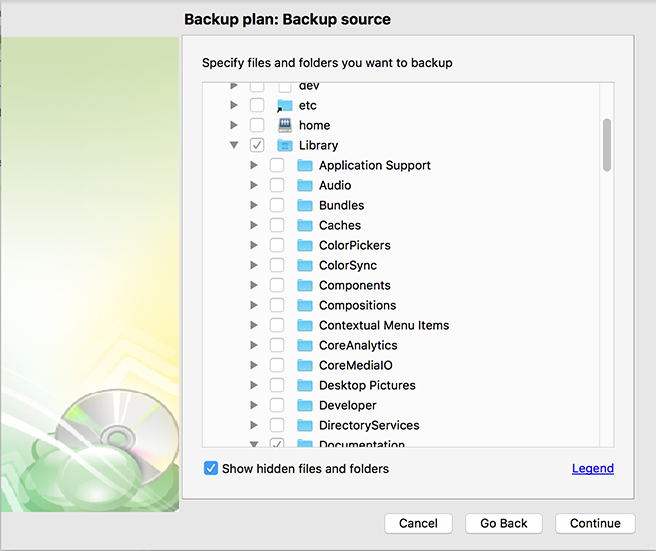
Specify files and folders to be included in the backup plan.
| Check Box Appearance | Description |
|---|---|
 |
This folder with all subitems excluded. All new content will NOT be added |
 |
This folder with all subitems included. All new content will be added |
 |
Specific items excluded. New content will be added, except for updates for excluded items |
 |
Only selected items included. New content will NOT be added, except for updates of included items |
To display hidden files and directories, select the Show hidden files and folders check box.
You can configure the symlink processing by Backup Agent for macOS. Read more about the symlink configuration in the Backup Agent for macOS Settings chapter.
When you have finished selecting files and directories to back up, click Continue.
| Top |
Advanced Filter
Advanced file filtering allows you to configure file and directory settings that are to be backed up or skipped in the backup plan.
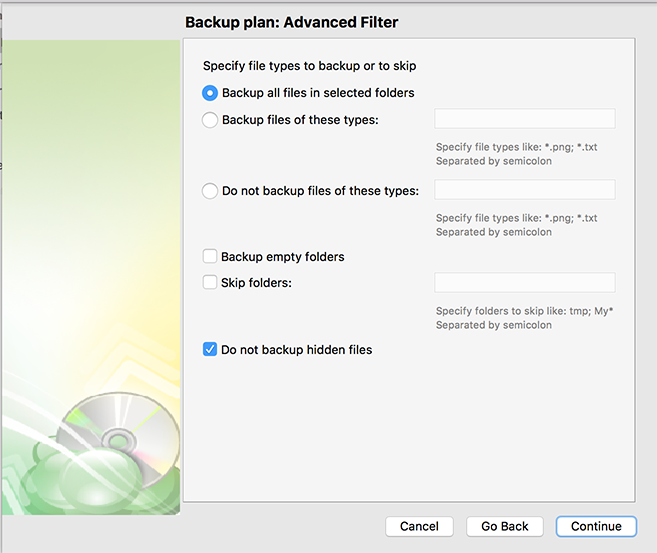
- To back up all files in directories selected on the previous wizard step, select the Back up all files in selected folders option
- To specify the file types to be backed up, select the Back up files of these types option, then specify the file type extensions in the entry field to the right, separating them with semicolons
- To exclude the file types from the backup plan, select the Do not back up files of these types option, then specify the file type extensions in the entry field to the right, separating them with semicolons
- To back up empty directories, select the Back up empty folders check box
- To exclude specific directories from the backup plan, select the Skip folders check box, then specify the folders to be excluded in the entry field to the right, separating them with semicolons
You can use masks to specify files or directories in entry fields. Use * wildcards for masking, i.e.:
- *abcd
- My*
- *My*
Note that masks in wildcards are case-sensitive.
With default settings, Backup for Mac and Linux backs up all files in specified folders.
When you have configured file and directory filtering, click Continue.
| Top |
Compression and Encryption
Configure compression and encryption. Backup for macOS supports up to 256-bit military-grade encryption by default.
Note that Backup does not store the key anywhere for security purposes. A forgotten password means no access to data. Keep the encryption password in a safe place.
This step may look different depending on the storage destination: there are some specific settings for different storage providers. For example, if you're backing up data to Amazon S3, the range of available options includes:
- Server-Side Encryption. With this option enabled, multi-factor encryption provided by Amazon is applied to backup data
- Storage Class. Select the S3 storage class to back up data straight to the required data tier. All S3 storage classes are supported
- S3 Transfer Acceleration. Use this option to accelerate file transfer. Note that the target bucket must have this feature enabled on the Amazon side. Additionally, this feature is offered by Amazon for an extra fee
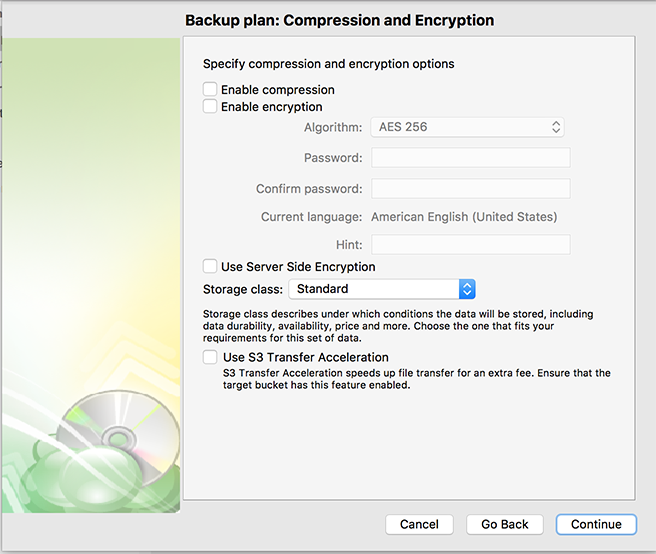
When you have configured compression and encryption settings, click Continue.
| Top |
Backup Consistency Check
Configure the full consistency check.
The full consistency check performs checks of all previous backup plan generations except the current generation, which is checked by the mandatory consistency check. If a full consistency check is successfully completed, a user can be sure that backed-up data can be restored.
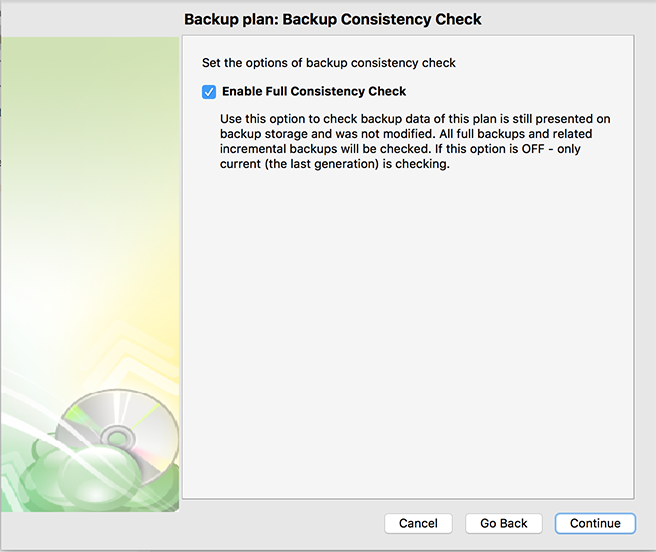
Read more about the full consistency check in the Full Consistency Check paragraph.
When you have configured the full consistency check, click Continue.
| Top |
Schedule
Schedule the backup plan execution. The following options are available:
- If you intend to run the backup plan manually, clear the Enable schedule option
- If you intend the backup plan to run on a constant periodic basis, select the Enable schedule option. Once you select this option, specify the parameters of the recurrence of the backup plan.
On this step, the schedule for incremental backups is configured. The full backup schedule is configured on the next step.
Specify whether the backup plan runs on a daily or monthly basis, then specify the recurrence parameters: weekdays and start time. For a monthly schedule, you can also set the occurrence, start date and time, daily and monthly frequency. The Repeat every and Every options allow configuring a flexible schedule according to your requirements.
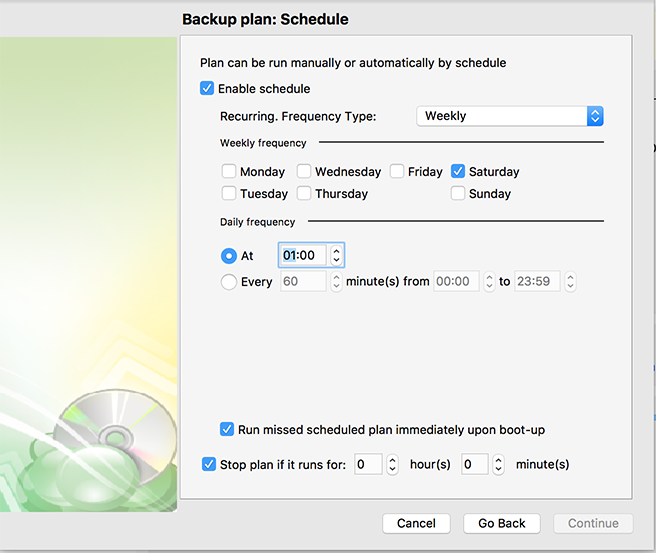
To run a missed scheduled backup plan as soon as the powered-off computer (where this backup plan is created) is turned on, select the Run missed scheduled plan immediately upon boot-up check box.
You can also set the maximum duration period for the backup plan. To do that, select the Stop plan if it runs for checkbox and specify the maximum period.
When you have configured the incremental backup schedule, click Continue.
| Top |
Full Schedule
Schedule full backups. It is recommended to schedule full backups along with incremental ones, since the retention policy (the mechanism of purging old backup data) is never applied to the current generation.
You can also set the maximum duration period for the backup plan. To do that, select the Stop plan if it runs for checkbox and specify the maximum period.
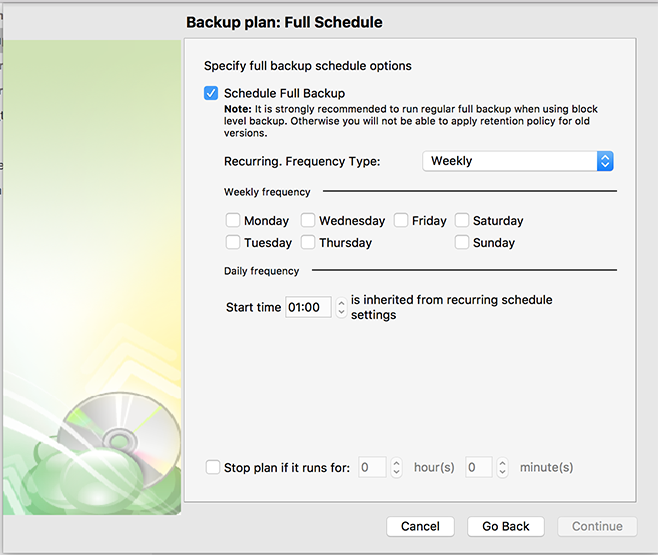
When you have configured the full backup schedule, click Continue.
| Top |
Retention Policy
Configure the retention policy for the backup plan.
In the new backup format, the retention policy is significantly simpler. The retention approach in the new backup format implies that data is always purged by generations (a sequence of a full backup and the following incremental backups).
Read more about the retention policy in the Retention Policy chapter.
- To keep all backup data, select the Do not purge (Keep backup forever) option
- To apply the retention policy for previous generations, select the Keep backup for option, then specify the retention period
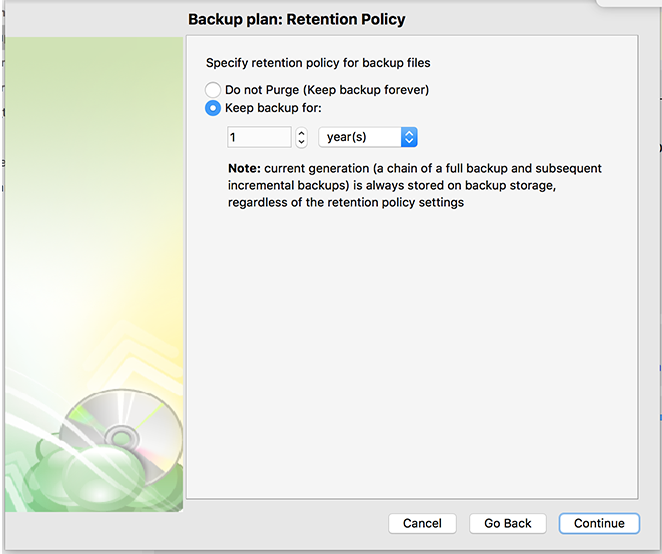
When you have configured the retention policy, click Continue.
| Top |
Step 9. Backup Plan: Pre/Post Actions
This wizard step may be absent due to Global Agent security options.
Specify pre- and post-backup actions.
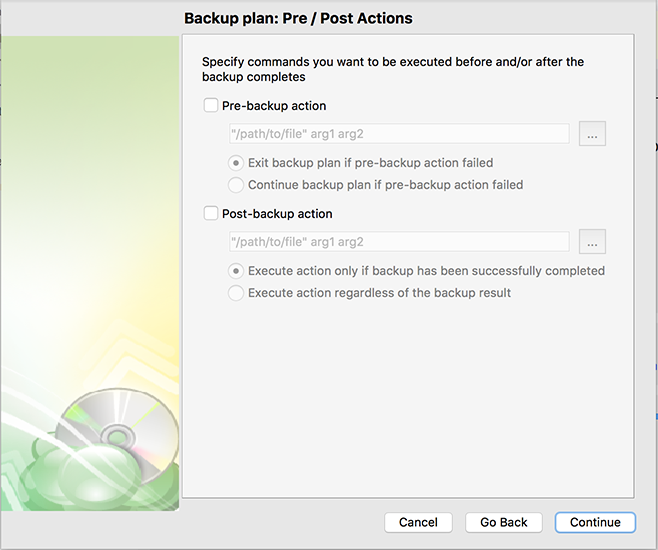
- To specify the pre-backup action, select the Pre-backup action check box, then specify the path to the pre-backup script.
- Select the Exit backup plan if pre-backup action failed option if you do not want the backup plan to be launched if the pre-backup action fails.
- Select the Continue backup plan if pre-backup action failed option if you want the backup plan to be launched regardless of the pre-backup action result.
Note: the path to the script must be enclosed in quotation marks.
- To specify the post-backup action, select the Post-backup action check box, then specify the path to the post-backup script.
- Select the Execute action only if backup has been successfully completed option if you want the post-action to be launched only after the successful backup plan termination.
- Select the Execute action regardless of the backup result option if you want the post-action to be launched regardless of the backup plan termination results.
Note: the path to the script must be enclosed in quotation marks.
Step 11. Backup Plan: Notifications
Specify notification settings for backup plan results. You can use the company notification settings or customize them as needed: specify the required recipients and customize the notifications on different backup plan results: Success Failure Warning
Select User receives a notification email when backup completes if you want to notify your users about the backup plan results. You can select whether users will be notified about backup failure or any backup result.
If you want the backup plan record to be added to the Windows Event Log, select the Add entry to Windows Event Log when backup completes check box.
- Select the When backup fails option if you want to receive the notification message if the backup plan fails
- Select the In all cases option if you want the entry to be put in the Windows Event Log in any case.
Click Next, then click Save to finish the wizard.
Run Backup Plan
To run the backup plan, click Start on the main toolbar. In the meantime, you can observe the backup process in the progress bar at the bottom of the plan view.
| Top |