Files Backup in Backup Agent (Legacy backup format)
Introduction
The most commonly used type of backup in the Backup Agent for Windows is a file-level backup. File-level backup allows you to back up individual files from your computer to the backup destination (local or cloud storage). This is great for backing up important project files, source code, personal documents, photos, presentations, Microsoft Office documents, and so forth. This type of backup is mainly designed to ensure that your most sensitive and important information is regularly backed up and therefore not vulnerable in the event of a hardware malfunction or ransomware strike.
It is not recommended to use a file-level backup type to back up the entire drive. For this purpose, the image-based backup is a better choice
Create Backup Plan
Use Backup Wizard to create a file-level backup plan.
- Open the Backup Agent.
- Expand the Files menu item in the main toolbar and select File Backup (legacy).
The backup plan consists of the following steps:
- Backup Type
- Cloud Storage
- Plan Name
- Advanced Options
- Backup Source
- Advanced Filter
- Compression and Encryption Options
- Retention Policy
- Schedule
- Pre/Post Actions
- Notification
Backup Type
Select the backup type. The following types are available:
- Local or Cloud Backup. Select this option to back your data to a single destination: local drive or a cloud storage
- Hybrid Backup. Select this option if you intend to back up your data to a local drive, then to cloud storage.
Click Next.
Select Backup Storage
Specify the storage destination for your backup plan.
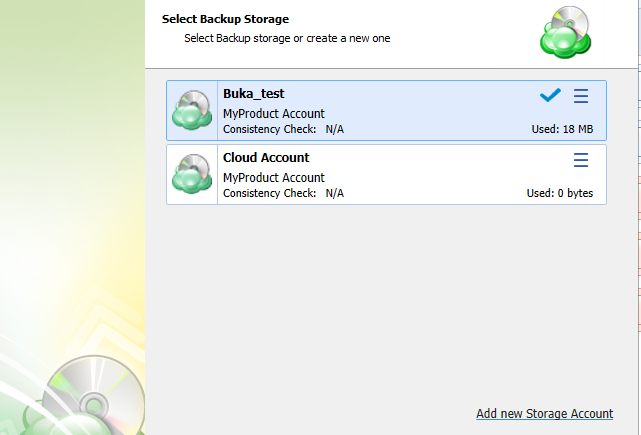
In case you selected a Hybrid Backup option on the previous Backup wizard step, specify the local storage destination, then specify the cloud storage destination
To add a new storage account, click Add new Storage Account.
Click Next.
Plan Name
Specify the backup plan name. If you want to keep your plan configuration in backup storage, select the Save backup plan configuration to the backup storage checkbox.
Click Next.
Advanced Options
By default, advanced options are skipped for the backup plan. You should enable them if necessary (not recommended).
Mark objects deleted in a backup source, File name encryption advanced options are no longer available.
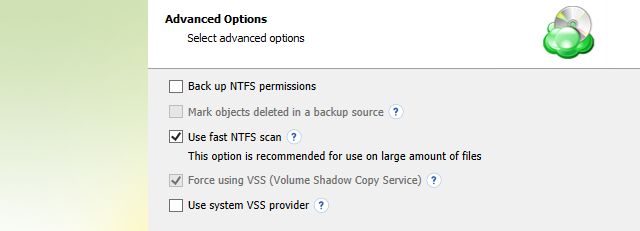
- Back up NTFS permissions. Select this checkbox to include current NTFS permissions in the backup plan.
- Use fast NTFS scan. This box is selected by default. It's our proprietary file scanning & search mechanism. Our method — as opposed to Windows's NTFS file scanning method — generates a file tree. Navigating through said file tree is considerably faster, resulting in overall faster backups.
Note that you Force Using VSS (Volume Shadow Copy Service) checkbox must be selected in order to use a fast NTFS scan.
- Force Using VSS (Volume Shadow Copy Service). Select this checkbox if you want the Backup Agent to back up objects from a snapshot in order to avoid any access conflicts
- Use system VSS provider. Select this checkbox in case you experience issues with a third-party VSS provider. Once the backup plan is started, the Backup Agent will use the system VSS provider forcibly.
Click Next.
Additional Advanced Options for Amazon S3
- If your backup storage destination is Amazon S3, select the S3 storage class for the backup plan:
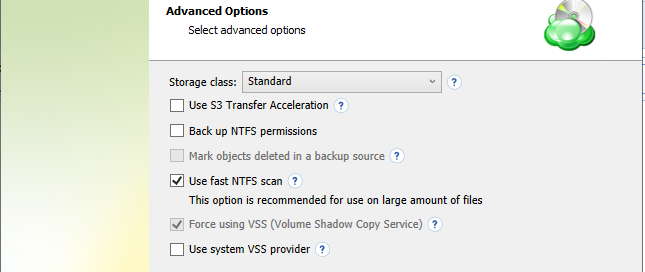
- Standard
- Intelligent-Tiering
- Standard-IA
- One Zone-IA
- Glacier Instant Retrieval
- Glacier Flexible Retrieval (formerly S3 Glacier)
- Glacier Deep Archive
Usage of different storage classes for different backups helps optimize your storage costs.
Learn more about Amazon S3 storage classes here
- Select Use S3 Transfer Acceleration to accelerate file transfer for an extra fee. The target bucket must have this feature enabled. Select this checkbox if you want to use the data transfer acceleration service provided by Amazon. To learn more, refer to the Amazon S3 Transfer Acceleration.
Additional Advanced Options for Microsoft Azure
If your backup storage destination is Microsoft Azure, and you have the General Purpose v2 Azure account, select the required storage class (access tier).
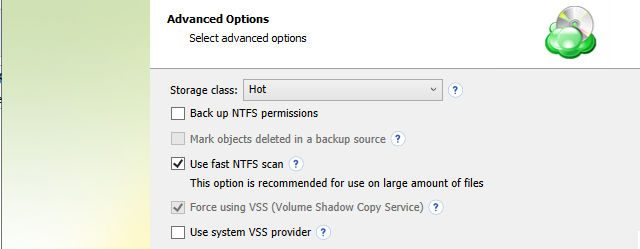
The following options are available:
- Hot tier. An online tier optimized for storing data that is accessed or modified frequently. The hot tier has the highest storage costs, but the lowest access costs.
- Cool tier. An online tier optimized for storing data that is infrequently accessed or modified. Data in the cool tier should be stored for a minimum of 30 days. The cool tier has lower storage costs and higher access costs compared to the hot tier.
- Cold tier. An online tier optimized for storing data that is rarely accessed or modified, but still requires fast retrieval. Data in the cold tier should be stored for a minimum of 90 days. The cold tier has lower storage costs and higher access costs compared to the cool tier.
- Archive tier. An offline tier optimized for storing data that is rarely accessed, and that has flexible latency requirements, on the order of hours. Data in the archive tier should be stored for a minimum of 180 days.
Note that this feature is only supported for General Purpose v2 Azure accounts. If you are using another kind of account, you need to upgrade your account to be able to use this feature
Be aware of the additional charges and increased blob access rates after your Azure account upgrade
To learn more about the difference between Azure storage tiers, refer to the Azure Blob Storage - Hot, cool, cold, and archive storage tiers article at docs.microsoft.com.
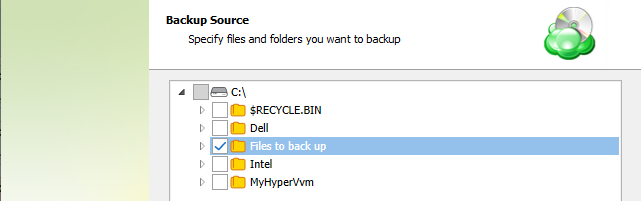
Backup Source
Specify files and folders for your backup plan.
You can use Advanced options to add a network share to include its content in the backup scope:
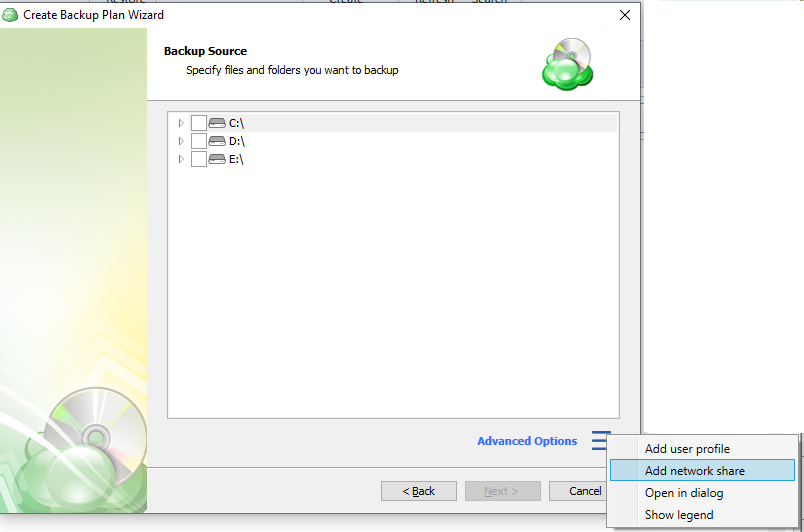
- Expand Advanced options and click Add network share
- Provide the path to the network share in the following format:
\\<server name>\<share name>
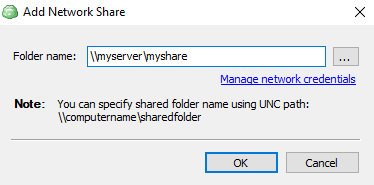
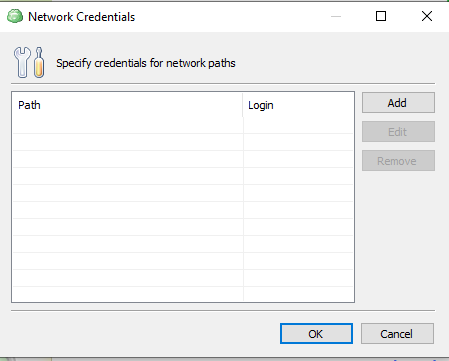
- Click Manage credentials and provide the credentials of account with backup operator permissions on the network share.
- Click Test to check whether the network share is accessible.
- Click Add
- Select files to back up on the added network share.
Click Next.
Advanced Filter
Specify additional selection criteria for objects of the backup plan.
The following options are available:
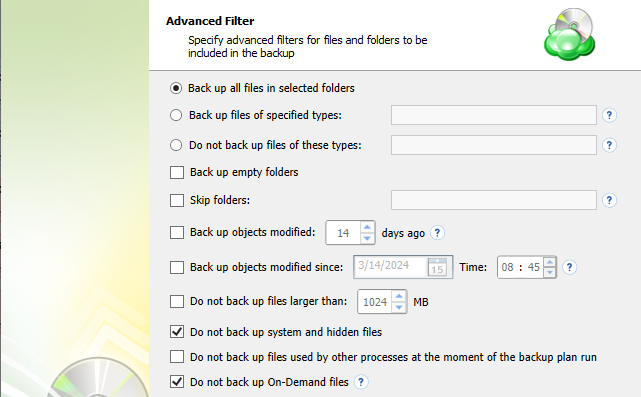
- Back up all files in selected folders. Select this option to include all objects in selected folders in the backup plan
- Back up files of specified types. Select this option to include files of specific types in the backup plan, then specify types in the field to the right by entering appropriate file extensions. Separate extensions with a semicolon
For example, to back up all mp3 files in selected folders, enter *mp3 in the field
- Do not back up files of these types. Select this option to exclude files of specific types from the backup plan, then specify types in the field to the right by entering appropriate file extensions. Separate extensions with a semicolon
For example, to exclude all text files from the backup plan, enter *txt in the field
- Skip folders. Select this option to exclude specific folders from the backup plan. Separate multiple folders by a semicolon
- Back up objects modified:. Select this checkbox to apply the modification date criteria to all objects in your backup plan, then specify the last modification date in the days ago field
For example, if you intend to include in the backup plan all objects that have been modified more than 15 days from the moment of the backup plan run, select the Backup files modified: checkbox, then in the days ago field, specify 15.
- Back up objects modified since:. Select this checkbox to apply the modification date criteria to all objects in your backup plan, then specify the date and the time, after which all objects will be included in the backup plan
For example, if you intend to include in the backup plan all objects that have been modified since 3 pm on October 15, 2019, select the Back up objects modified since: checkbox, then in the date field, specify 10/15/2019 and in the Time: field, specify 15:00
- Do not back up files larger than:. Select this checkbox to limit the object size in the backup plan, then specify the object maximum size in MB
- Do not back up system and hidden files. Select this checkbox to exclude from the backup plan files that have 'Hidden' and 'System' attributes
- Do not back up files used by other processes.... Select this checkbox to exclude from the backup plan files that are open at the moment of the backup plan run.
- Do not back up On-Demand files (selected by default). Select this checkbox to exclude On-Demand files from the backup plan. To learn more about On-Demand files, refer to the OneDrive Files On-Demand For The Enterprise article at techcommunity.microsoft.com.
Once you disable the option not to back up On-Demand files (enabled by default), upon the plan run, On-Demand files that available online only (with an Unpinned attribute) will be downloaded from your OnDrive storage, then uploaded to backup storage specified in the backup plan. After these files are backed up, they will be marked with an Unpinned attribute which means that these files are available online
Click Next.
Compression and Encryption Options
Compression
Managed Backup offers compression to reduce the storage space required for your backup and to speed up the upload process to the target storage.
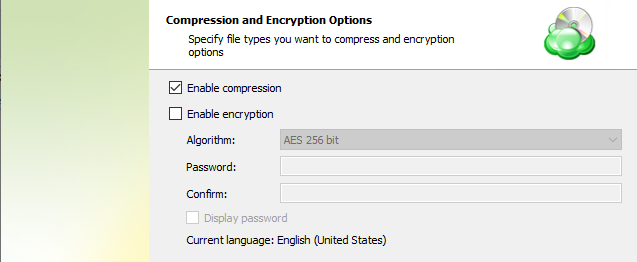
Encryption
You can protect your backup by encrypting its contents. Managed Backup supports AES encryption with key sizes of 128, 192, and 256 bits. A larger key size provides stronger encryption but may increase the time required for processing your backup. For more details on AES encryption, refer to the Advanced Encryption Standard.
If you choose to save your backup plan configuration to the destination storage, be aware that the encryption password is not stored in the configuration file for security reasons. Ensure that you save this password securely, as it will be required to restore the backup's contents.
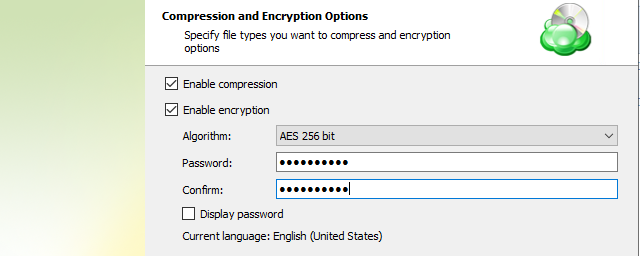
If you change any encryption settings (algorithm or password) for an existing backup plan, a full backup will be executed the next time the backup plan runs.
Amazon S3-Specific Settings
Server-side encryption is now enabled by default on the backup storage.
Retention Policy
Specify retention settings for the backup plan. To read more about retention, refer to the Retention Policy chapter.
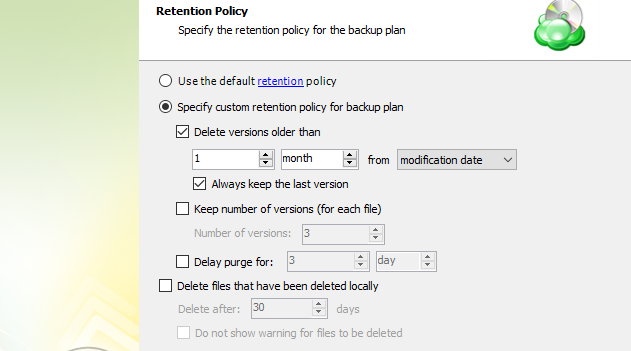
The following settings are available:
- Use the default retention policy. Select this option to use the predefined retention policy settings. To view and edit them, click the retention link in the option.
- Specify custom retention policy for backup plan. Select this option to use custom retention settings for this backup plan
- Delete versions older than. Select this checkbox to delete old file versions in cloud storage, then specify the period and the criteria of this action applying: whether the counting starts from a modification date of an object or the last backup date
- Always keep the last version. Select this checkbox to keep the last versions of objects in cloud storage regardless of other settings
- Keep number of versions (for each file). Select this checkbox to specify the number of versions of files that are kept in backup storage, then, in the Number of versions field, specify the number
- Delay purge for. Select this checkbox if you intend to keep objects in backup storage after deleting them in a backup source, then, in the Delete after field, specify the purge delay period.
- Delete files that have been deleted locally. Select this option if you want to delete an object from backup storage after deletion of them in a backup source. Then specify the period after which objects will be deleted automatically.
- Do not show warning for files to be deleted. Select this checkbox to skip the warning about files to be deleted in cloud storage.
Click Next.
Schedule
Specify the schedule settings for the backup plan.
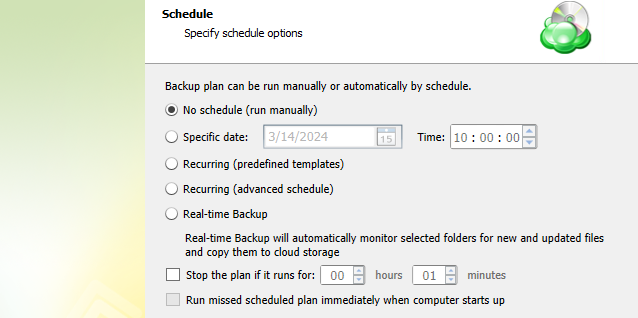
The following options are available:
- If you plan to run the backup plan manually, select No schedule (run manually) option
- If you intend the backup plan to run on a particular date and time, select the Specific date option, then specify the date and time you want your backup plan to be run
- If you want the backup plan to run on a constant periodic basis with the use of templates available in the Backup Agent, select Recurring (predefined templates) option
- If you want the backup plan to run on a constant periodic basis using custom settings, select Recurring (advanced schedule) option
- Real-time Backup. Select this option to allow Backup Agent to detect object changes in selected folders and back them up to the cloud storage (this occurs every 15 minutes)
- To stop the backup plan if it continues suspiciously long, select Stop the plan if it runs for checkbox, then specify the backup plan maximum duration
- To run the backup plan after the computer is on in case the backup plan run has been missed, select Run missed scheduled backup immediately when computer starts up checkbox.
Click Next.
Simple Recurring Schedule
In case you selected the Recurring (predefined templates) option, specify the recurring schedule settings.
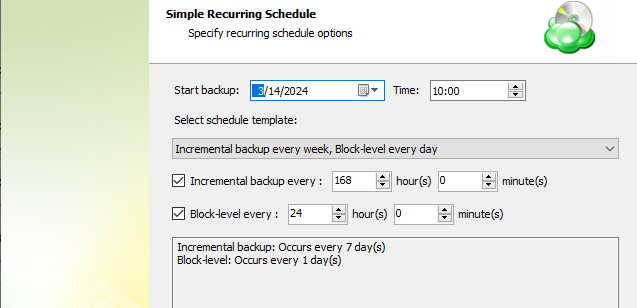
- In the Start backup field, specify the date and time of the first backup plan run
- Select the required schedule from the Select schedule template drop-down list. The following schedules are available:
- Incremental backup every week, block-level backup every day
- Incremental backup every day, block-level backup every hour
- Incremental backup every day
- In case you want to customize the schedule templates:
- Select or deselect the Incremental backup every: checkbox, and, if the checkbox is selected, specify the period of an incremental backup run in hours and minutes
- Select or deselect the Block-level every: checkbox, and, if the checkbox is selected, specify the period of a block-level backup run in hours and minutes.
Note that block-level feature applies to files with a size more than 1 MB due to block size limitations
Click Next.
Advanced Recurring Schedule
In case you selected the Recurring (advanced schedule) option, specify the recurring schedule settings.
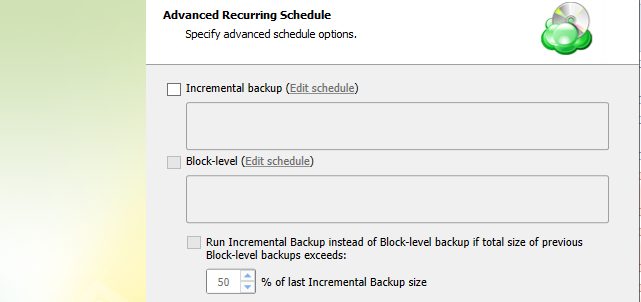
- Select or deselect the Incremental backup: checkbox, then click Edit schedule and specify the period of an incremental backup in the Recurring Schedule Options dialog box. Once you are finished, click OK
- Select or deselect the Block-level backup: checkbox, then click Edit schedule and specify the period of a block-level backup in the Recurring Schedule Options dialog box. Once you are finished, click OK
Click Next.
Pre / Post Actions
Starting from Management Console version 5.0, pre- or post- actions for Backup Agents can be restricted by the provider. To learn more about the pre-/post action settings, refer to the Global Agent Options and Companies chapters
Specify actions to be executed before and/or after the backup plan run.
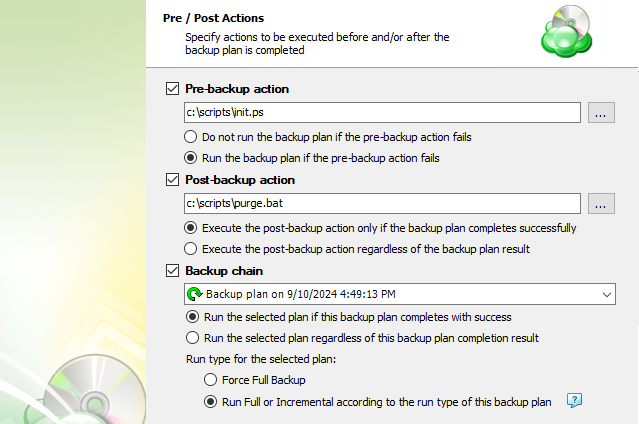
- To specify the action that will be performed before the backup plan starts, select Pre-backup action checkbox, then, in the field below, specify the path to the script to be executed before the backup plan run
- Specify the conditions of the script's execution:
- Do not run the backup plan if pre-backup action fails option if you do not want the backup plan to run if the pre-backup script fails
- Select Run the backup plan if pre-backup action fails option if you want the backup plan to be launched regardless of the pre-backup script execution result
- To specify the action that will be performed after the backup plan is completed, select Post-backup action checkbox, then, in the field below, specify the path to the script to be executed after the backup plan terminates
- Select Execute post-backup action if backup plan completes successfully option if you want to run it only if the backup plan is successfully completed
- Select Execute post-backup action regardless of the backup result option if you want the script to execute regardless of the backup plan execution results
- To chain the backup plan with another plan, select Backup chain checkbox, then select the plan name in the drop-down menu
- Select Run the selected plan if this backup plan completes with success option if you want to run the specified plan only if the backup plan has been successfully completed
- Select Run the selected plan regardless of the backup plan completion result option if you want to run the chained backup plan regardless of the current backup plan execution results.
- In case you chained a backup plan, you can enable the full backup for it regardless of the contents in the backup storage. To do this, select the Force full backup for the chained plan. By default, full or incremental backups will be started according to the schedule of this backup plan.
Notifications and Logging
You can receive email notifications informing you about the backup process results, and maintain logging.
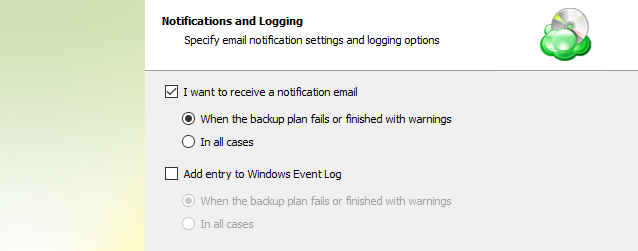
You can receive email notifications after each run of the backup plan or only if it fails for some reason.
In addition, you can register the activity related to the backup routine in the Windows Event Log. You can choose whether to log all activity, or add new entries to the log only when a backup routine fails.
Summary
Review the configuration of the backup plan.
Click Next to proceed to the last wizard page.
Select the Run backup now checkbox to execute the backup plan immediately.
If you want to run the backup plan later, click Finish.
Edit a Backup Plan
To edit the backup plan, proceed as follows:
- Switch to the Backup Plans tab.
- Open the plan to edit, expand it, then click Edit.
- Follow the backup wizard steps to save the backup plan configuration.
Delete a Backup Plan
To delete the backup plan, proceed as follows:
- Switch to the Backup Plans tab.
- Open the plan to delete, expand it, then click Delete.
- Confirm the backup plan deletion.