Create Autotask API User
To integrate the two platforms (Autotask and Managed Backup), some special access permissions on the Autotask side are required. Set them before integrating the Autotask with Managed Backup. If you integrate Autotask with multiple applications, you must create a separate API user account for each integration. We encourage you to also create a specific security level for each integration, and disable access to features that are not required for the specific integration.
Create API User
To create an API user account, proceed as follows:
In Autotask, navigate to the menu bar by hovering over the menu button at the top left of the page. Then, hover over Admin and select Extensions & Integrations
Expand the Other Extensions & Tools and select Integration Center
Select CloudBerry Lab - BDR integration vendor and in the context menu click + Add API User
Fill or edit the following fields: General Area:
- First/Last Name. First Name, Middle Name, and Last Name are referenced in many other entities, usually in combination with a role the person is playing in this context or an action they are taking. Enter the individual's first (given) name, last name (surname), and, optionally, middle name
- Email Address. This email address will be used for notifications should there be a problem with the integration. Enter the email address of a person who will be able to take action if an error occurs
- Active. This value defaults to true
- Locked. If an API user has been locked out because of repeated unsuccessful login attempts and that resource cannot unlock the account from the login page, clear the check box to unlock the account. The number of unsuccessful consecutive user attempts before the user account is locked is determined by a system setting. Refer to [System settings for site setup(https://ww1.autotask.net/help/Content/4_Admin/2FeaturesSettings/ApplicationWide/SystemSettings/SystemSettingsSiteSetup.htm)
- Security Level. The Security Level list only includes active API-only security levels (in ascending alphabetical order) plus the currently assigned level, if that is now inactive. Select an API security level
- Date Format. The date format defaults to the default location’s date format. The drop-down selector contains all of the available date formats
- Time Format. The time format defaults to the default location’s time format. The drop-down selector contains all of the available time formats
- Number Format. The number format defaults to the default location’s number format. The drop-down selector contains all of the available number formats
- Primary Internal Location.
Credentials Area
Generate Key. Click this button to auto-generate a username (key). The Username (Key) field will be populated.
Username (Key). This field is auto-populated when the Generate Key button above the field is clicked. You can override the auto-generated username if you meet the following requirements:
- Must contain letters and numbers
- May contain special characters (but the following special characters are not allowed: @ ( ) ; : [ ] | \ ")
- Must be unique for your database (including inactive resources)
Generate Secret. Click this button to auto-generate a Password (Secret)
Password (Secret). This field is auto-populated when the Generate Secret button above the field is clicked. The password will match the Password requirements configured in the system settings for Site Setup. If your target application does not allow long passwords, you can shorten or override the auto-generated password. In Edit mode, the password is not displayed. If you need to see the password, you will need to click Generate Secret to generate or input a new password. The Password (Secret) field will be populated.
Copy and save username and secret to use them for intergation purposes. This data should be kept in the safe place.
Check that in API Tracking Identifier CloudBerry Lab - BDR is selected as API Integration Vendor.
Click Save & Close.
The new API user appears in Integration Center grid and now is able to authenticate into Autotask for integration purposes. Update your integration with the new API user's credentials in Management Console as described in .
License Type Requirement
In the past, API permissions were added to regular user accounts you used to log into the UI, and cost the same as any other license. Starting with SOAP API version 1.6 and all versions of the REST API, working with the Autotask Web Services API requires a special license type, which is free of charge.
The API User (system) license type does not permit the user to log into the Autotask UI. Autotask provides a system security level with this license type that can be copied, tailored to your requirements, and assigned to API users. You can create up to 50 custom API security levels, and assign them to an unlimited number of API users. Refer to API User (system).
How the API User (API-only) security level works
The default API User (API-only) security level provides the same API access as the standard Full Access security level.
- API-only resources cannot log into the Autotask UI.
- They cannot be assigned to tickets or tasks; their names do not appear in any resource data selectors or resource menus.
- API-only resources can create entities (via the API) but they cannot own or be associated with them. An API User can be a CreatorResourceID, but cannot be a ResourceID or OwnerResourceID (except in select cases where Autotask does not distinguish between a CreatorResourceID and a ResourceID; that is, the entity does not have an explicit CreatorResourceID but does have another ResourceID).
Edit API User
To change some API user settings or resetting secret in case it might be compromised, you can edit your API users. To edit an API user account, proceed as follows:
- In Autotask, navigate to the menu bar by hovering over the menu button at the top left of the page. Then, hover over Admin and select Account Settings & Users.
- Expand the Resources/Users (HR) and select Resources/Users.
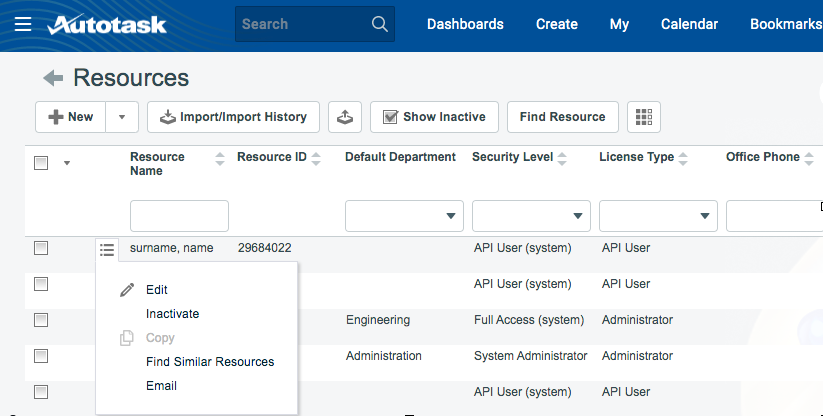
- Select the API User you want to edit, and in the context menu click +Edit.
- Change required values or generate new password (secret) if necessary. If you reset the secret (password), you should save the new secret to update the Autotask API user integration credentials on Settings > Autotask. Click Save & Close.
Unlock API User
In rare cases when several attempts to access Autotask failed unexpectedly, Autotask may lock the affected API user. To unlock an API user account, proceed as follows:
- In Autotask, navigate to the menu bar by hovering over the menu button at the top left of the page. Then, hover over Admin and select Account Settings & Users.
- Expand the Resources/Users (HR) and select Resources/Users.
- Select the API User you want to unlock, and in the context menu click +Edit.
- Clear the Locked check box. Click Save & Close.
Inactivate API User
To temporarily inactivate the API user account, proceed as follows:
- In Autotask, navigate to the menu bar by hovering over the menu button at the top left of the page. Then, hover over Admin and select Account Settings & Users.
- Expand the Resources/Users (HR) and select Resources/Users.
- Select the API User you want to inactivate, and in the context menu click +Inactivate. You can activate this account again if necessary.