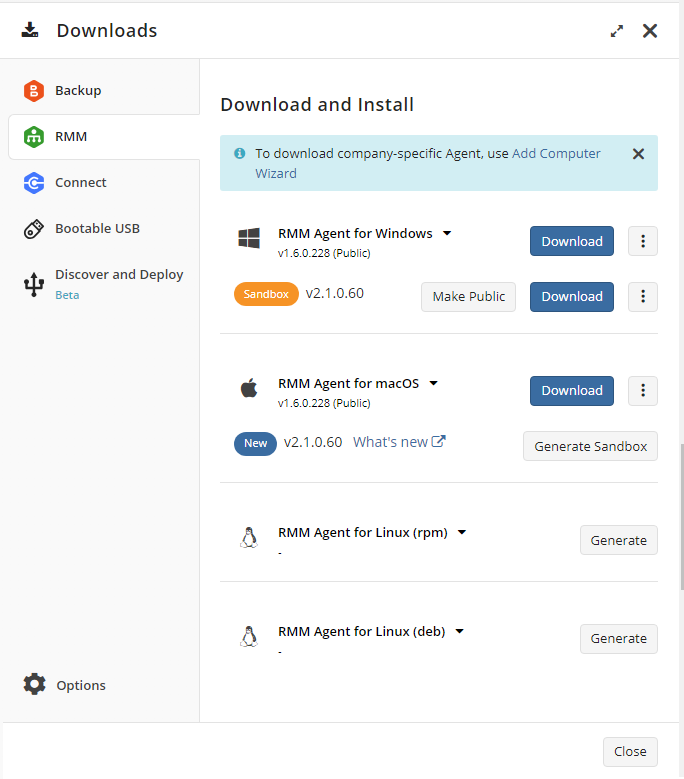
Download and Install RMM Agent for macOS
Generate New Installation Package
First, make sure you have the latest RMM Agent version available for installation. To do this, proceed as follows:
- Open the Management Console.
- Select Downloads.
- Open the RMM tab.

- Find the RMM Agent version that suits your operating system (macOS). In case there is no generated installation package, click the Generate button after the product version you are going to install. Wait while the package will be generated for you. By default, the public package is suggested to be installed. You can see the newest version of the product and can make it public by the Make Public button. As soon as the newest version becomes public, it will be available for all users. In case you already have generated installation packages and the Enable Sandbox option for the download panel is enabled, you can add the newest version to your sandbox to test it before making it public. To add the newest version to sandbox, click the Make Sandbox button.
Note that if a target computer has the Backup Agent installed, you can install the RMM Agent straight from the Management Console. To do this, click Install in the RMM column on the Remote Management page
System Requirements
The RMM Agent for macOS installation is supported for the following operating systems:
- MacOS 10.15 "Catalina"
- MacOS 11.0 "Big Sur"
- MacOS 12.0 "Monterey"
Install RMM Agent
To install the RMM agent to the local computer only, proceed to the Downloads menu in Management Console.
- Open the Management Console.
- Click Downloads.
- In the side pane, open the RMM tab, select or generate the required installation package, and then click the Download button. To download the RMM Agent version that will associate the computer with a specific company, click Add Computer Wizard on the top banner.

- Run the installation file.
- Follow the setup wizard steps.
RMM Agent Installation on Selected Computers
To install the RMM Agent on selected computers, proceed as follows:
- Open the Management Console.
- Select the computers on which you want to install RMM Agent, then expand Install > RMM.

- Confirm to proceed with the installation.
Using RMM Agent on Local Computer
You can view data collected by the RMM Agent in the Management Console. To learn more, read the RMM Service In Management Console chapter.
The information collected by the RMM Agent is displayed in the RMM column on the Remote Management page.

Troubleshooting
Installation Logs
On macOS, installation logs can be found in Console.
- Open Console:
- Use Spotlight Search (Command + Space), type "Console," and open it.
- Alternatively, go to Applications > Utilities > Console.
- Navigate to Installation Logs:
- In the Console app, look for "Install.log" under /var/log. This log captures system-level installation activities.
- You can also search for specific error messages or the name of the application in the Console's search bar.
If you prefer terminal access, open Terminal and view the :
bash
tail -f /var/log/install.log
This command will show the latest entries. You can replace tail -f with cat if you prefer to see the entire log.
These logs provide details on any issues that occurred during installation, which can help troubleshoot failures.
RMM Agent Logs
RMM Agent logs can be located in **Library > Application Support > RMMAgent > Logs