Email Service
You can use the following services to send email notifications to your users:
MSP360 email service (default)
Amazon SES The primary reasons to use a custom SMTP or Amazon SES service are:
You can manage your own SPF record and handle email bounces yourself
You can access email statistics
Proper email service configuration helps prevent your notifications from being marked as spam.
Configure MSP360 Email Service
MSP360 is our own email service based on Amazon SES. If you select the MSP360 email service, you do not need any further settings except the sender's email verification.
To use the MSP360 email service, proceed as follows:
- Open the Management Console.
- In the Settings menu, select Email Service.
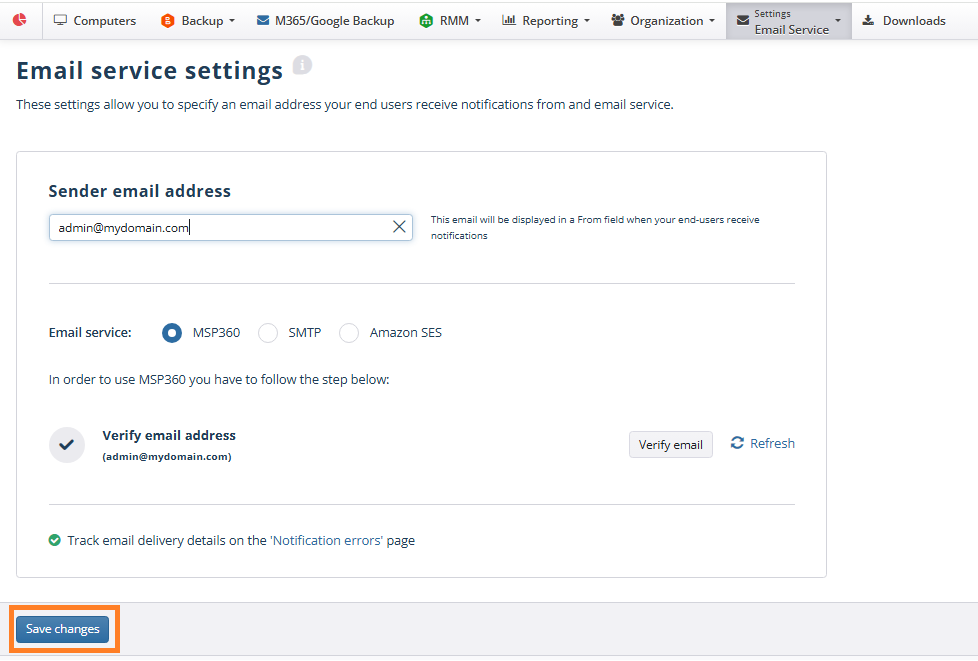
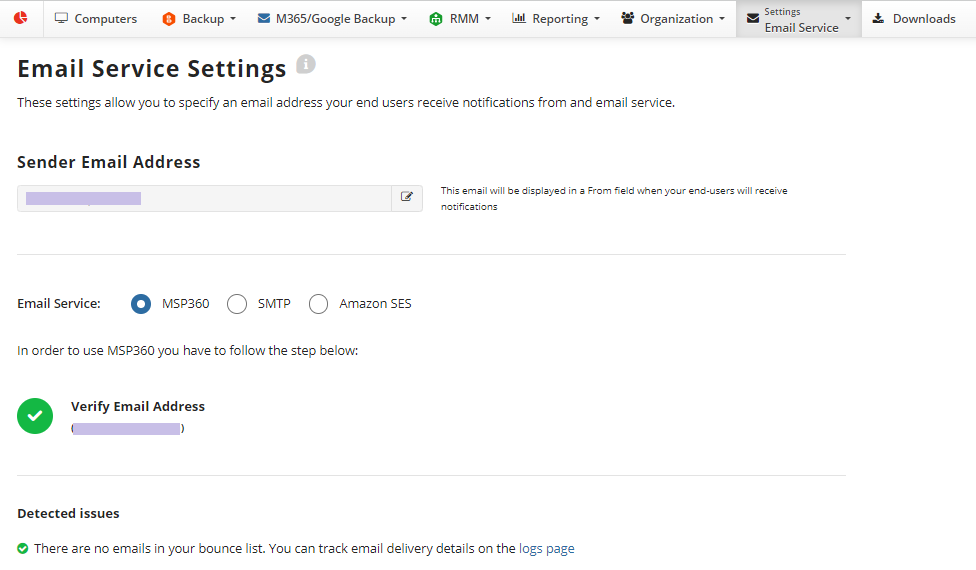
- Enter an email address that will appear as a sender of notification emails and select the MSP360 email service.
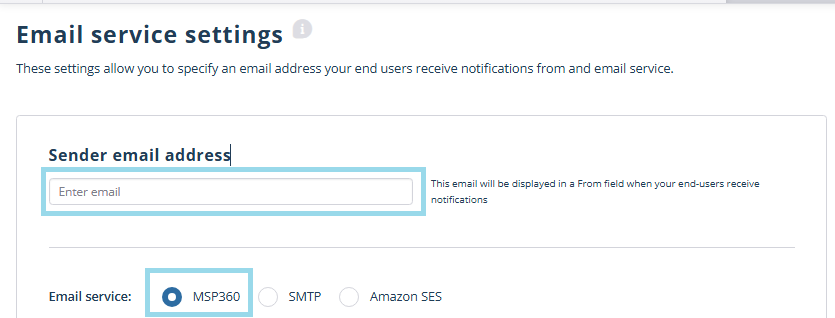
If you want to change the email address that is already provided use the edin icon:

- Click Verify email. The verification email containing a link for email address confirmation will be sent to the specified email address.
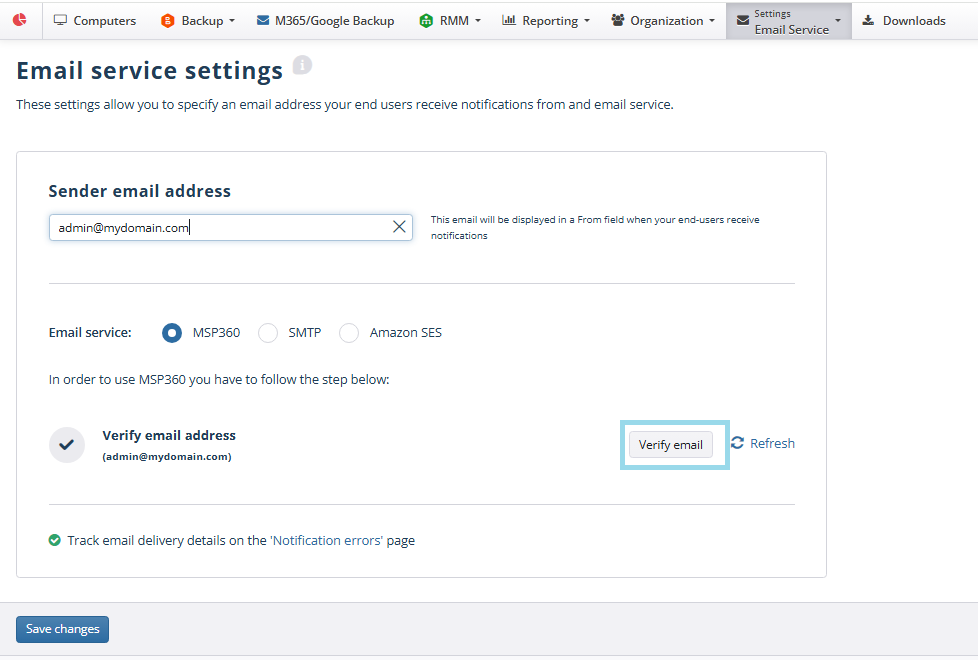
Repeat the verification if you do not see the verification email in the mailbox.
- Open the mailbox and go to the provided URL to confirm that you are authorized to use this email address. The verification process can differ depending on your mail service provider.
- The email address will be verified automatically. Once the email address is verified, click Save changes in the Management Console.
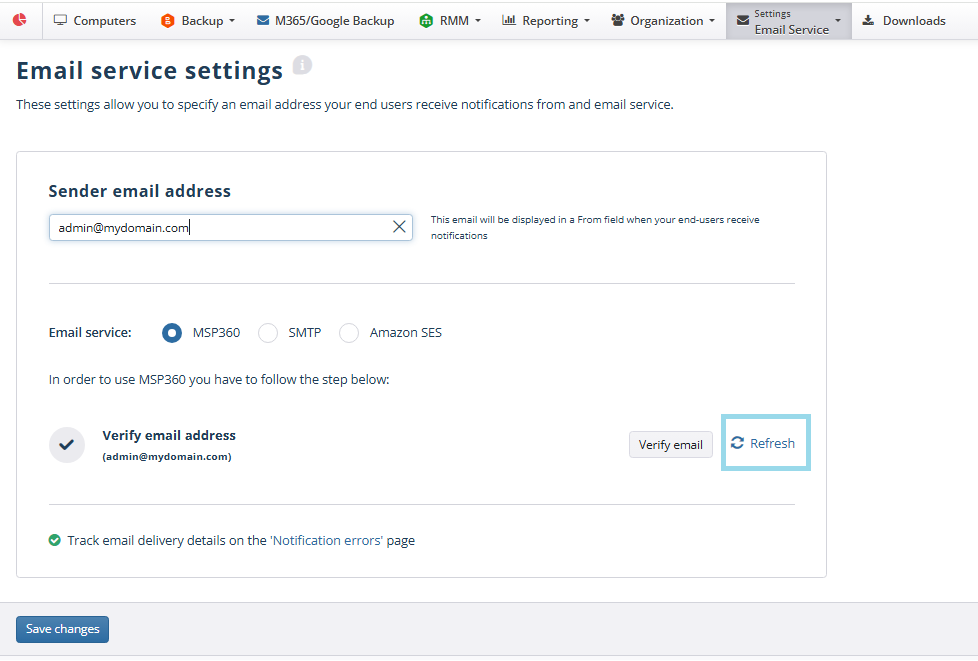
- Return to the Management Console and click the Refresh control next to the Verify email button. Managed Backup will check if you need to perform additional action to complete the configuration. In this example, you will need to add records to the resource records of your domain.
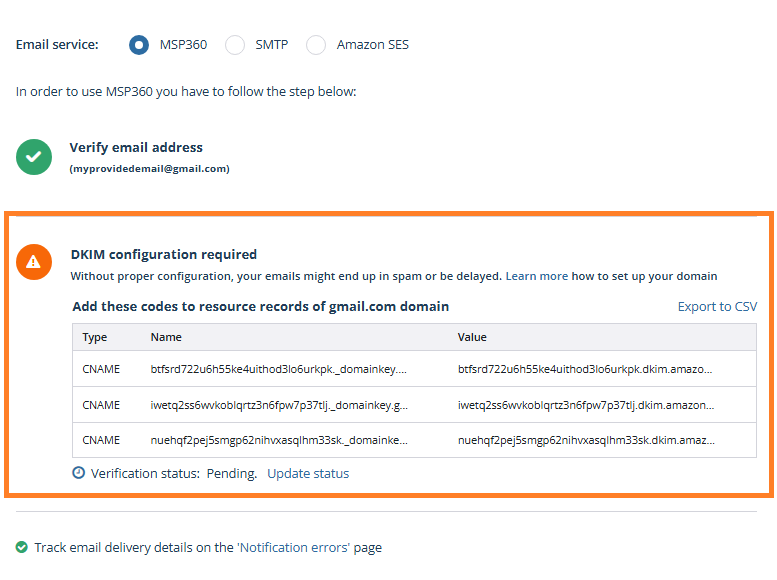
- DKIM records are added to your domain’s DNS zone, usually with the provider that manages your DNS records (domain registrar, hosting provider, or DNS provider). This is not done on the website itself (not in the website code), but in your domain management panel — for example, in Cloudflare, GoDaddy, Namecheap, AWS Route 53, or similar services.
- Open your domain’s DNS settings (usually: go to Domains → Overview, select your domain (e.g., example.com), then go to DNS → Records and click Add Record). Add the type, name, and value of the CNAME or TXT record (depending on your email provider) from the Management Console. In this example, this step is repeated three times.
For the Name field, it is recommended to paste the host part (highlighted by blue) of the copied record without the domain part. The domain name will be added to the record automatically by domain management service.

Refer to examples below for details
- Once the email address is verified and all provided DKIM records are added, click Save changes in the Management Console.
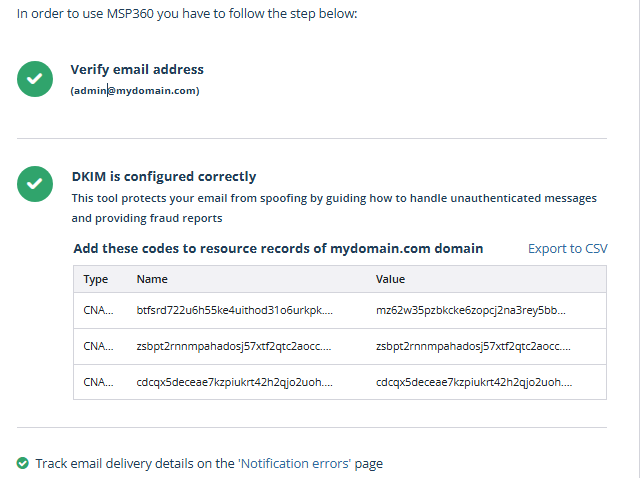
The green checks mean that everything is configured correctly.
Example 1: Adding DKIM record in Cloudflare
To add the DKIM record in Cloudflare, log in to your Cloudflare account and open your domain. In this example we will use the domain mydomain.com. E.g., following DKIΜ record is visible in the Management Console:

- Type: CNAME
- Name: btfsrd722u6h55ke4uithod31o6urkpk._domainkey.mydomain.com
- Value: mz62w35pzbkcke6zopcj2na3rey5bbmy.dkim.amazonses.com
Go to DNS → Records and click Add Record.
Add a new CNAME record with the following details:
- Type: CNAME
- Name:
btfsrd722u6h55ke4uithod31o6urkpk._domainkey - Target / Content: paste the Value provided in the Management Console -
mz62w35pzbkcke6zopcj2na3rey5bbmy.dkim.amazonses.com
You can use the copy to clipboard icon next to the values or export all records to CSV file.
In Cloudflare, for the Name field, use only the host part btfsrd722u6h55ke4uithod31o6urkpk._domainkey without the domain name .mydomain.com, because Cloudflare adds the domain automatically
Example 1: Adding DKIM record in GoDaddy
To add this DKIM record in GoDaddy, log in to your GoDaddy account and open your domain. In this example we will use the domain mydomain.com. E.g., following DKIΜ record is visible in the Management Console:
- Type: CNAME
- Name: btfsrd722u6h55ke4uithod31o6urkpk._domainkey.mydomain.com
- Value: mz62w35pzbkcke6zopcj2na3rey5bbmy.dkim.amazonses.com
You can use the copy to clipboard icon next to the values or export all records to CSV file.
Go to Domain Portfolio, select your domain, then open DNS (or Manage DNS).
Click Add New Record and create a new CNAME record with the following details:
- Type: CNAME
- Name:
btfsrd722u6h55ke4uithod31o6urkpk._domainkey - Value / Points to: : paste the Value provided in the Management Console -
mz62w35pzbkcke6zopcj2na3rey5bbmy.dkim.amazonses.com - TTL: Leave the default value (usually 1 hour) ` Click Save to apply the changes.
In GoDaddy, for the Name field, use only the host part btfsrd722u6h55ke4uithod31o6urkpk._domainkey without the domain name .mydomain.com, because GoDaddy automatically appends the domain to the record
Configure Custom SMTP Email Service
You can use your own SMTP service to send email messages to your users.
To use your own SMTP email service, proceed as follows:
- Open the Management Console.
- In the Settings menu, select Email Service.
- Select SMTP.
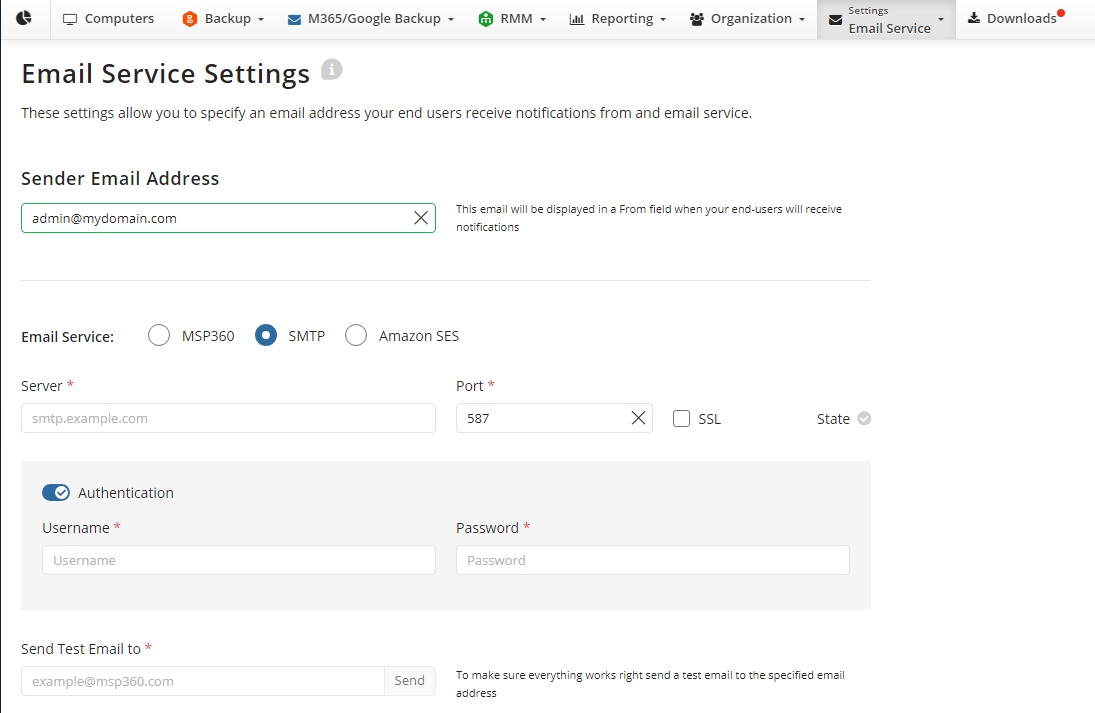
- Specify the mail server settings:
- In the Server field, enter your SMTP server address
- In the Port field, enter the port number
- Customize the SSL usage: select the SSL check box or leave it unselected. Refer to the table below to figure out which settings you need to specify for the correct operation of your SMTP server
| Port | SSL Enabled | Connection Status |
|---|---|---|
| 25 | ✔️ | - |
| 25 | - | ✔️ |
| 465 | ✔️ | ✔️ |
| 465 | - | - |
| 587 | ✔️ | - |
| 587 | - | ✔️ |
| Custom port | ✔️ | Depends on server |
| Custom port | - | Depends on server |
| Empty port | ✔️ | ✔️ |
| Empty port | - | ✔️ |
If you use your own SMTP email service (the SMTP option), the following IP addresses of Managed Backup SMTP Servers should be allowed on customer's SMTP server for connection:
52.6.7.137
52.5.40.159
3.230.30.31
18.205.167.123
From these IP addresses Managed Backup services can connect to customer provided SMTP servers for sending emails.
Configure SMTP Email Service for Google Workspace
For correct operation of email service using your SMTP server with Google Workspace email addresses (for example, smtp.gmail.com), specify one of the following settings:
| Port | SSL Enabled | Connection Status |
|---|---|---|
| 25 | ✔️ | |
| 25 | - | ✔️ |
| 465 | ✔️ | ✔️ |
| 465 | - | - |
| 587 | ✔️ | - |
| 587 | - | ✔️ |
Configure SMTP Email Service for Microsoft 365
As announced by Microsoft, Basic Authentication will be turned off for all tenants starting October 1, 2022, with the exception of SMTP AUTH. To avoid any issues with notifications, we recommend using another email service option. Read KB article for details
For correct operation of the email service with your SMTP server with Office 365 email addresses (for example, smtp.office365.com), specify one of the following settings:
| Port | SSL Enabled | Connection Status |
|---|---|---|
| 25 | ✔️ | - |
| 25 | - | ✔️ |
| 587 | ✔️ | - |
| 587 | - | ✔️ |
- If your mail server requires authentication, enable it with the Authentication toggle button, then specify the authentication credentials.
- In the Send test email to field, specify the email address for testing purposes. Note that this field is mandatory.
- Once you are done, click Save changes.
Configure Custom Amazon SES Email Service
If you have an Amazon AWS account, you can use your specific Amazon SES. This service may be useful when you need to send many email messages simultaneously, view email sending statistics, etc.
SES-configured AWS account needs to be added to the Management Console even if you do not use Amazon S3 as your backup storage provider.
To estimate your expenses using Amazon SES, refer to the Amazon SES pricing chapter at aws.amazon.com
Note that once you selected the Amazon SES email service, in order to get back to the MSP360 email service usage, you need to address to MSP360 technical support team for assistance
To use the Amazon SES email service, proceed as follows:
- Perform steps 1-2 described in the Configure Email Service paragraph.
- Select Amazon SES.
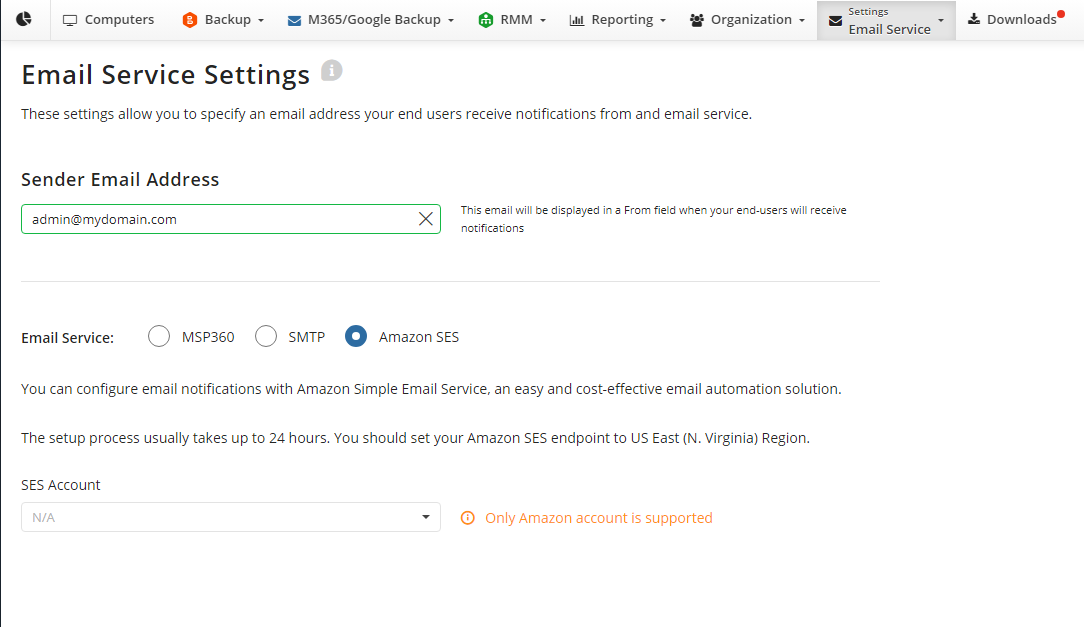
Select SES configured AWS account that was added to Management Console.
Proceed with the steps provided for the Amazon SES email service:
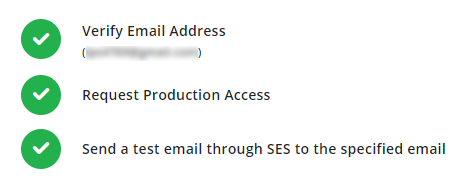
- Verify your email. Click Verify Email, then wait until your email address is verified
- Request production access. Once your email address is verified, your SES account is put into a sandbox. While your Amazon SES account is in the sandbox, several restrictions are applied:
- You can only send mail to verified email addresses and domains, or the Amazon SES mailbox simulator
- You can only send mail from verified email addresses and domains
- You can send a maximum of 200 messages per 24-hour period
- You can send a maximum of 1 message per second
To request that your account be removed from the Amazon SES sandbox using the AWS Management Console, proceed with the instructions in the Moving out of the Amazon SES sandbox chapter at docs.aws.amazon.com
- Send a test email through SES to the specified email address.
- Once you are done, click Save changes.
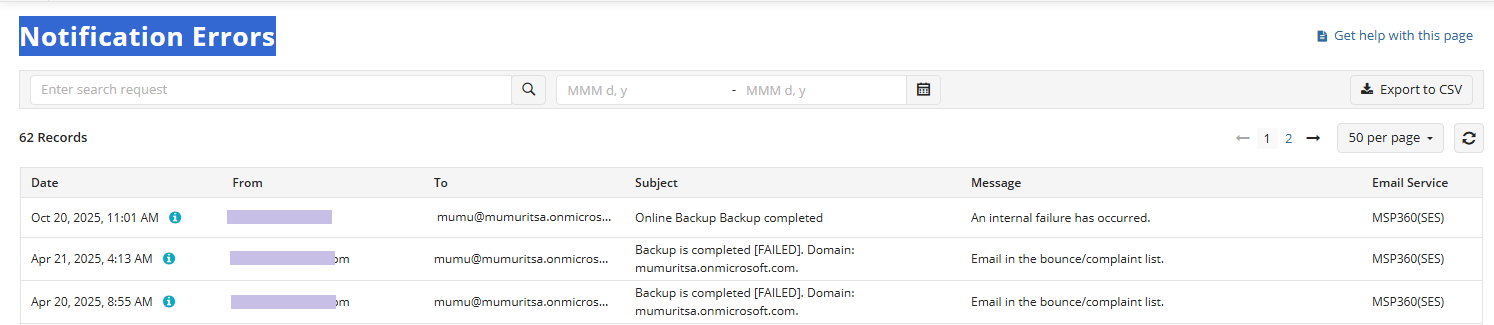
Notification Delivery Issues
The system now detects cases where Managed Backup is unable to deliver notifications, allowing you to address them promptly. If a notification email cannot be delivered to one of the specified recipients, the following banner appears in the Management Console:

Click X recipients to see details and the affected email addresses.
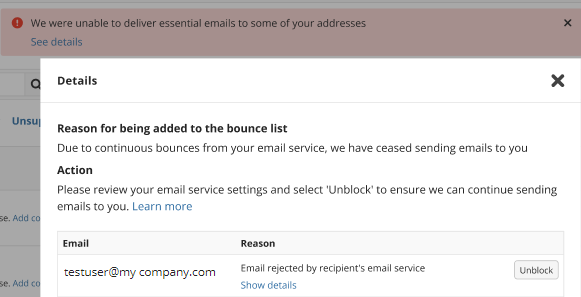
You can unblock them in case you adjusted the email service settings.
For complete information on the issue for every email address, click Notification Errors.

You can export this list to CSV or use the provided search function to quickly identify issues related to specific addresses or events.