Create Bootable USB Drive
To perform a bare-metal recovery, you need to create a bootable USB drive on a computer running Windows. This bootable USB will contain a pre-boot environment, and the backup data for restoration will be retrieved from the backup storage specified in your image-based backup plan.
USB Drive Requirements
- Minimum Capacity: 1 GB
All data on the USB drive will be permanently erased. Please ensure that you have backed up any important data from the drive before proceeding
Creating a Bootable USB Drive Using Management Console
To create a bootable USB drive, proceed as follows:
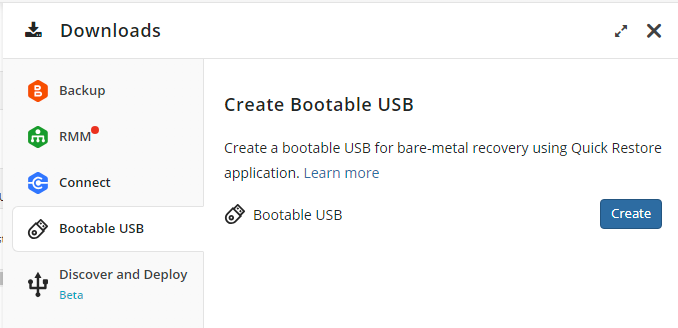
- Open the Management Console.
- Select Downloads.
- On the Bootable USB tab, click Create.
Launch the Quick Restore application when prompted.
Insert the USB drive you want to use as a bootable recovery tool.
Select USB drive in the Create Bootable USB dialog.
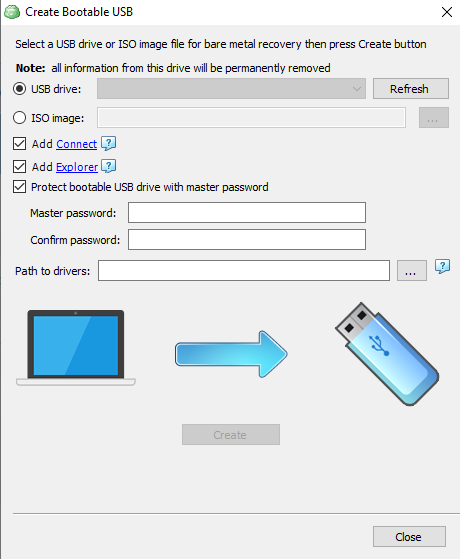
Select the Add Explorer checkbox to include the Explorer application for browsing your cloud storage and for cloud-to-cloud data transfer needs.
Select the Add Connect checkbox to include the Managed Connect application on the bootable USB drive to enable secure, remote access during Bare-Metal Restore or recovery scenarios. When the system is booted from the USB, Connect can be used for remote access. You can initiate a connection from the Management Console:
- Using web browser interface
- Using desktop app by means of a PIN code.
Set a master password. You will be prompted to protect the recovery tool with a master password for security. It is recommended to create a strong password and store it securely.
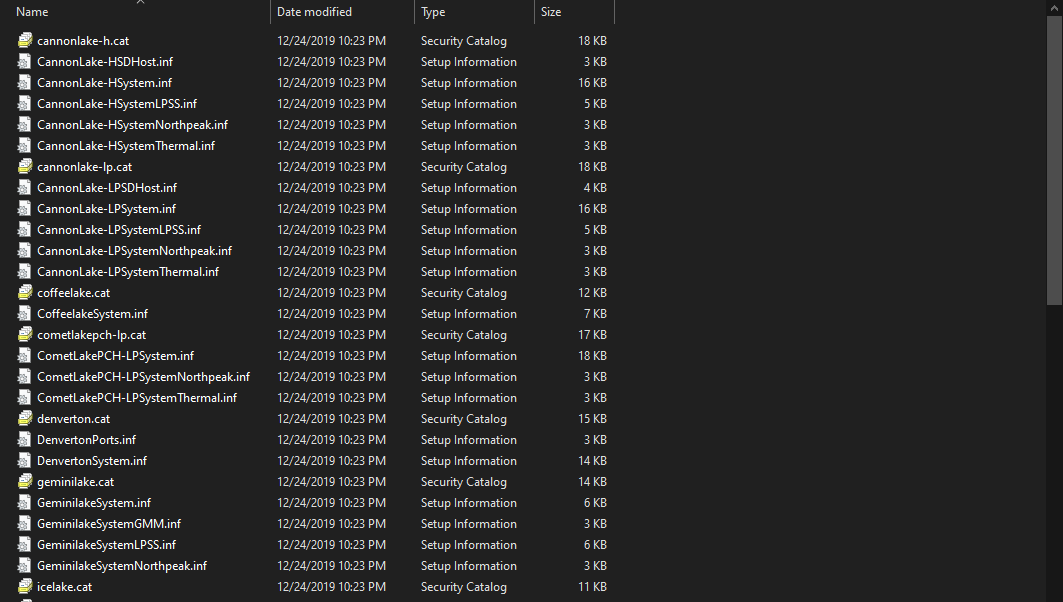
Add specific hardware drivers (optional). If your system requires specific drivers, collect them in a folder and specify the path in the Path to drivers field. When adding drivers to the recovery disk, only INF, CAT, and DLL files are supported. Driver packages provided by vendors in ZIP, RAR, 7Z, or EXE formats cannot be used directly. The INF files are essential, as they reference all necessary driver files. To simplify the process, you can organize the drivers by placing them in separate subfolders within a main folder. The selected folder will be scanned recursively to include all relevant driver files.
Example: These files will work properly:

These files will not work properly:
- Click Create.
- If prompted, download and install both Windows ADK and Windows PE add-on. Refer to the following Microsoft documentation for instructions on how to choose the right set for your environment.
- In most scenarios, it is recommended to select Windows ADK 10.1.26100.1 (May 2024) and the Windows PE add-on for this ADK support the following OS releases:
- Windows 11, version 24H2 and all earlier supported versions of Windows 10 and 11
- Windows Server 2025, and Windows Server 2022
- To get required software:
- After all tools are successfully installed, click Create again.
- In most scenarios, it is recommended to select Windows ADK 10.1.26100.1 (May 2024) and the Windows PE add-on for this ADK support the following OS releases:
- Once USB drive creation is complete, click Close. Your USB device now contains the necessary boot files in the folder called Boot.
Creating a Bootable USB Drive Using Backup Agent
- Open the Backup Agent.
- Verify Backup Storage:
- On the Backup Storage tab, ensure that the storage account associated with the image-based backup is correctly configured with the correct backup prefix. You will need to use the same backup prefix during the recovery procedure on the target machine.
- This step can be done later, but it may be more convenient to do it now to avoid issues in the pre-boot environment.
- Insert the USB Drive you want to use as a bootable recovery tool.
- Run the Backup Agent and click Create Bootable USB.

- Select USB drive in the Create Bootable USB dialog.
Add Connect (optional). Select the Add Connect checkbox to include the Connect application on the bootable USB drive. To add Connect, select the Allow to Add Connect to the Recovery Disk checkbox in Settings > Global Agent Options.
Select the Add Explorer checkbox to include the Explorer application for browsing your cloud storage and for cloud-to-cloud data transfer needs.
Set a master password. You will be prompted to protect the recovery tool with a master password for security. It is recommended to create a strong password and store it securely.
Add specific hardware drivers (optional). If your system requires specific drivers, collect them in a folder and specify the path in the Path to drivers field.When adding drivers to the recovery disk, only INF, CAT, and DLL files are supported. Driver packages provided by vendors in ZIP, RAR, 7Z, or EXE formats cannot be used directly. The INF files are essential, as they reference all necessary driver files. To simplify the process, you can organize the drivers by placing them in separate subfolders within a main folder. The selected folder will be scanned recursively to include all relevant driver files.
Example: These files will work properly:
These files will not work properly:
- Click Create.
- If prompted, download and install both Windows ADK and Windows PE add-on. Refer to the following Microsoft documentation for instructions on how to choose the right set for your environment.
- In most scenarios, it is recommended to select Windows ADK 10.1.26100.1 (May 2024) and the Windows PE add-on for this ADK support the following OS releases:
- Windows 11, version 24H2 and all earlier supported versions of Windows 10 and 11
- Windows Server 2025, and Windows Server 2022
- To get required software:
- After all tools are successfully installed, click Create again.
- In most scenarios, it is recommended to select Windows ADK 10.1.26100.1 (May 2024) and the Windows PE add-on for this ADK support the following OS releases:
- Once USB drive creation is complete, click Close. Your USB device now contains the necessary boot files in the folder called Boot.