Get Started with ConnectWise PSA Integration
ConnectWise PSA is a business process automation platform that allows businesses to sell, service, and support technology more efficiently and in a more streamlined way. The business management tool allows a business to centralize all information, automate business processes, gain real-time visibility in operations, and provide better customer support. To manage integration, the Miscellaneous > ConnectWise PSA / Autotask Integration permission should be granted as the administrator permission on Organization > Administrators.
The app can also be used for ticket management, help desk management, project management, customer relationship management, time tracking, asset tracking, billing and invoicing, technician dispatching, procurement, inventory management, among others.
Integration with Management Console allows the following:
- Map Management Console and ConnectWise companies
- Map Management Console and ConnectWise contacts to personalize information (optional)
- Map Management Console (e.g., activated licenses, storage accounts) and ConnectWise products
- Sync storage billing information with ConnectWise
- Edit the company to configure billing.
- Click Invoice Settings to change invoice description
- Click Cost/Price Settings to set custom cost and price values, if needed.
- Enable auto-billing to sync billing information with ConnectWise on a monthly basis
- Click Ticket Settings to define ticket processing modes
- Create Backup Agent tickets in ConnectWise
- Create RMM Agent tickets in ConnectWise.
Before you begin, create a new Security Role in ConnectWise PSA and new API Member for authentication purposes.
Authentication in Management Console
Start creating an integration with authentication. To authenticate ConnectWise API Member in the Management Console, proceed as follows:
- Open the Management Console.
- In the Settings menu, select ConnectWise PSA.

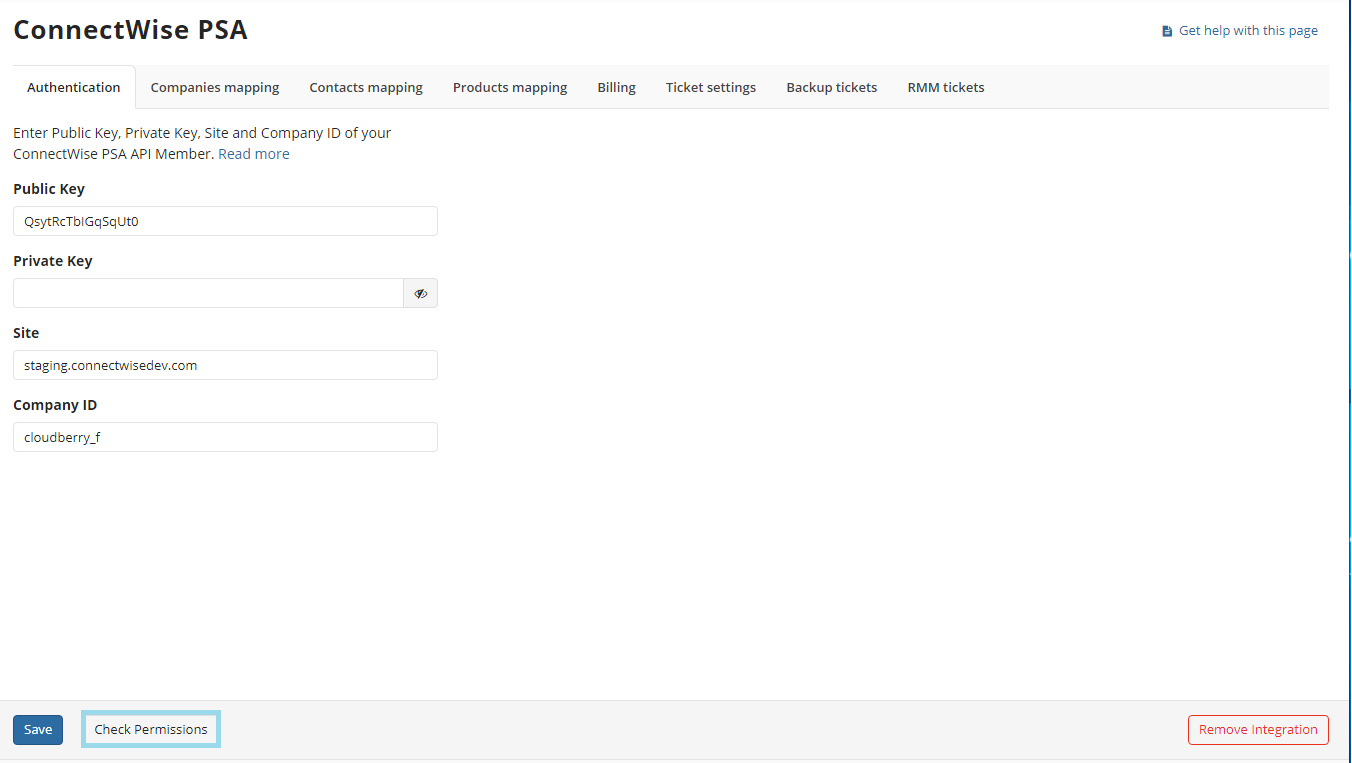
You need to provide the following data from ConnectWise PSA web console:
- A public key and a private key. You can find those in the API keys tab
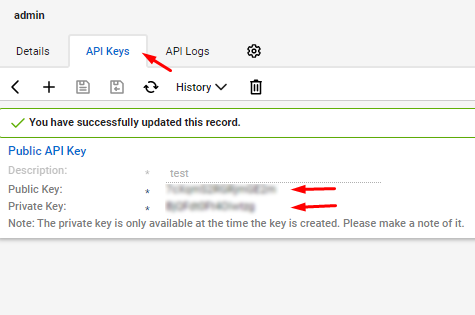
Note that if you create or edit a description, a new pair of public and secret keys is generated and should be updated in Management Console
- You need to provide the site and Company ID that you use to access ConnectWise.
Once you specify all required credentials in the Management Console, click Save.
To check for missing permissions, click Check Permissions.
If the validity of credentials is confirmed and you have all required permissions, you can start configuring your integration. In case the integration is not fully and properly configured (all required data on all mandatory tabs are not provided), it cannot function properly. Below you can see instructions on how to configure the integration.
Configure Integration
The following steps help you configure your integration:
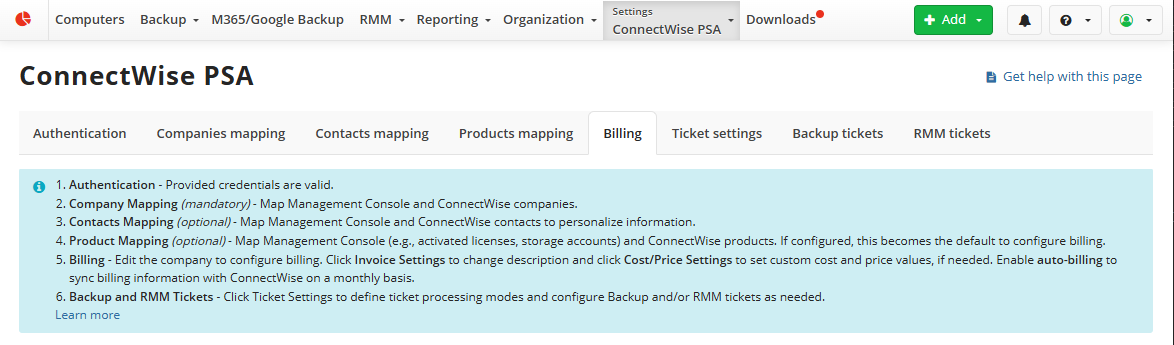
- Perform authentication in the Management Console as described above and check permissions
- Import your ConnectWise companies to create mapping between the ConnectWise companies and companies in Management Console.
- (This step is optional) Import your ConnectWise contacts to create mapping between the ConnectWise contacts and contacts in Management Console. This helps you to enhance the ticket detailing.
- Map Management Console (e.g., activated licenses, storage accounts) and ConnectWise products. If configured, these settings become the default to configure billing.
- Configure billing settings
- Configure options on how to handle your tickets
- Configure tickets generated with Backup Agent
- Configure tickets generated with RMM Agent.
- Save your configured integration to start using it.
Edit Integration
You can change an integration of Managed Backup with ConnectWise PSA. To do this, proceed as follows:
- Open the Management Console.
- In the Settings menu, select ConnectWise PSA.
- Make required changes and confirm them as prompted.
- Save the integration.
Remove Integration
If the integration is no longer needed you can remove it. Refer to Delete ConnectWise Integration for details on how to delete your integration along with user data.