Prepare Microsoft Azure Storage Account for Lifecycle Policy
To start using lifecycle rules with Microsoft Microsoft Azure Storage Account, perform the following steps:
- Prepare a Microsoft Entra ID account and grant the required permissions
- Use the Microsoft Entra ID Account to create Managed Backup Service administrator
- Add a new or existing Azure storage account
- Specify AD credentials for the Azure storage account (in case these credentials are not detected automatically) and manage the Lifecycle Rule Settings.
Prepare Microsoft Entra ID Account
To start using Managed Backup Service with Microsoft Entra ID, you need an Microsoft Entra ID user account.
- Go to the Azure Portal.
- Click on Microsoft Entra ID.
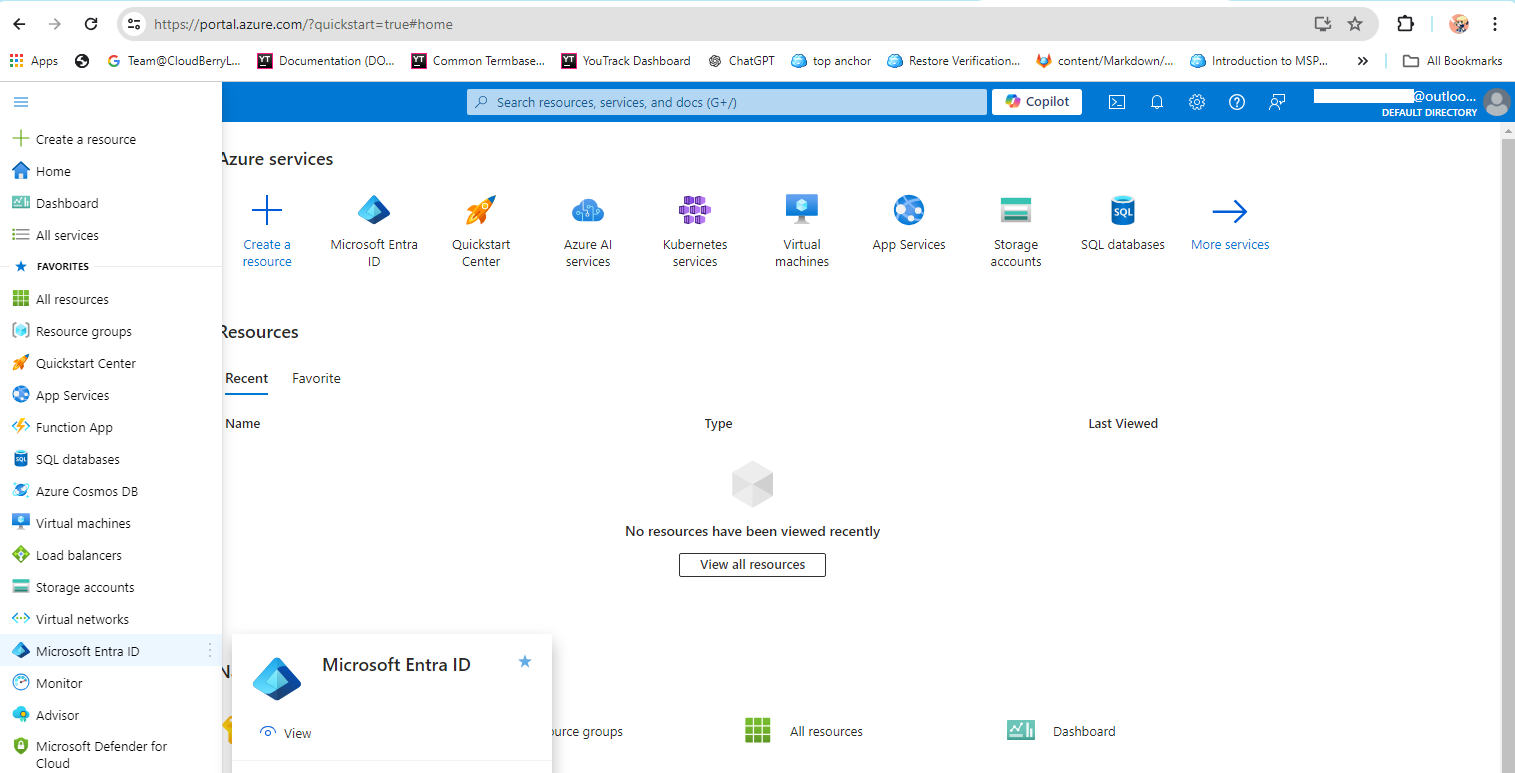
- Click on Users
- You can either create an entirely new user account or use the User principal name of an existing account to create an administrator account in Management Console and then log in to Management Console with your Microsoft credentials.
Create New User on Azure Portal
- Go to the Azure Portal.
- Click on Microsoft Entra ID.

- Click on Users
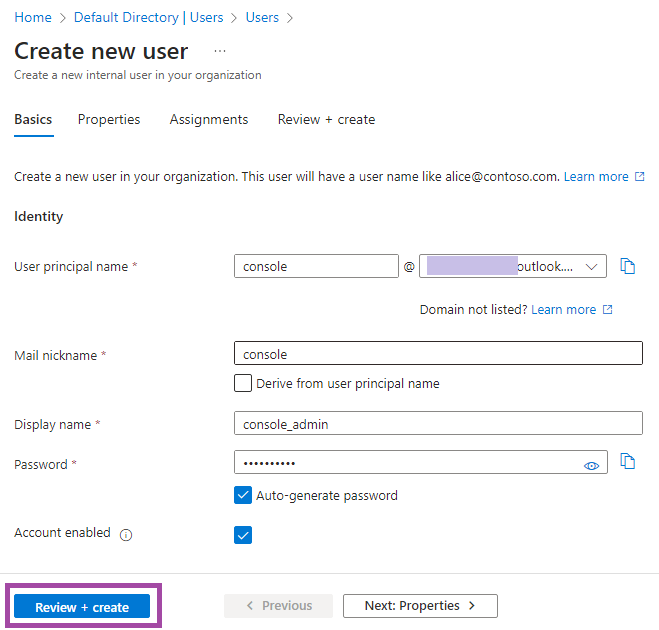
- Click + New user and select one of the available options. This article describes the Create New User option.

- Enter the required information and click Review + create.
- Check the provided information and click Create.
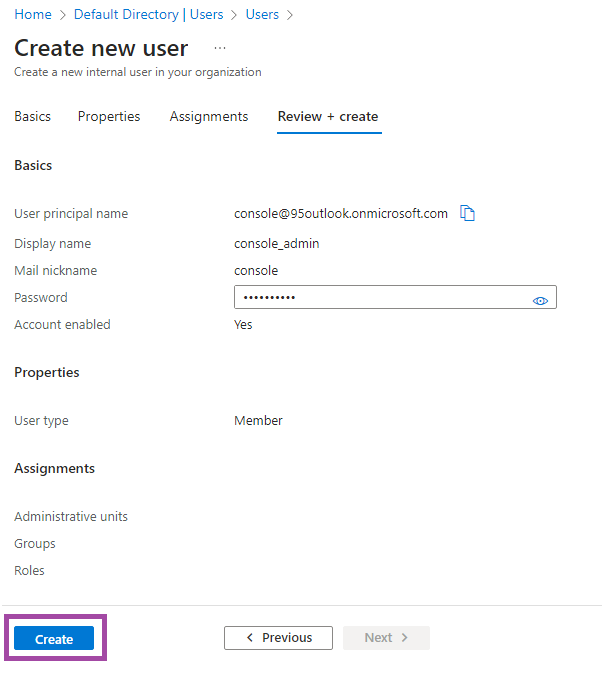
- When the created user appears in the user list, copy the User principal name of this user. You will need this data to create an administrator account in the Management Console.
Grant Required Permissions
To use the Azure storage account and manage the Lifecycle Rules Settings for it, you should grant the newly created user account or an existing account with Owner or Contributor permission to manage your Azure subscription:
- Owner. Users assigned the Owner role have full access to all resources and can manage policies, including creating, editing, and assigning policies.
- Contributor. Users assigned the Contributor role can create and manage all types of Azure resources, including Azure Policy definitions and assignments.
To grant the permission to manage your Azure subscription, perform the following steps:
- Go to the Azure Portal.
- Enter Subscriptions in the top search box to access your subscriptions.

- Click on the required subscription name
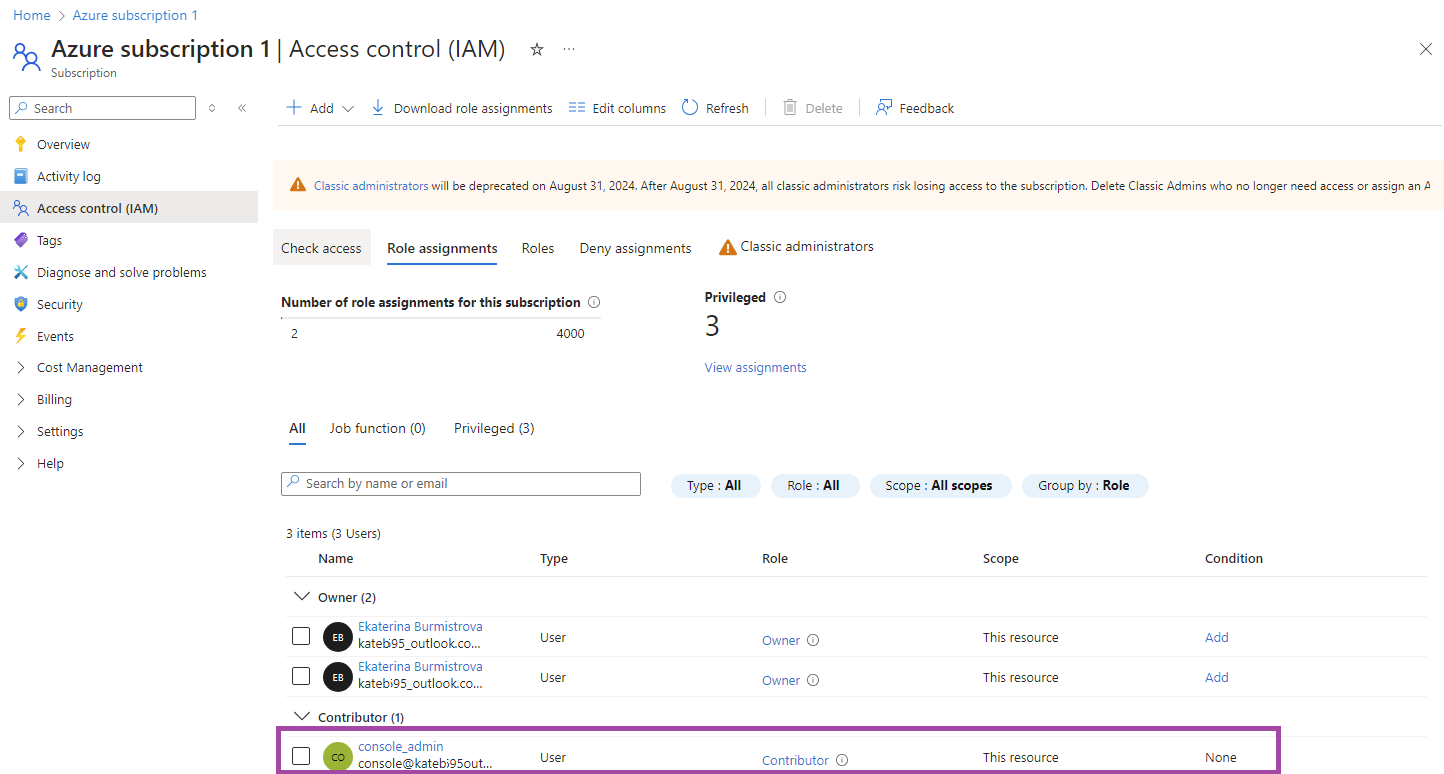
- Click on Access control (IAM) to assign a role to the selected or created account.
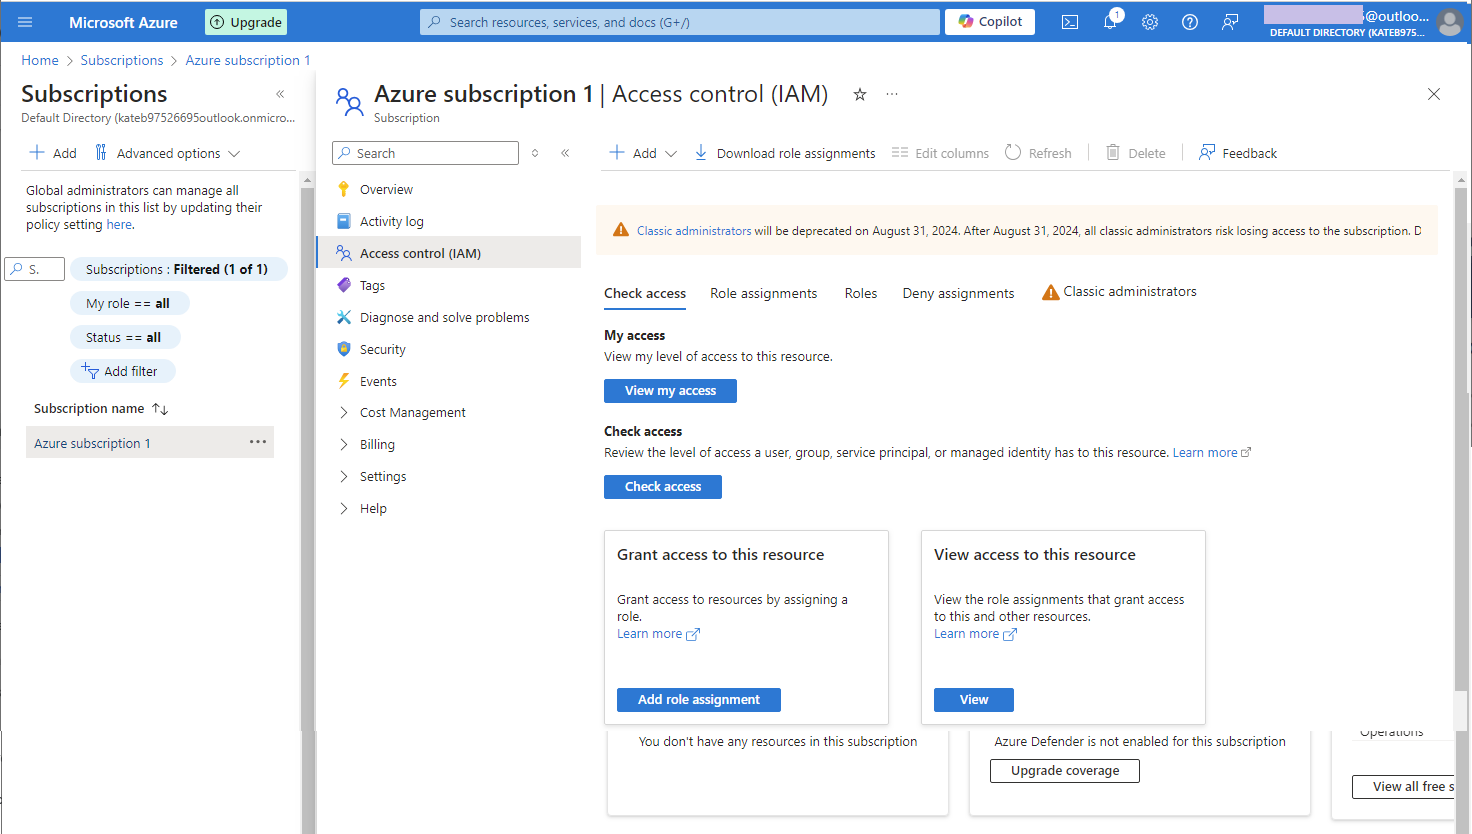
- On the Role Assignment tab, click + Create.

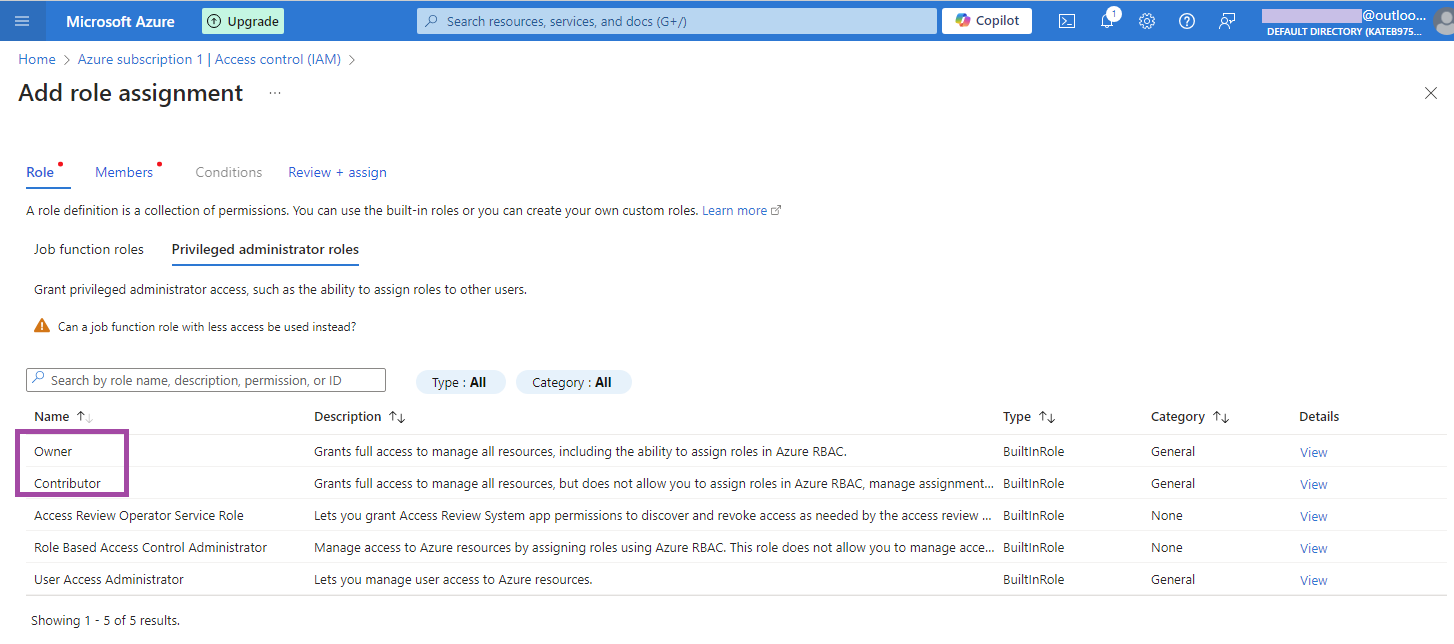
- On the Role tab, select Owner or Contributor role. Search for these roles on Privileged Administrator Roles.
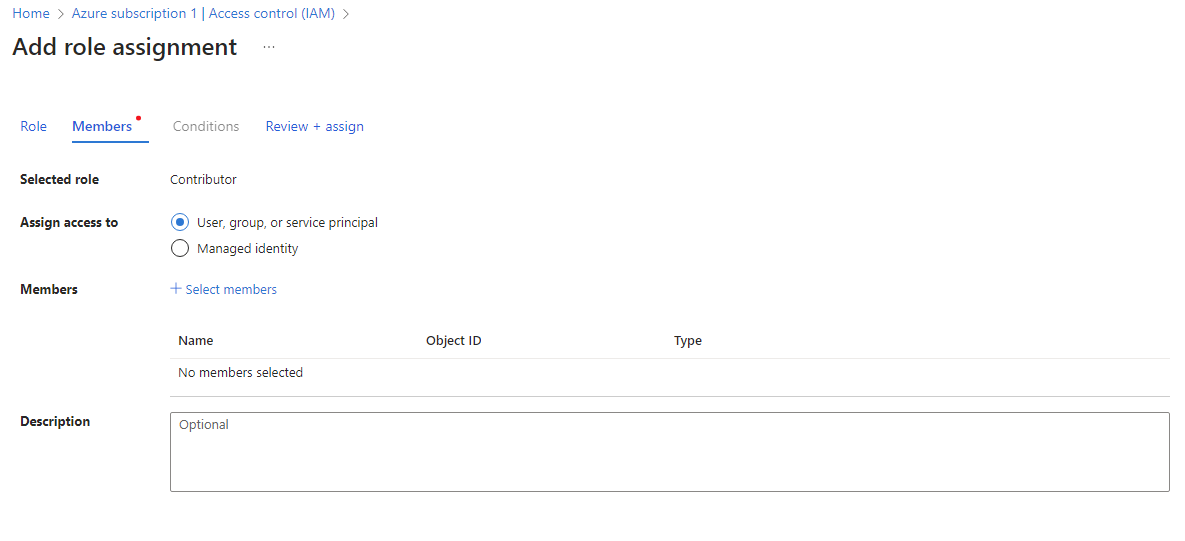
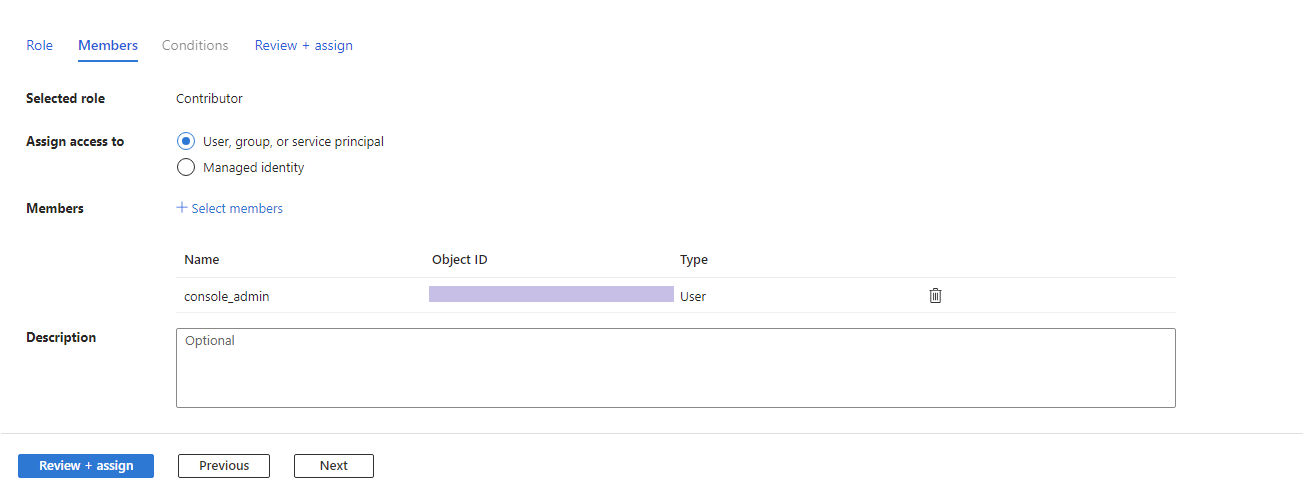
- In this example the Contributor role is selected. On the Members tab, select User, group and service principal radio button, and click + Select members to assign this role to the selected or created account.
- Review and assign the role.
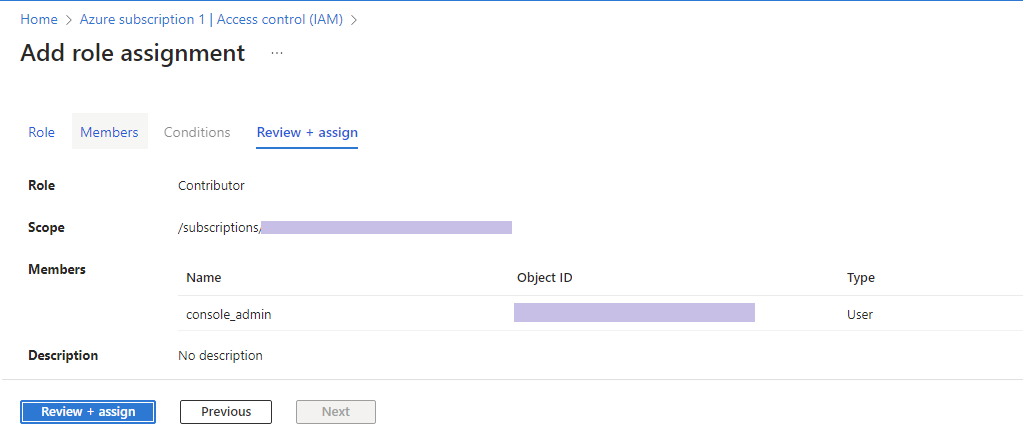
- Once you can see the assigned role on Access control (IAM), you are ready to add the selected or created account as an administrator to the Managed Backup Service Management Console.
Create Administrator
To create a new administrator in the Managed Backup Service Management Console, perform the following:
- In the Organization menu, select Administrators.
- Click +.
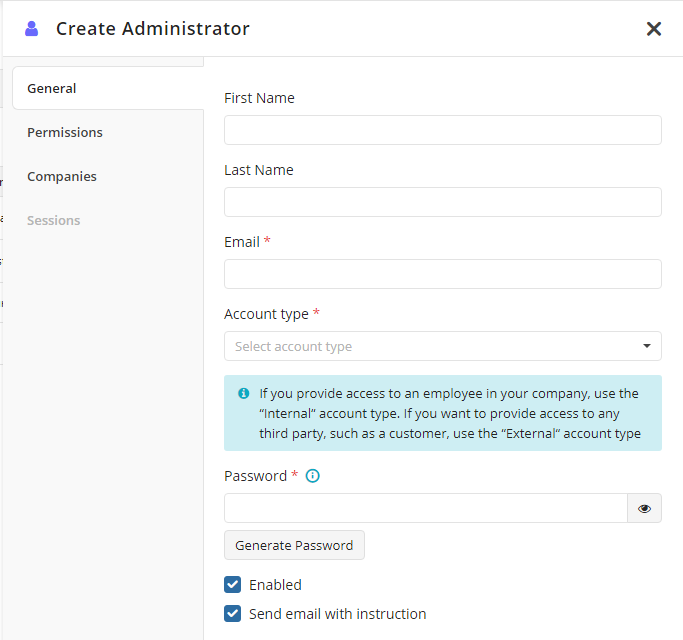
- Specify the administrator's personal information.
- Specify the administrator's email address. You should use the User principal name of the Microsoft Entra ID account created or selected in the previous step as the administrator's email address.
You should use the User principal name only to create the administrator. All other email addresses associated with the Microsoft Entra ID user will not work for this purpose.

- Select the administrator account type. The following types are available:
- Internal. Select this type if you are granting this account to anyone inside your company
- External. Select this type if you are granting this account to any of your customers. No permission restrictions apply to this account type
- Specify the password for the administrator or generate it automatically.
- Select the Enabled check box to enable the new administrator immediately.
- To provide the administrator with initial guidelines, select the Send email with instruction check box.
- Switch to the Permissions tab. By default, no permissions are granted.
- Specify the permissions for the new administrator. You should grant the permission required to create and manage the Azure storage account if you plan to add it for backup purposes:
| Permission | Description | Comment |
|---|---|---|
| Manage Storage Accounts | Administrators granted this permission are allowed to create and manage storage accounts. To learn more, refer to the Storage Accounts chapter | This permission is mandatory |
- Once you are done, click Create.
To log into Management Console using your Microsoft Entra ID (formerly Azure AD) credentials, click the Microsoft icon below the login and password fields and proceed with Microsoft Authentication using your Microsoft Entra ID account credentials.
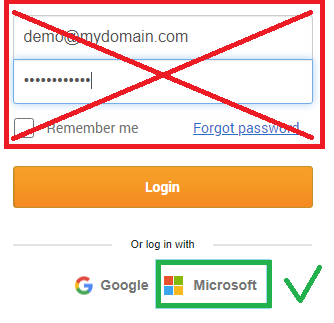
As a result, the administrator will be able to add existing Azure storage account for Managed Backup service usage. In case you do not have an Azure storage account, create it as described below.
Create Azure Storage Account
To create a storage account, proceed as follows:
- In the Azure Management Portal, click Storage accounts in the left sidebar.
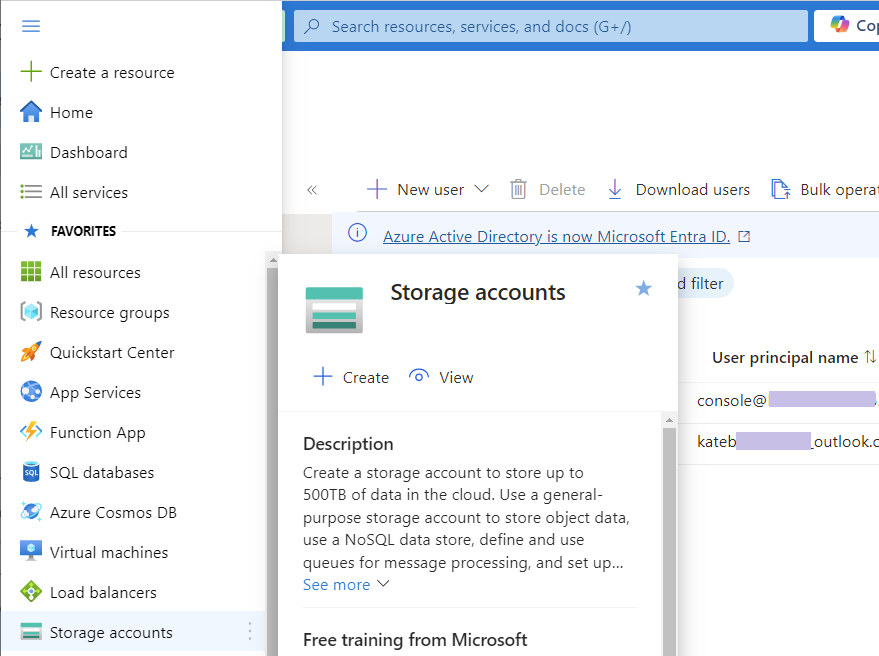
- You will be redirected to the Storage Accounts grid. You can select here the storage account to use for the backup purposes or create a new one by clicking + Create.

- Provide required information and click Review + Create.
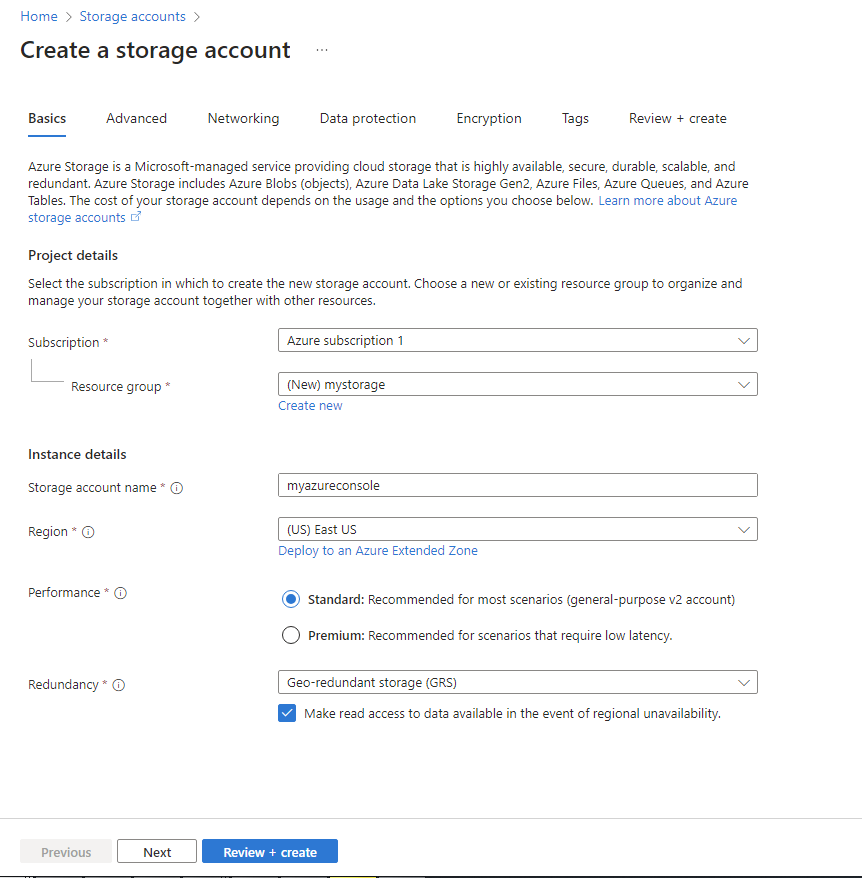
- Check provided information and click Create.
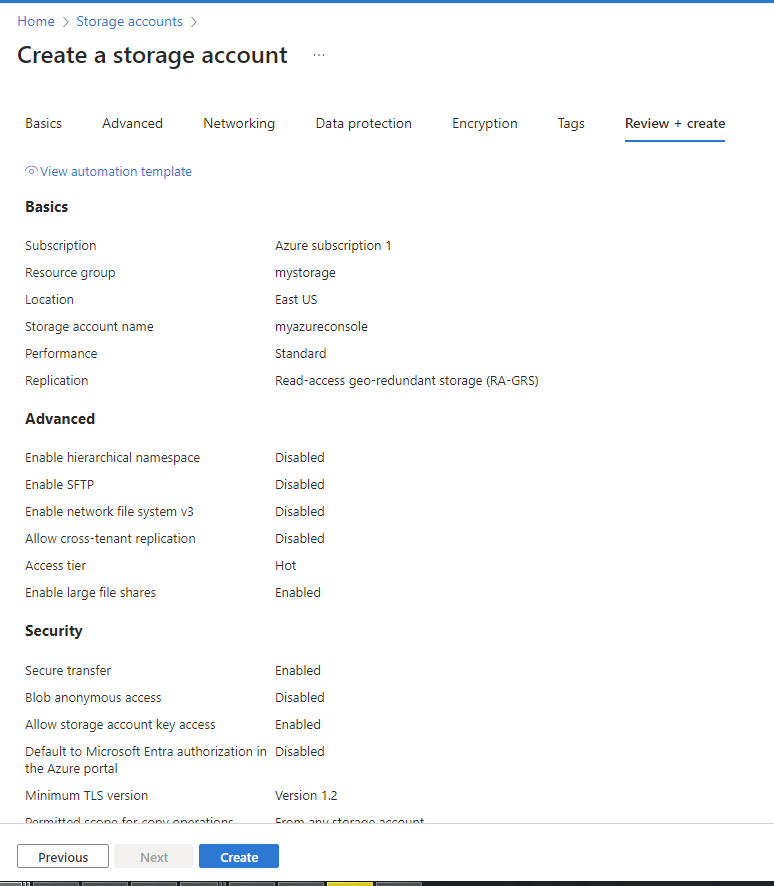
To add this storage account to Managed Backup Service, retrieve the access keys, as described below.
Retrieve Access Keys
To start working with Managed Backup Service you need to generate Azure access keys for the Azure storage account you are planning to use for backup purposes.
- In the Azure Management Portal, click Storage accounts in the left sidebar.

- Click the name of the storage account you are planning to use for backup purposes.

- Expand Security + networking and click on Access Keys. Here you can generate keys or use the default ones.
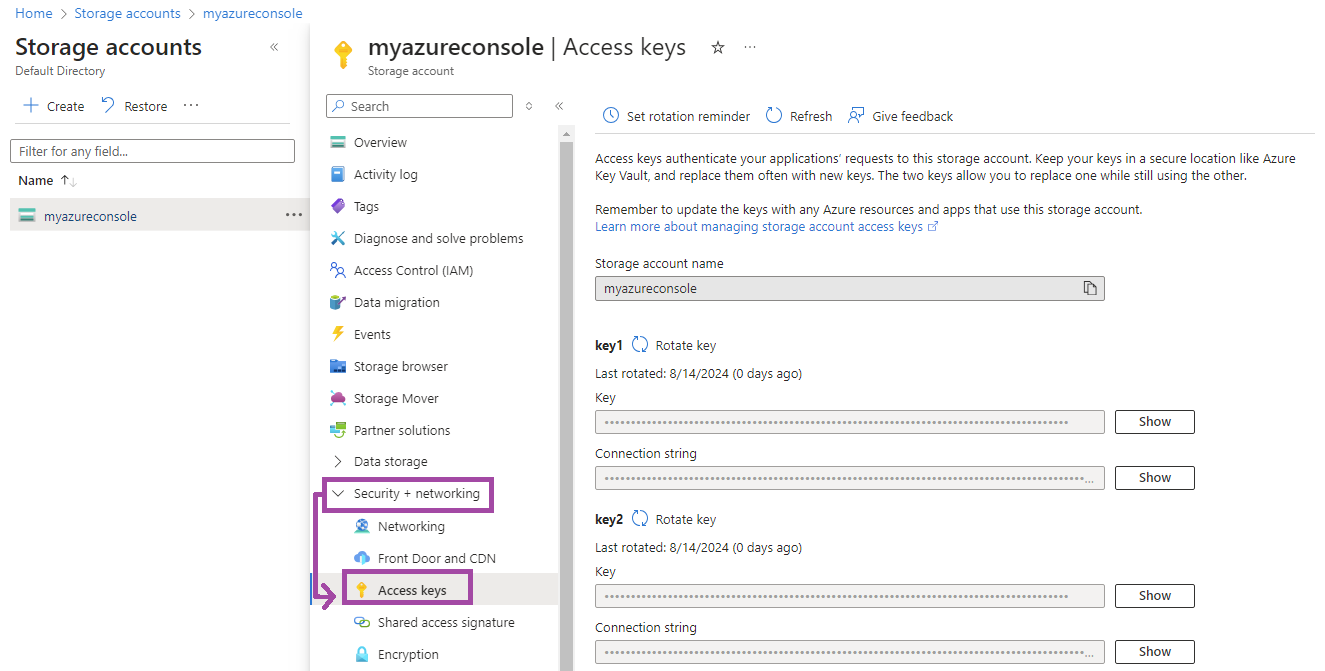
Write down the storage account information somewhere; you will need it in the Managed Backup Service Management Console to add the Azure Storage Account.
Add Azure Storage Account to Managed Backup Service
- Open the Management Console.
- Open Backup > Storage Accounts.
- Click Add Account to open the Add Cloud Storage wizard.

- Select Microsoft Azure.

- Click Next.
- Specify the retrieved credentials to access the storage account.
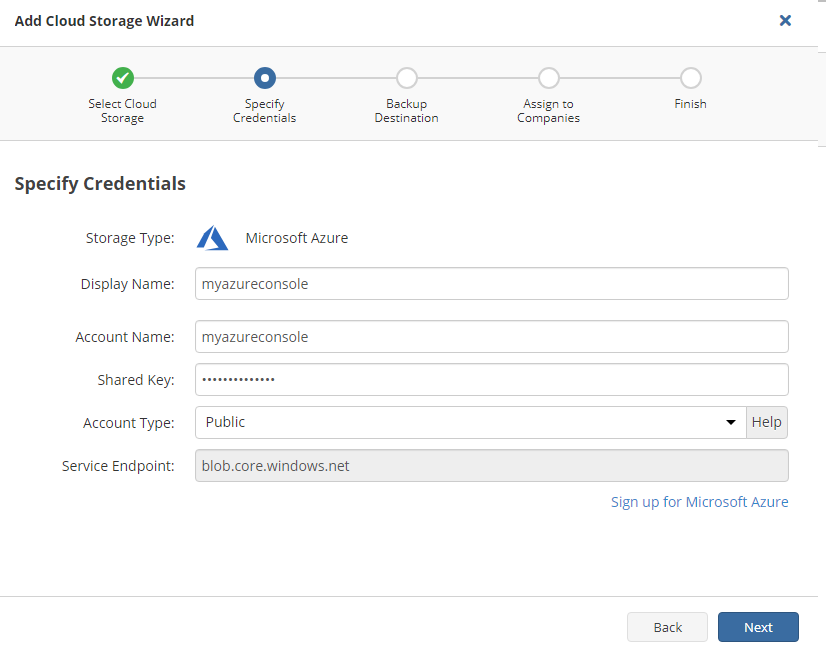
If you want to create a new storage destination, click Sign Up for Microsoft Azure
- Click Next.
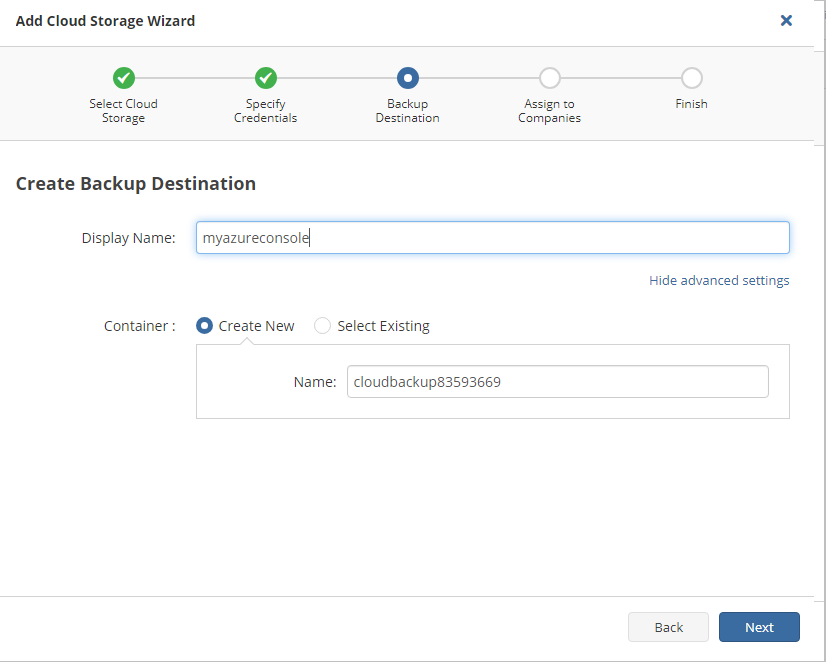
- Specify the container. In the Display Name field, specify the container name which will be displayed, then select whether you use an existing container or create a new one:
- Select the Create New option to create a new container
- Select the Select Existing option to use the existing container, then select it in the drop-down list.
- Click Next.
- Select the companies or users to assign to the storage account.
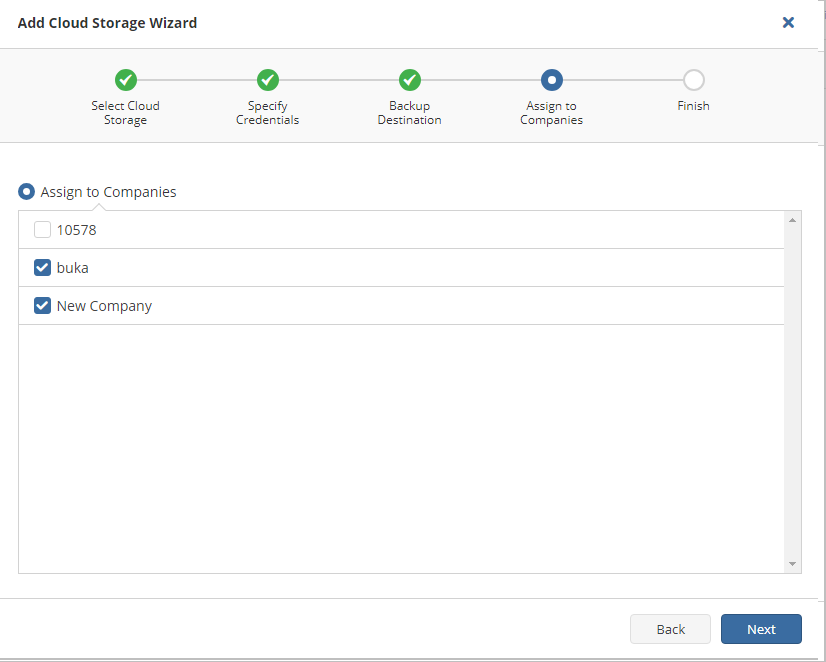
Note that it may take a while to assign companies and users to the storage account
- Click Next.
- View the storage account summary, then click Save.
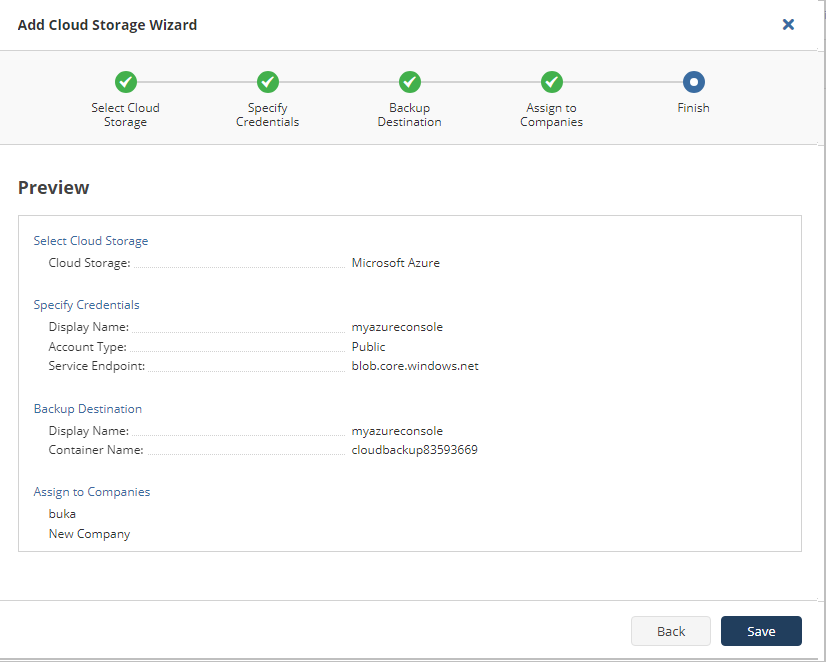
Refer to Manage Storage Accounts for more information on how to manage the added Azure storage account.
- Note, the Lifecycle Rules Settings are not yet configured for the Azure Storage account.

To manage Lifecycle Rules Settings for the Azure storage account refer to the Azure Lifecycle Policies article.
There are some required actions needed to manage the Lifecycle Rules Settings. You cannot perform some operations with the added backup storage unless these actions are performed.