Backup History Report
The backup history report contains data on backup plans performed in a specified period of time. This chapter covers the following topics:
View Reports
To view the list of available reports, select the Scheduled Reports item in the Reporting menu.
The list of available reports has a grid view.

The report table columns contain the following data:
- The report type
- Schedule options
- Filtering options
- The next report delivery time
- List of recipients
- Report state
To open an HTML report or download a CSV file, expand the actions next to the report.

Select Send Now to send the report immediately.
Add and Configure New Report
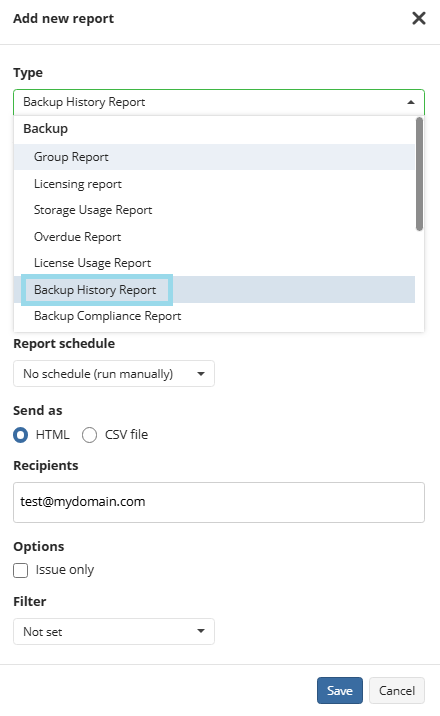
To configure a new report report, proceed as follows:
- Open the Management Console.
- In the Reporting menu, select Scheduled Reports.

- Click +.
- In the drop-down list in the Backup group, select the Backup History Report.

- Name the report.
- You can select the number of months for which the report will be generated
- Specify the schedule options for the report. The following options are available in the Schedule type option group:
- No schedule. Select this option if you want to generate and receive a report manually
- Monthly. Select this option if you want to receive a report on a monthly basis
- In Day of month drop-down list, select the required day of report delivery
- In Sending Time drop-down list, select the required time of report delivery
Specify the report format. The following formats are available:
- HTML
- CSV
Specify recipients for the report.
Select Issue Only to receive only a report about the plans with issues.
Specify filtering options.
- Select Not set option (set by default) to receive the full report
- Select By company option to receive reports on the specific company
- In Company drop-down list, select the company you want to receive the report on
- Select By user option to receive reports on the specific user
- In User drop-down list, select the user you want to receive the report on
Once you are finished, click Save.
Edit a Report
To Edit a Report
- In the Reporting menu, select Scheduled Reports.
- Click the edit icon in the line of the report you want to edit.

- Make the required changes (refer to the Add a New Report paragraph to learn about the available settings ).
- Once you are finished, click Save.
Delete a Report
To Delete a Report
- In the Reporting menu, select Scheduled Reports.
- Click the delete icon in the line of the report you want to delete.

- Confirm the report deletion in the dialog box.