Account Settings
To manage the account settings for Google Workspace Backup (except for the Provider account), click the account icon to the right of the horizontal menu bar to access the Account menu.

Click My Account. On the user account side panel, you can configure your account settings.
The following settings are available on the General tab:
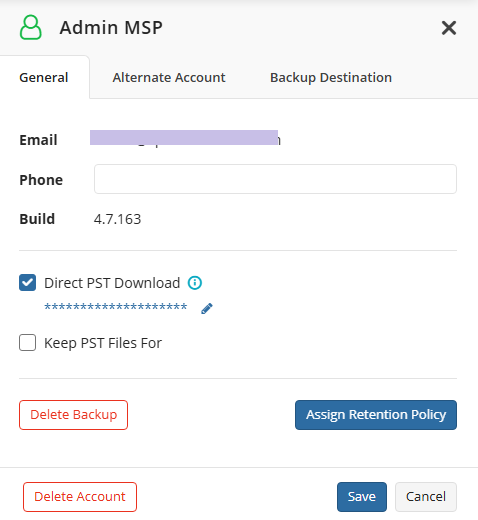
- Email. Specifies the email you use to register your contact. All product notifications and reports will be sent to this email address. Note that the email address cannot be changed in Account Settings.
- Phone. Specifies the contact phone number.
- Build. Specifies the Microsoft 365 / Google Workspace (formerly Office 365 / G Suite) product version.
- Direct PST Download. Allows you to download exported PST files directly from the backup storage, for example, using CloudBerry Explorer. You should set a password to protect PST files exported after the password is set. Downloaded archives can be unzipped locally with the standard tools using the password.
- Keep PST Files For. Specifies the retention policy for exported PST files.
Note that once you enable the Direct PST Download option, files exported after the password is set will be password-protected and compressed, but not encrypted.
You can perform the following actions on the General tab:
- Assign a retention policy
- Delete your backup. This operation removes all information about your backup. Backup data can remain in your backup storage for a short period until the deletion operation is complete.
- Create a retention policy for exported PST files.
- Delete account. All data related to this domain's users / user backups will be cleared. Users' backups will remain in the backup storage and will be kept according to assigned retention policy.
If your backed-up domain is deleted by mistake, you can access your backup account with an alternate email address to restore the backup content.
The following actions can be performed from the Alternate Account tab:
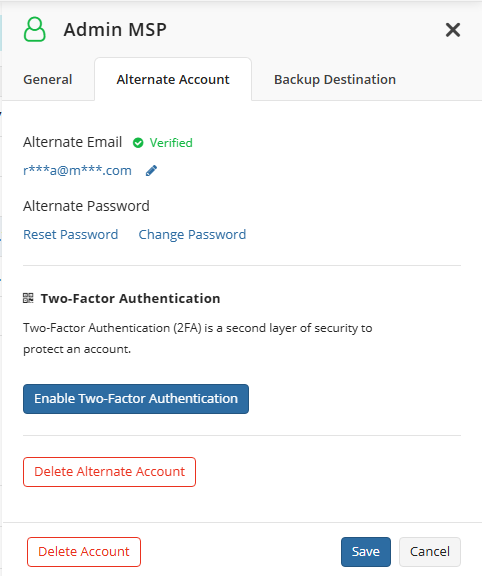
- Configure your alternate account
- Reset or change alternate account password
- Delete account
- Delete alternate account
- Enable Two-Factor Authentication
Edit Your Contact Info
On the General tab, specify your phone number, if required. Note that the email address cannot be changed in Account Settings.
Alternate Email Address
Specify an alternate email address. For security reasons, it is required to delete domain users' data, and it adds another layer of security to the backup content. It is recommended to use a strong password for this alternate email. Save your contact info to apply. Visit your mailbox to verify the alternate email address as described below.
To verify the alternate email address:
- Visit your mailbox to verify the alternate email address.
- In the Alternate email address verification email, click Activate email. Check your spam filters if you cannot see this email.
Now your alternate email is ready to be used.
Delete Account
To Delete Your Account
Select My Account in the user menu to the right of the horizontal menu bar.
Click Delete Account. Confirm deletion.
Note that once you delete your account, all associated settings and domain users data will be deleted permanently from the backup project! This cannot be undone.
Delete Alternate Account
To Delete Your Alternate Account
Select My Account in the user menu to the right of the horizontal menu bar.
On the Alternate Account tab, click Delete Alternate Account. Confirm deletion.
Note that once you delete your alternate account, all associated settings will be deleted permanently from the backup project! This cannot be undone.
Two-Factor Authentication
Two-Factor Authentication is a process that involves two authentication methods performed one after the other to verify that the party requesting access is who they claim to be. Microsoft 365 enables 2-step verification to cover possible security issues.
To enable Two-Factor Authentication:
- On the Alternate Account tab, click Enable Two-Factor Authentication.
- Scan the QR code with any compatible application such as Google Authenticator, Microsoft Authenticator, or Authy, then enter the numbers displayed in the authentication application in the verification code field.
- Confirm enabling Two-Factor Authentication by entering the alternate email password. Click Validate.
Edit Your Backup Destination
On the Backup Destination tab, you can manage your current backup destination.
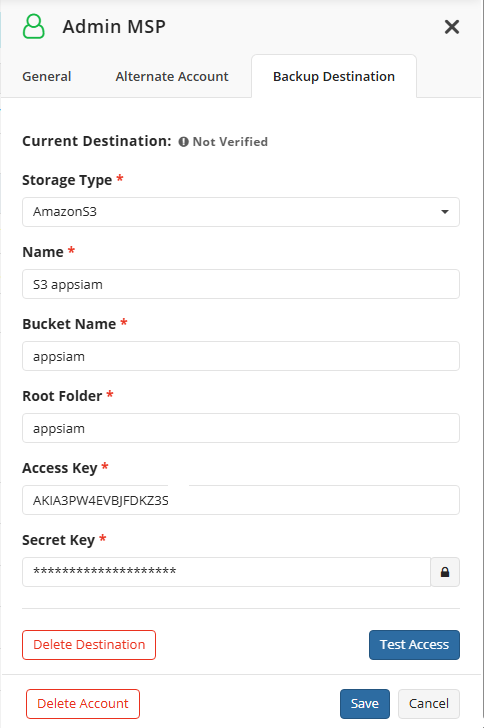
Click the Test Access button to check the accessibility of your backup destination. If everything is OK, the current destination becomes verified.
Delete Backup Destination
To Delete Your Backup Destination
- Select My Account in the user menu to the right of the horizontal menu bar.
- Click Delete Destination. Confirm deletion.
Delete Account
To Delete Your Account
Select My Account in the user menu to the right of the horizontal menu bar.
Click Delete Account. Confirm deletion.
Note that once you delete your account, all associated settings and domain users settings will be deleted permanently from the backup project! This cannot be undone.
Delete Backup Data
To Delete Your Backup Data
Select My Account in the user menu to the right of the horizontal menu bar.
On the General tab, click Delete Backup.
In the Delete Backup dialog, select the data to delete, and confirm the data deletion by entering the alternate email password. If your backup storage has Object Lock (Immutability) enabled, deletion is not available. Contact your cloud storage provider's support for assistance.
Click Delete. Confirm deletion.
Note that once you delete your backup, all settings associated with your backup will be deleted permanently! This cannot be undone.