Manage Users
For details on how to manage users in Management Console refer to Manage Domain Users. This chapter is intended for Microsoft 365 Backup administrators and covers the following topics:
Add Users
By design, the Microsoft 365 Backup system cannot automatically add more than 20,000 users at once. If your domain contains more users, you should contact the support team to request permission for a full domain sync, allowing all users to be backed up.
IMPORTANT: If you attempt to sync more than 20,000 users without the permission, only the users already added to the backup will be synchronized until the required permission is granted.
To add new users/groups (Microsoft 365 Groups) to Microsoft 365 / Google Workspace Backup, open the dashboard, and on Users in Actions menu select Sync domain. Users will be added automatically.

With this menu you can:
Sync Domain. Add all actual domain users to the user grid.
Add All to Backup. Add all actual domain users to backup.
Export to CSV. Export all actual domain users to a comma-separated value file.
User Groups. Navigate to the list of Microsoft 365 Groups to manage backup for them
Shared mailboxes and public folder mailboxes are also added and synchronized along with regular mailboxes. Every shared mailbox or public mailbox requires 1 user backup license. You can identify added shared mailboxes in the exported CSV file (the "Shared mailboxes" column contains TRUE for shared mailboxes).
You can enable all or specific users to configure backup for them.
Manage Users and Groups
To manage users/groups of your domains or separate users, included in Microsoft 365 / Google Workspace Backup, select Users in the horizontal menu bar of the dashboard.
All users/groups are listed in the grid. Headers are active grid elements which allow you to sort lists according to specified criteria. You can select multiple users or user groups to configure backup for them.
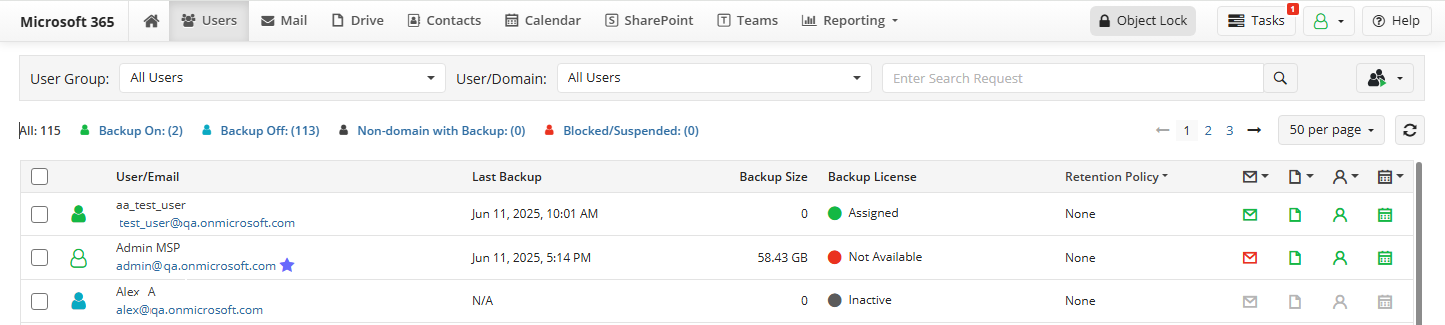
The grid contains the following data:
User/Email. Username and registered email address. Global Microsoft 365 administrators are marked with star signs.
Last Backup. Date and time of last backup
Backup Size. User backups size on storage
Backup License. Backup license status for the user. The following statuses are available:
- Assigned. This status means that the license is assigned to the user and is active. This status is painted green
- Not available. This status means that the license is either deleted or expired. To learn more about licenses, refer to the Licensing chapter
- Inactive. This status means that backup service is switched off for the user and license is not used.
Retention Policy. This status specifies whether the default or custom retention policy is used.
User Groups filter can be used to select:
- users outside any group (Not in Groups),
- users included in specific Microsoft 365 group, distribution list, or mail enabled security group
- all users (All Users). This option clears the filter.
User / Domain filter can be used to select:
- All - all users. This option clears the filter
- Users in Domain - all users included in backed up domain
- Users Not in Domain - all users with configured backup that resides outside backed up domain
- Blocked/suspended Users - all users with sign-in blocked or suspended status
The following statuses can be used to filter data:
- All - all users. This option clears the filter
- Backup On - all users WITH configured backup
- Backup Off - all users WITHOUT configured backup
- Non-Domain with Backup - all users with configured backup that resides outside backed up domain
- Blocked/suspended - all users with sign-in blocked or suspended status
Also, you can use search to filter the users by search expression. Type the search expression in the Enter Search Request box and click the search icon.
Icon Explication
Users grid contains a set of controls which can be used to manage settings. Learn grid icons and their meaning.
| Icon | Description |
|---|---|
 |
Mail backup settings for selected user |
 |
OneDrive backup settings for selected user |
 |
Contacts backup settings for selected user |
 |
Calendar backup settings for selected user |
Configure Backup Options for Selected User
To configure backup options for one user, select this user in the grid, then click Configure Backup to configure backup services for this user in the pane to the right.
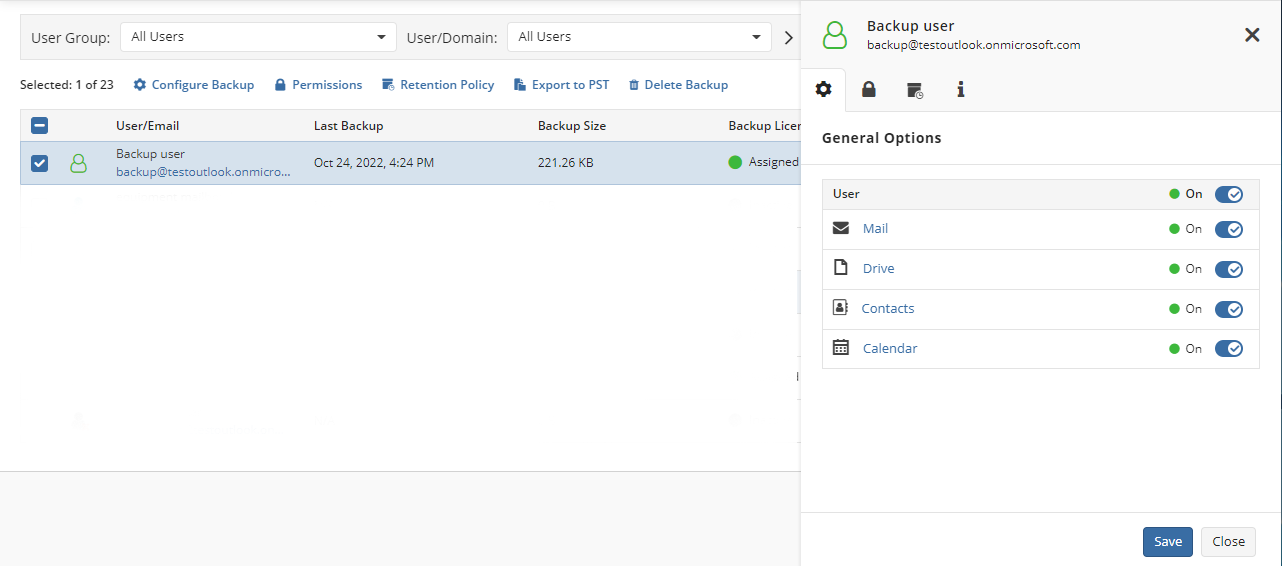
Depending on Auto-activate new users settings, added new users can be enabled or disabled in the grid. To configure the backup for the disabled user, turn off the disabled state for this user in the side panel, then enable backup for the following Microsoft 365 services: Mail, Drive, Contacts, and Calendar. Once you are done, click Save.
Configure Backup Options for Multiple Users or Groups
To configure backup options for multiple users or groups, select required users/groups in the grid, then click Configure Backup to configure backup services for these users in the pane to the right. You can use filters above the grid to simplify the user search process. select required users/groups in the grid, then click Configure Backup to configure backup services for these users in the pane to the right. You can use filters above the grid to simplify the user search process.
To disable multiple users or groups, select required users/groups in the grid, then click Configure Backup and turn off enabled status for these users/groups (main selector). All backup services will be disabled for these users/groups. Microsoft 365 / Google Workspace licenses will be released for these users.
To resume backup services for the disabled users, turn off the disabled status for these users (main selector), then enable backup for desired backup services. Microsoft 365 / Google Workspace licenses will be assigned again for these users, if available.
Once you are done, click Save.
Configure User Permissions
To configure user permissions for one user, select the required user, then click Permissions. In the pane to the right select the user permissions and an alternate account required to validate some operations, e.g., deleting the user's backup content.
The following permissions are available:
- Sign In. Enable this option to allow users (except for Global Microsoft 365 administrator which is granted with this permission by default) to sign in to console and view their settings
- Restore. Enable this option to allow selected users to restore data from the backup content.
Also you can enable and configure an alternate account for the selected user. Once you are done, click Save. To configure permissions for multiple users, select required users to apply permission configuration to them, then click Permissions. On the side panel, select user permissions and set an alternate account for these users. Once you are done, click Save.
Retention Policy
To configure the assignment of retention policies created according to the Retention Policy chapter, select the required user(s) and click Retention Policy.
In the side panel to the right, select the existing retention policy for selected user(s) as described in the Retention Policy chapter.
Export to PST
To export copies of messages, calendar events, and other items for the selected user to the PST (personal storage table) file, select the required user(s) and click Export To PST. Export tasks will be created. You can monitor these tasks in Task Manager. After the task is complete, you will be notified by email.
Notification will contain a link to the backup storage folder with the exported PST file. You can download the exported PST file using this link. Alternatively, you can download the exported PST file from the Reporting > Export Results.
Refer to the Export to PST chapter for details.
Export to CSV
To export users data to a CSV (comma-separated values) file, select the required user(s), then click the Actions menu and select Export To CSV. The Users.csv file will be exported to your Downloads folder.
Delete Administrative Account
Only the provider and administrators can perform this operation.
To delete administrative account:
- Open Dashboard.
- In the Account menu click My Account.
- Click Delete Account on the bottom of the side panel.
- Confirm account deletion by clicking Delete. All data related to the domain users / user backups will be cleared, but user backups will not be deleted from the backup storage
Delete Backup Content for Selected Users
Only the provider and administrators can perform this operation. Users are not allowed to delete their own backups.
To delete backup content for one or multiple users, select the required user(s), then click Delete Backup.
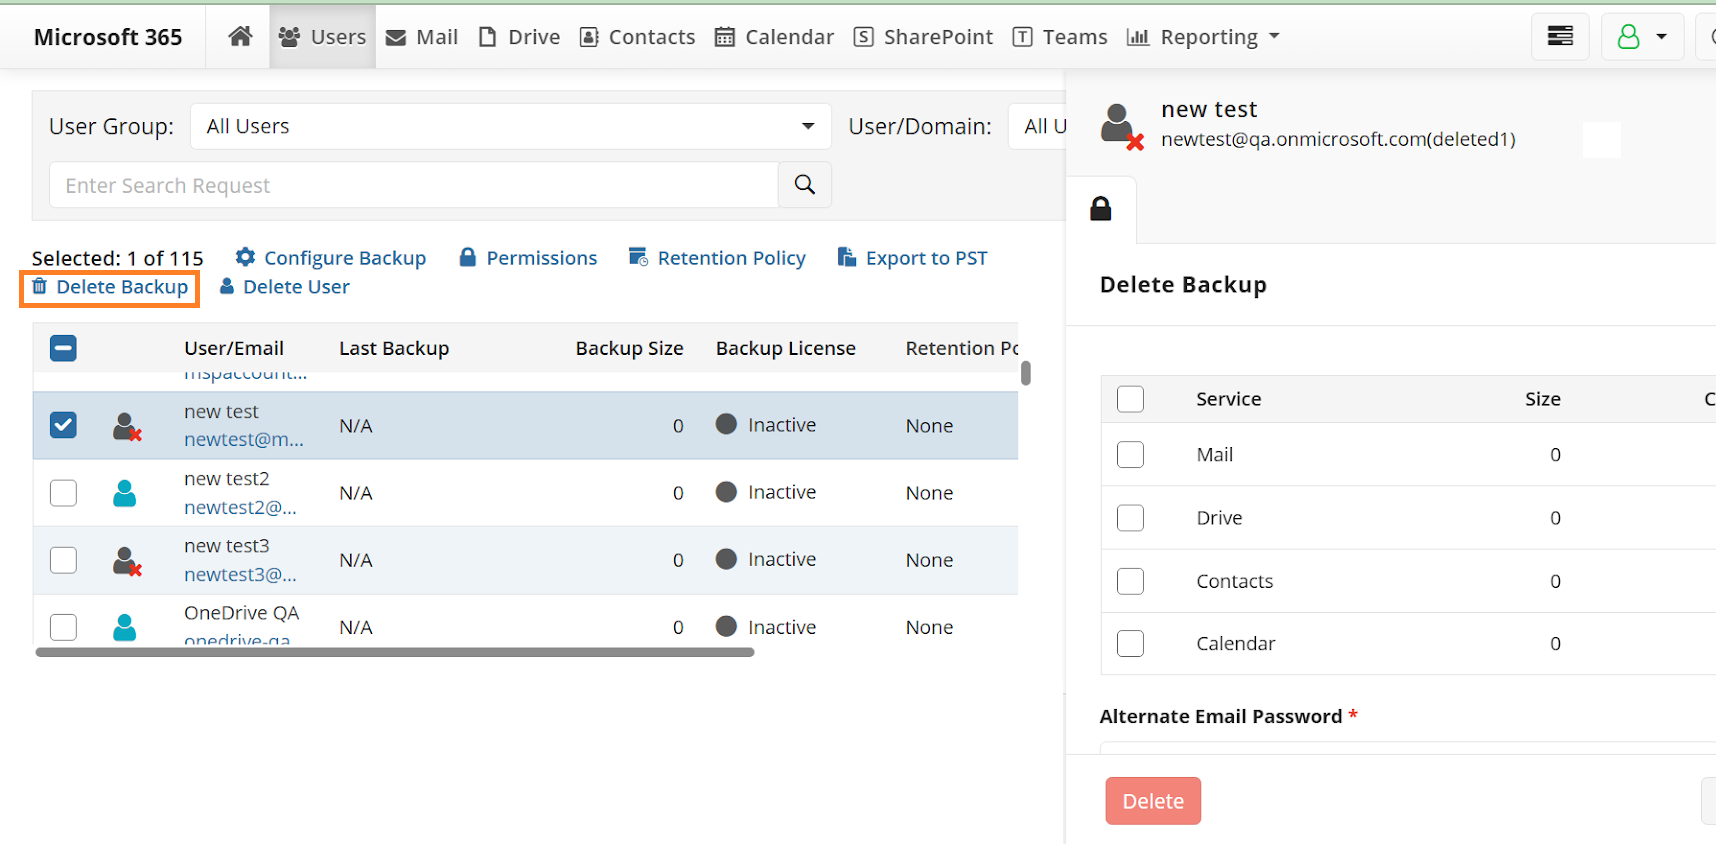
- In the right pane, select Microsoft 365 services to be deleted from backup contents.
- Specify the alternate email address. Deletion operations require setting up an alternate email address.
- Click Delete. The backup content will be deleted from backup storage.
Note that data deletion is not available without providing an alternate email password or in case of immutable backup storage destinations. In case of immutable backup storage destination contact your backup storage provider support for assistance
Delete Selected Users
Only the provider and administrators can perform this operation.
To delete one or multiple users, select the required user(s), then click Delete User.
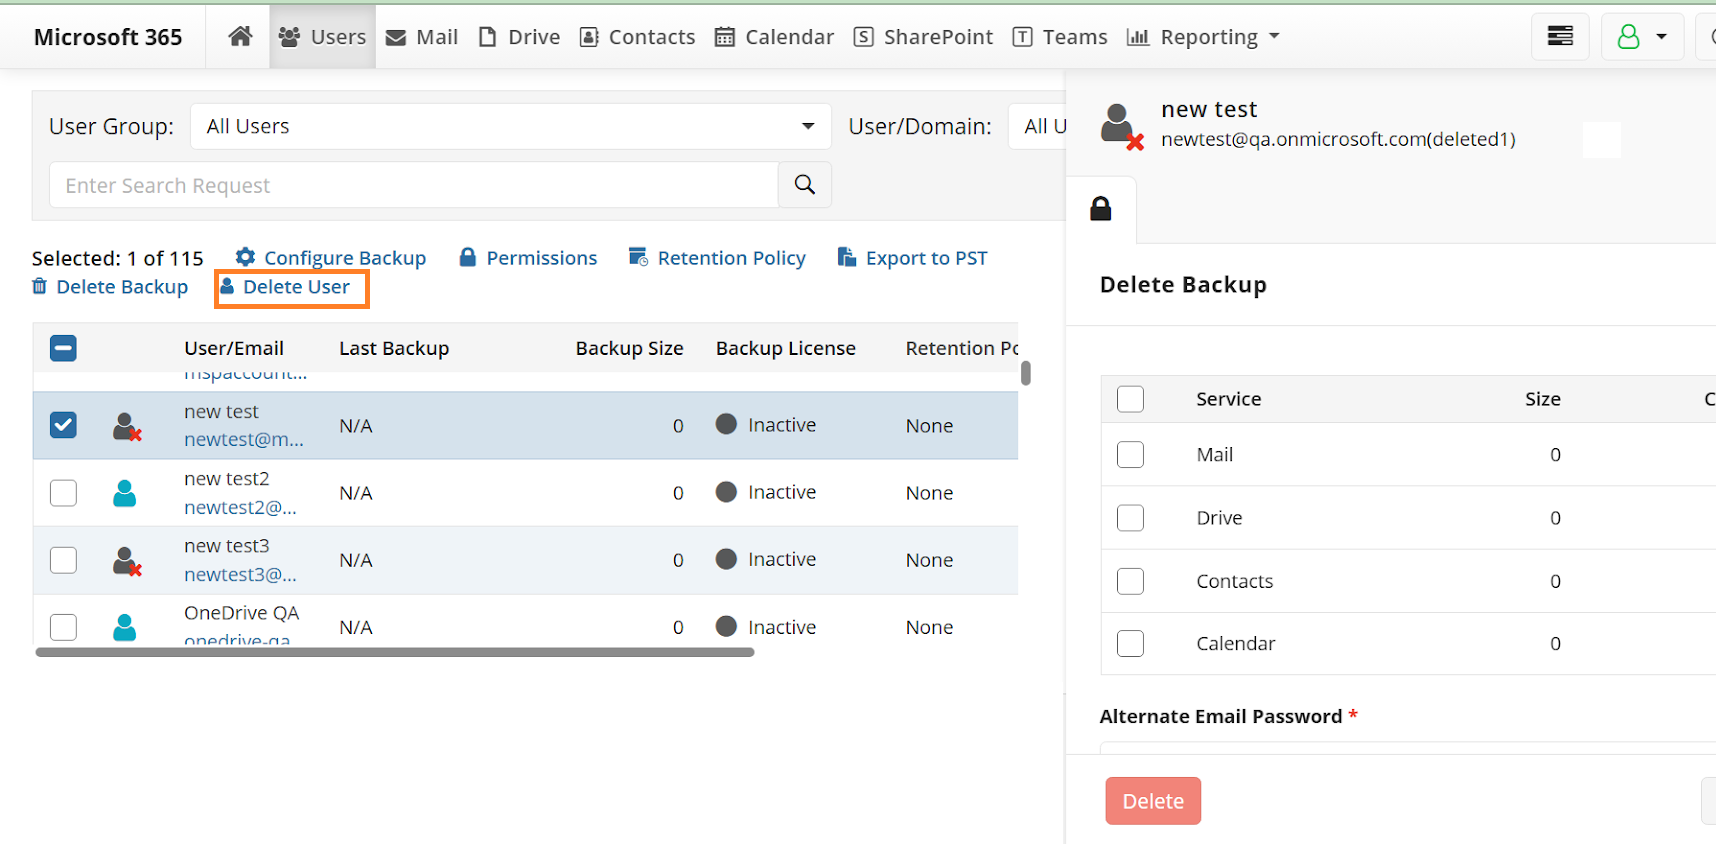
- Specify the alternate email address. Deletion operations require setting up an alternate email address.
- Click Delete. Selected users will be deleted.
User deletion permanently removes all associated backup data across all services, including SharePoint