Manage Computers
For remote management of computers, the Management > Computers, ex-Remote management permission should be granted as the administrator permission on Organization > Administrators.
This article covers the following:
Remote Management Options
You have the following computer management options:
- Computers page in the new main menu
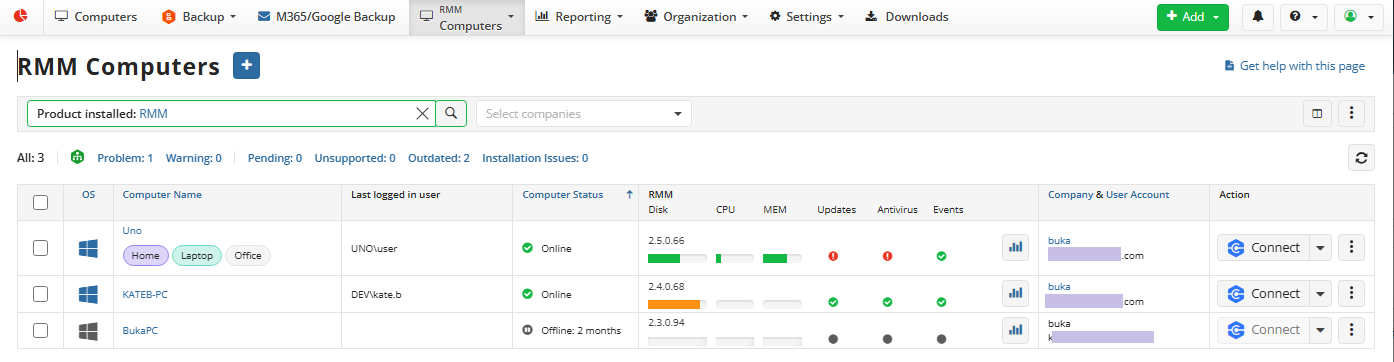
- RMM > Computers page in the new main menu. New enhanced main menu introduces this separate page where you can see the computers with the RMM Agent installed. New menu is available for all new users and for existing users.
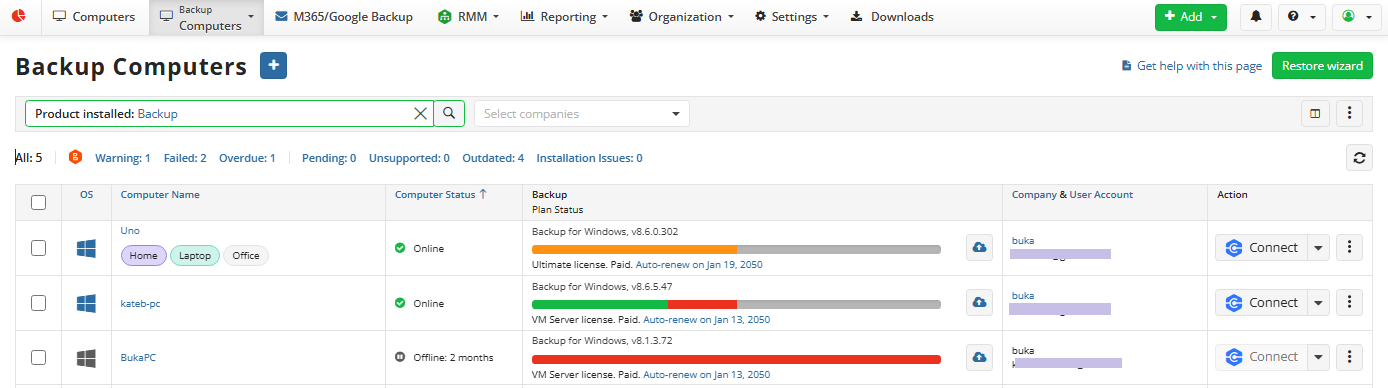
- Backup > Computers page in the new main menu. New enhanced main menu introduces this separate page where you can see the computers with the Backup Agent installed. New menu is available for all new users and on demand for existing users.
- Computers > Remote Management in the legacy main menu
To access the Remote Management tools, proceed as follows:
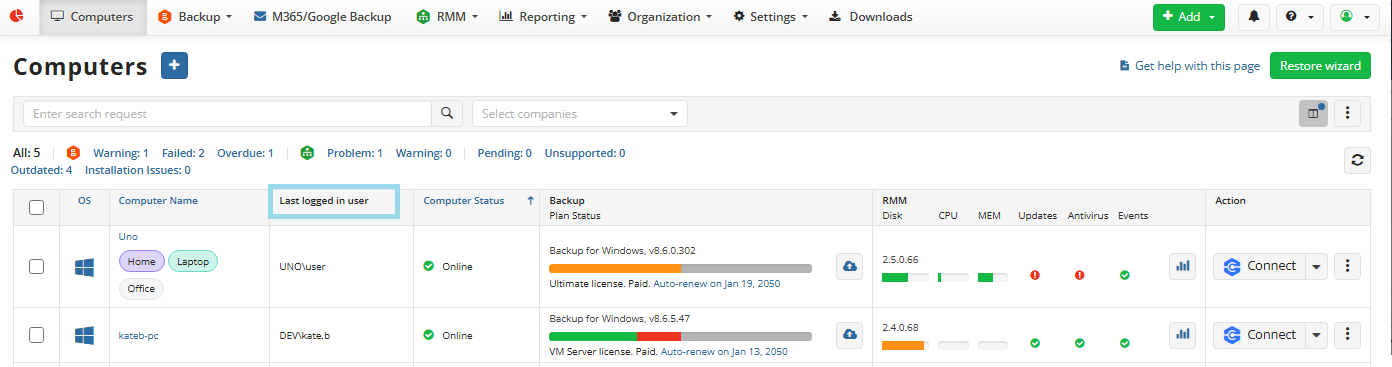
- Open Computers to manage all computers. Now You can see the last logged in user for the computers.
- Open Backup > Computers to manage all computers where Backup Agent is installed
- Open RMM > Computers to manage all computers where RMM Agent is installed
Refer to Add Computer to Remote Management and Manage Computers (Enhanced User Experience) for details on how to manage computers.
Add Computer to Remote Management
To add a computer, proceed as follows:
- Open the Management Console as a provider or an administrator who can manage the company that will contain the computer or all companies.
- On the Computers click Add Computer.
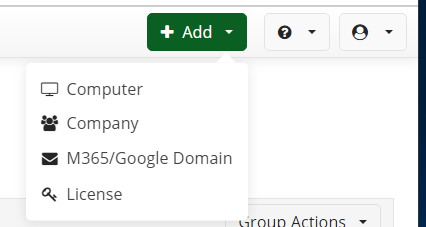
Proceed with Add Computer wizard as described below
Prepare Configuration Before to Add Computer
- On the Pre-Configuration step, select the MSP360 product to install on the computer. Later you can add other products, if you want.
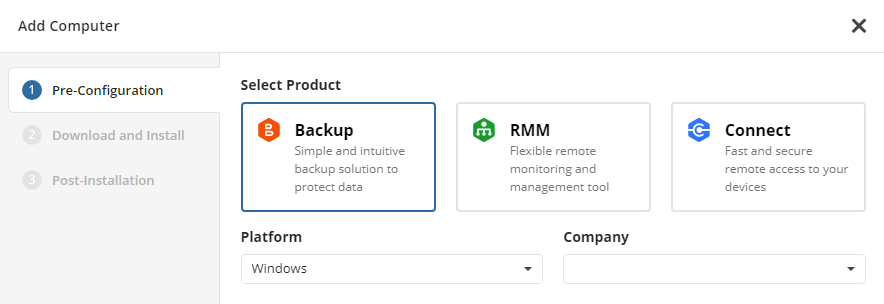
- Select the operating system of the computer.
- Select the company you are planning to add this computer to. Expand the Company to select one of the existing companies or to create a new one. To add an existing company, click on the company name.
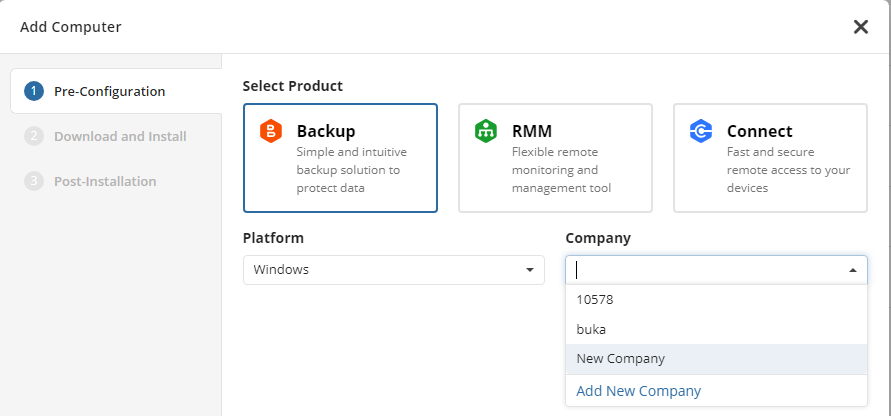
To create a new company click Add New Company and specify the new company name. You can configure your new company later as described in Companies.
- Click Next to select the installation method.
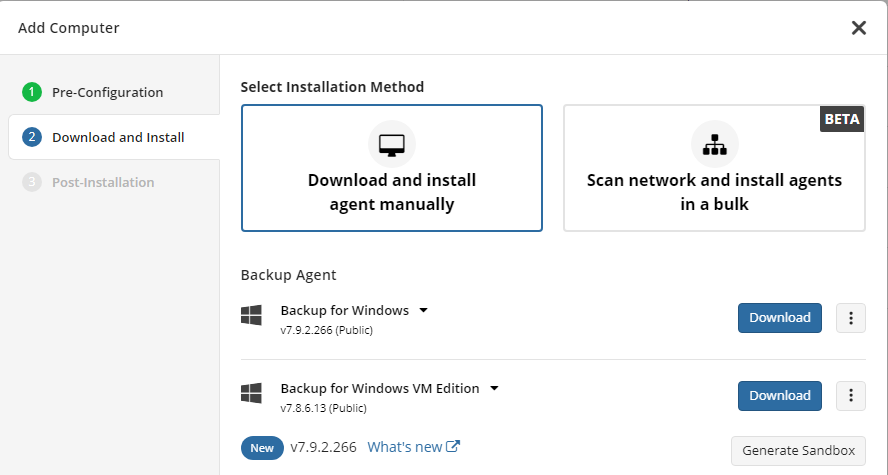
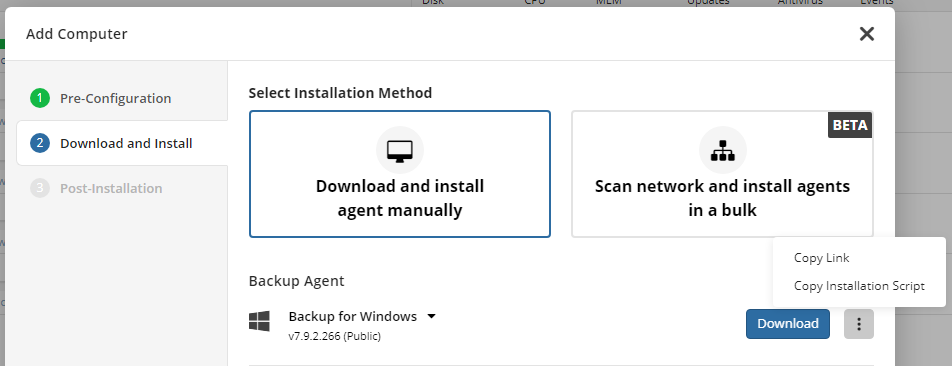
Select Installation Method to Add Computer
On this step you can select the installation method. You can perform downloading and installation manually with Download and install manually or use beta version of Discover and Deploy tool with Scan network and install agents on bulk.
Download and install manually
- Select the package to install on the computer. In case there are no generated builds, click Generate after the build you are going to install. Wait while the build will be generated for you. By default, the public build is suggested to be installed. You can see the newest version of the product and can make it public by the Make Public button. As soon as the newest version becomes public it will be available for all users. In case you already have generated builds and the Enable Sandbox option for the download panel is enabled, you can add the newest version to your sandbox to test it before making it public. To add the newest version to sandbox, click the Make Sandbox button.
You can copy the installation script to execute it on the added computer or copy the link to download. To perform these operations use the actions next to the Download button.
- Download and install the package on the target computer. To perform these operations use the actions next to the Download button. To install this script on the target computer, run PowerShell with administrator privileges, then execute the copied script. This computer, except for computers that are already included in another company, will be included in the specified company. In case the installation script will be executed on a computer that is already included in another company, Agent will be installed, but the original company remains unchanged.
- Click Next. On the Post Installation step you will see the instructions on how to complete the procedure.
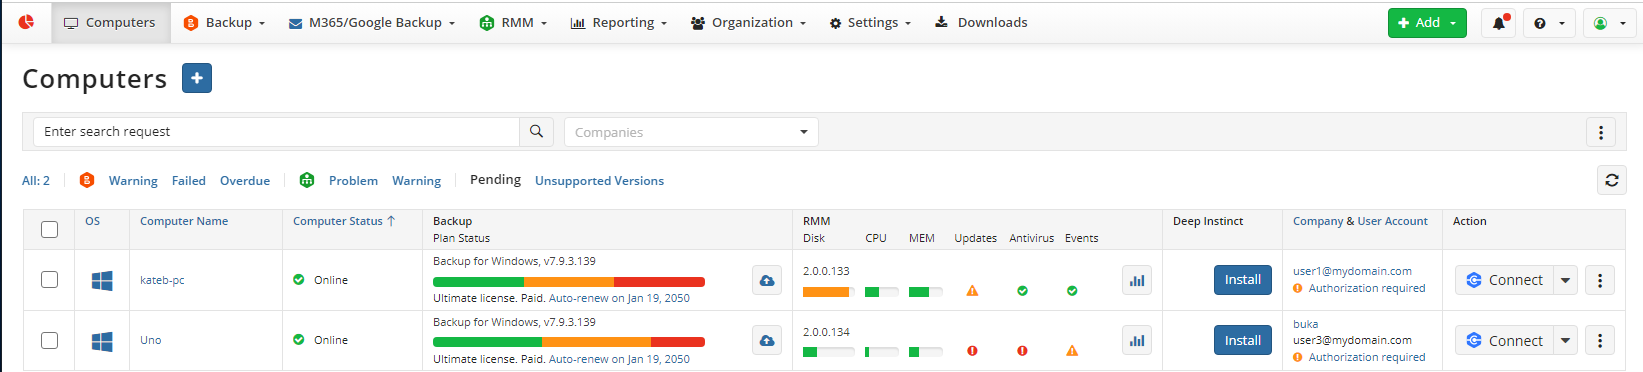
Note, in some cases you will need to refresh the Computers page to see the new computers. Use the Pending filter to quickly find added, but not yet authorized computers. You should authorize the computer before you will be able to manage it. Close the wizard if all required build are downloaded. The Backup Agent must be installed in the default location.
Scan the network and install agents in bulk.
- Download and install the Discover and Deploy tool package on the target computer.

You can copy the installation script to execute it on the added computer or copy the link to download. To perform these operations use the actions next to the Download button.
- Click Next. On the Post Installation step you will see the instructions on how to complete the procedure.
Refer to the Discover and Deploy chapter for instructions on how to scan your environment and install Agents.
Note, in some cases you will need to refresh the Computers page to see the new computers. Use the Pending filter to quickly find added, but not yet authorized computers. You should authorize the computer before you will be able to manage it. Close the wizard if all required agent versions are downloaded. The Backup Agent must be installed in the default location.
Authorize Computers
Once the selected Agent is installed on the computer, refresh the Computers page to see the new computers. Use the Pending filter to quickly find added, but not yet authorized computers.
- On the Computers grid find the computers that require authorization using the Pending filter.
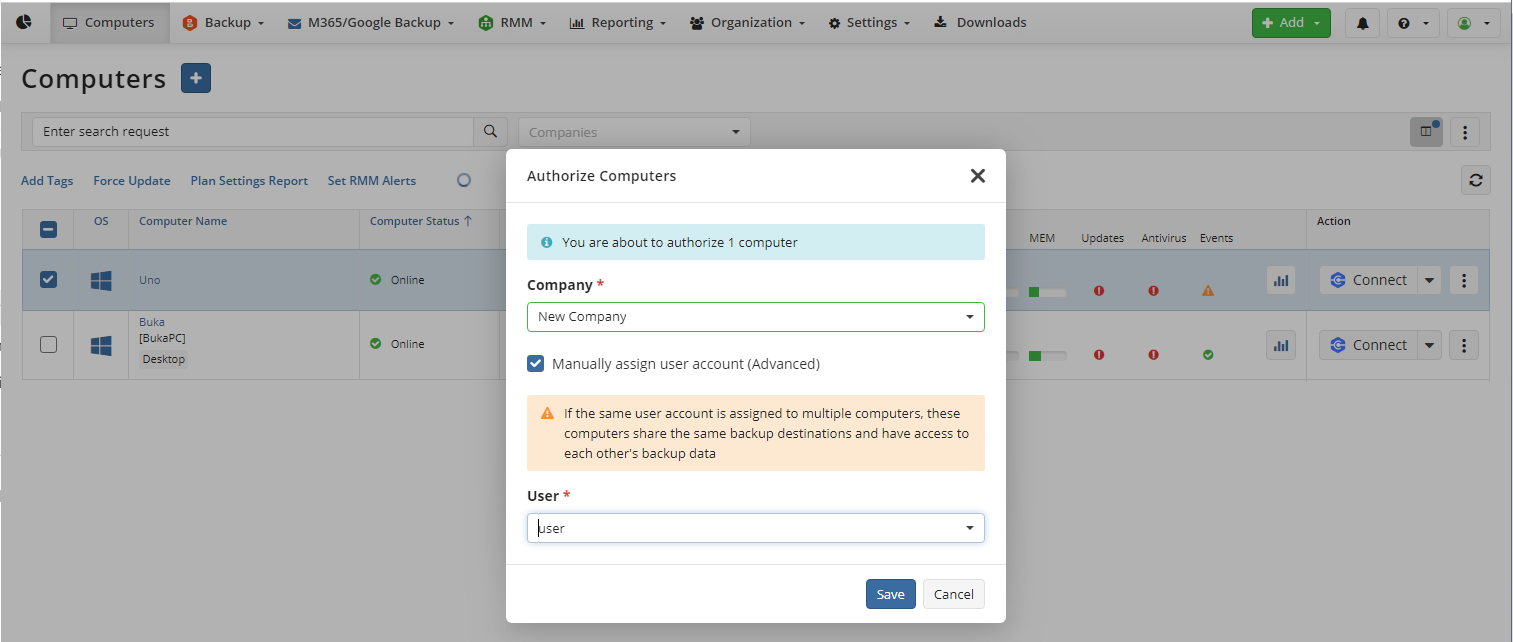
- Click Authorize action item or right-click in a computer entry, then select Authorize computer. For a single computer in the Company & User Account column, click Authorization required.
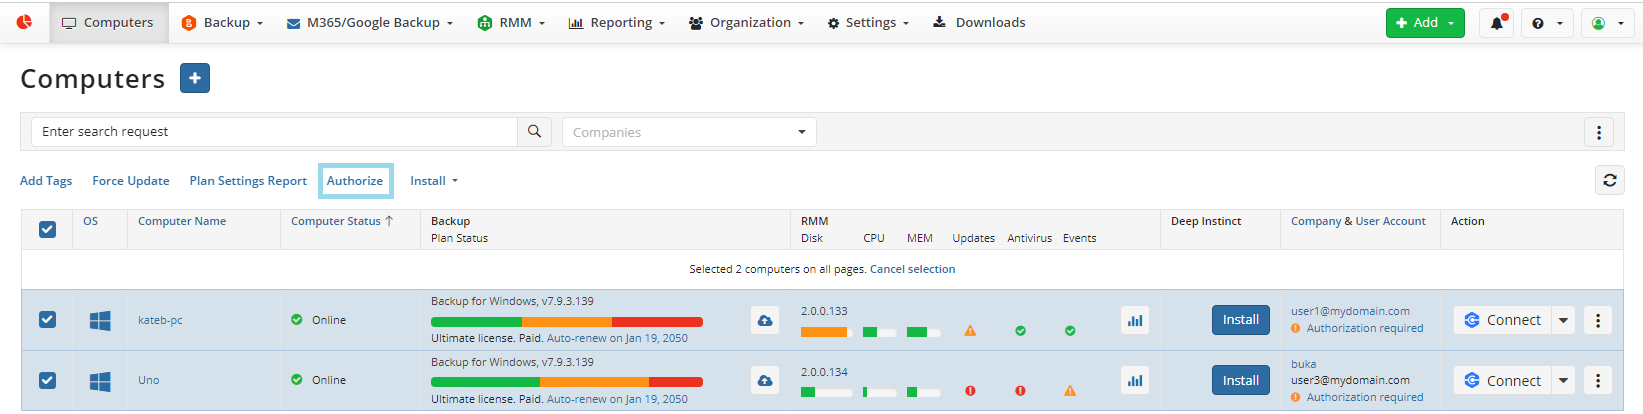
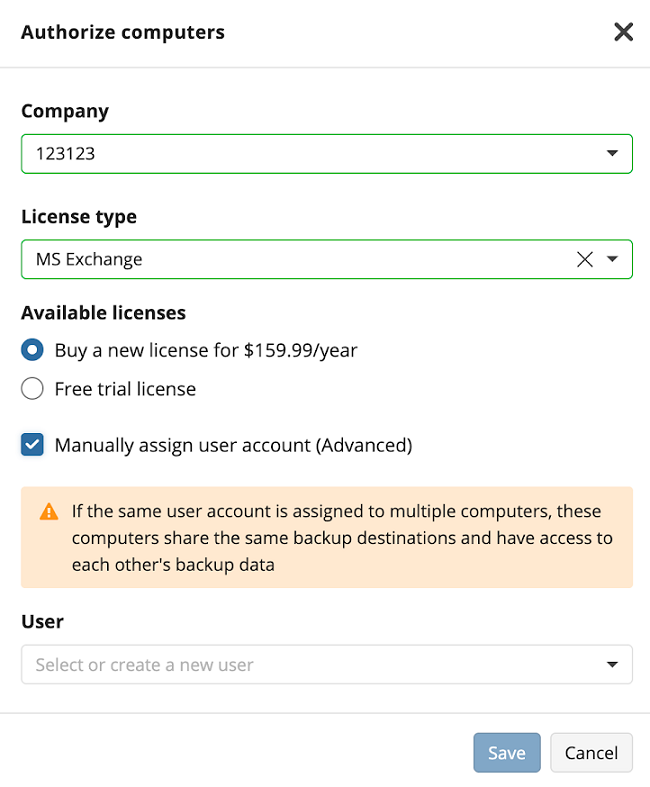
- Select or create a new company to add the computer. In case you create a new company you can configure the new company later. Now you only set a name for the new company.
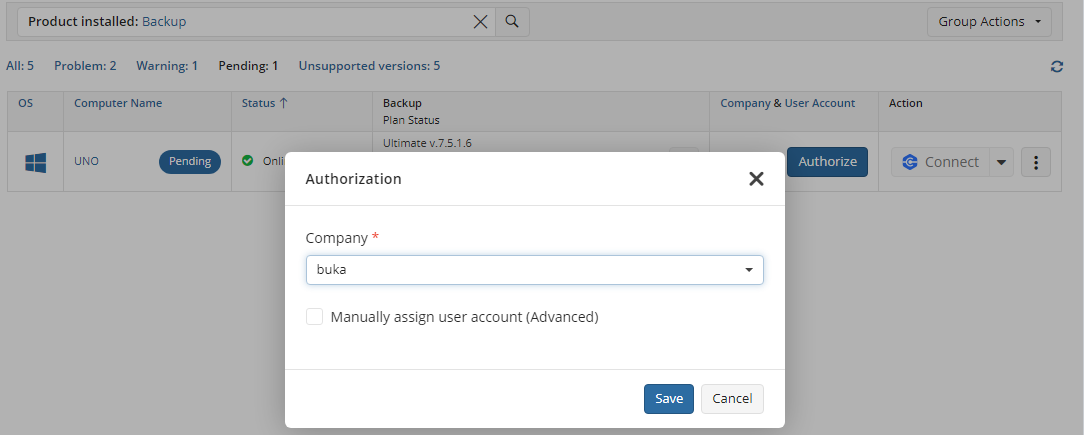
You can manually associate the computer with the user with Manually assign user account (Advanced).
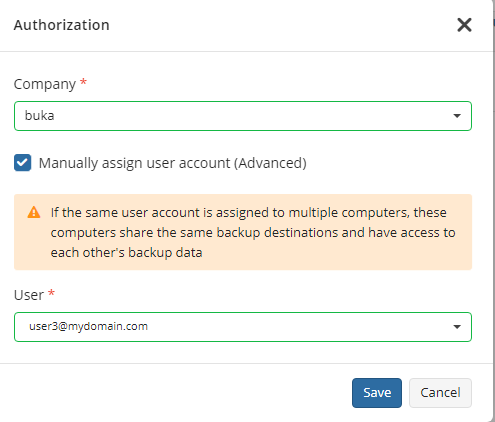
It is not recommended to use the provider account for backup purposes. Consider, if the same account is assigned to multiple computers, these computers will share the same backup destinations and backup data access will also be shared between these computers
If you select a specific user, the selected user should be enabled. Check the user status on the Organization > Users.
If this is the first authorization after installing the Backup Agent, you can set the license type for the Backup Agent to use on this computer.
Manage Computers
Context Menu for Remote Management
Manage your computers remotely in the Computers menu. The new context menu help you to quickly navigate to the important features. Right-click on the required computer entry to access context menu:
Computers and Backup > Computers. The following options are available for computers:
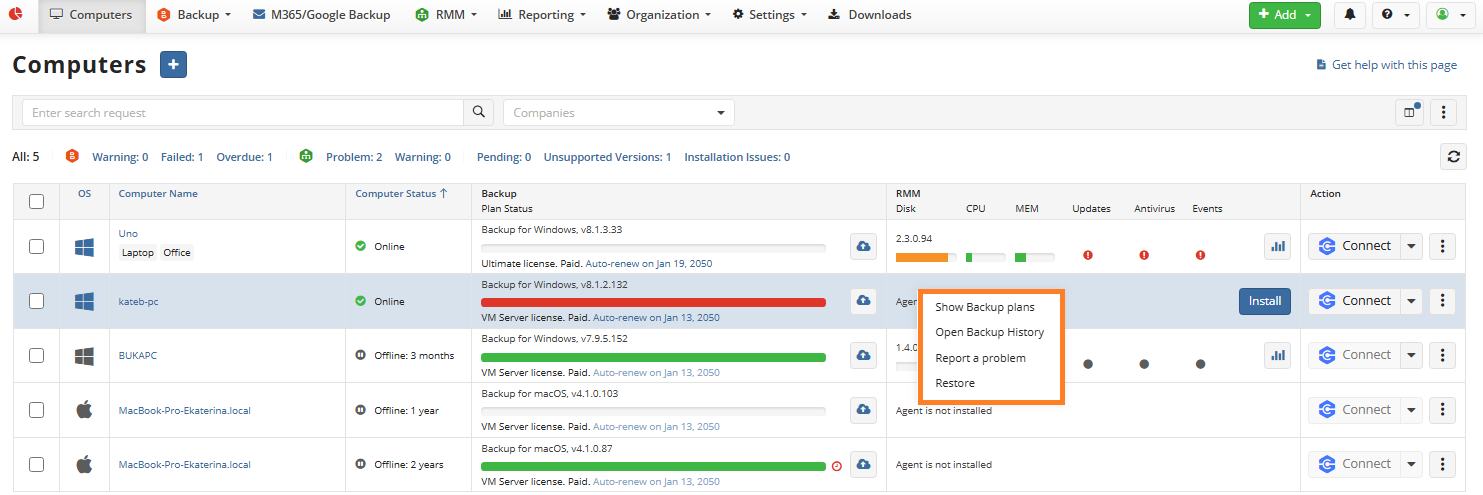
- Authorize computer (available only if the computer requires authorization).
- Show backup plans. Navigate to the Backup Plans tab on the side panel.
- Open Backup History. Open the Backup History grid in the new tab.
- Restore. Navigate to the restore options on the side panel.
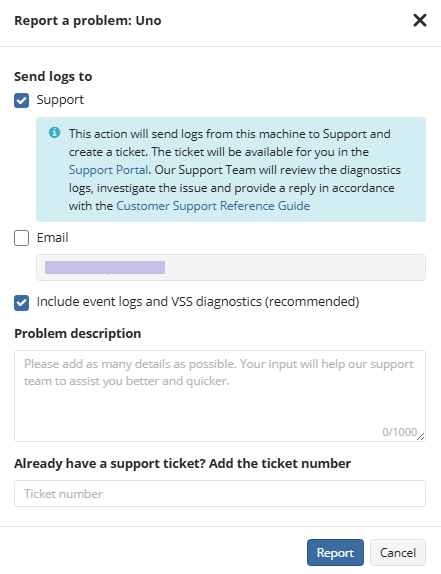
- Report a problem. Create a support ticket.
- In case the Include event logs and VSS diagnostics (recommended) checkbox remains selected, these files will be attached to the reported case. Being a Provider, you can request from the support team that all reports from your subadmins will be send directly to you, and then you can manage the case.
- In case of you select Email, you can add/manage recipients to receive this report.
- Describe the problem in Problem description
- Provide the support case number in case the support case is already created to attach the logs to the support case.
RMM > Computers. The following options are available:
- Authorize computer (available only if the computer has 'Pending" status and require authorization).
- Report a problem. Create a support ticket.
Searching and Filtering
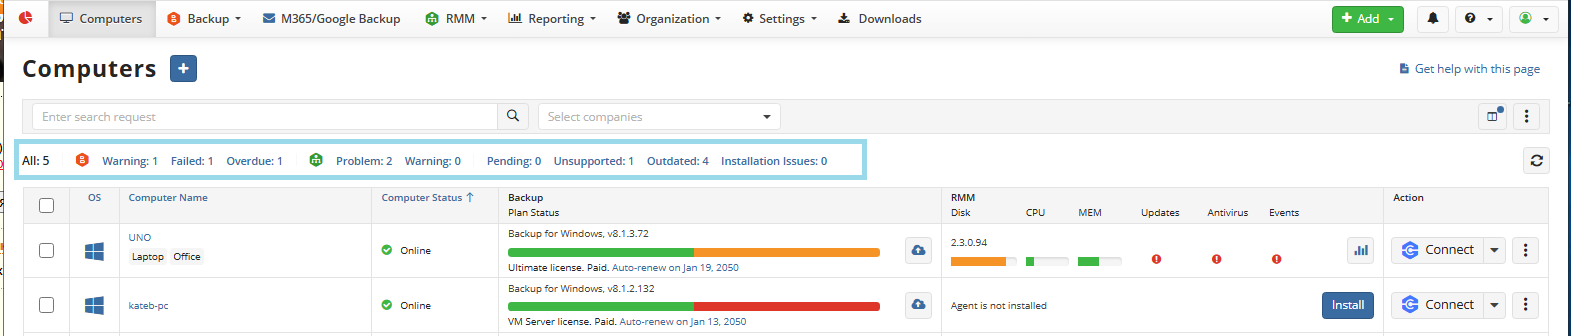
With a large number of computers, use search and filtering. To find the required computer in the list, enter search request.
You can assign tags to computers to create independent groups across the companies.
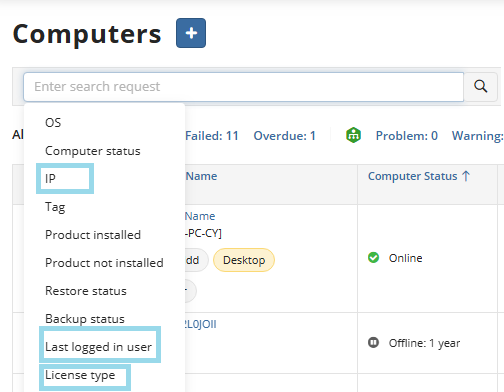
You can find the required computer by the following search categories:
- OS. Search for a computer with a specific operation system
- Computer status. Filter computers by statuses (Online, Offline, Pending)
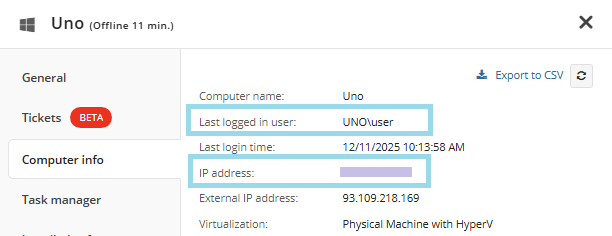
- IP. Search for a computer by IP address. Information about external and internal IP addresses can be found on the Computer info tab is RMM Agent is installed on the computer.
- Tag. Filter computers by assigned tags
- Product installed. Search for a computer by installed Agent
- Product not installed. Search for a computer on which specific Agent is not installed
- Restore status. Search for a computer by restore plan status
- Backup status. Search for a computer by backup plan status.
- Last logged in user. Information about last logged-in user and screen state can be found on the Computer info tab is RMM Agent is installed on the computer.
- License type. In prepayment mode, you can filter the computers by the type of the backup license.
To find a computer by internal IP Address ot last logged-in user, you need RMM Agent installed on this computer.
To search for computers associated with a specific company, use the Companies filter.

With a large number of managed computers, set up the number of computers to display on one page.
Filters
Use the following filters to nonitor Agent-related issues in endpoints:
- Pending. Computers that require authorization.
- Unsupported. Computers where Backup, Connect or RMM Agents should be updated immediately, because the agent versions on them are not supported.
- Outdated. Computers where outdated Backup or RMM Agents are used. It is recommended to update Agents on these computers.
- Installation issues. Computers where installation of Agent failed or completed with warnings.
Backup Agent
- Warning. Computers with Backup/Restore Plans with warnings.
- Failed. Computers with failed Backup/Restore Plans
- Overdue. Computers with Backup/Restore Plans in Overdue status
RMM
- Problem. Computers with problems detected by RMM Agent.
- Warning. Computers with warnings detected by RMM Agent.
Computer Statuses
The following statuses are available for managed computers:
- Online. Managed computers are online, if an Agent installed on this computer can interact with the Management Console.
- Offline. Managed computers are offline, if an Agent installed on this computer cannot interact with the Management Console. Backup plans cannot be performed for offline computers.
- Pending. Added computer has pending status unless it is not authorized.
Available actions for computers
| Action | Online | Backup Offline | RMM Offline | Offline |
|---|---|---|---|---|
| Add/remove tags | ✔️ | ✔️ | ✔️ | ✔️ |
| Assign a license | ✔️ | ✔️ | ✔️ | ❌ |
| Edit a license | ✔️ | ✔️ | ✔️ | ❌ |
| Authorize computer | ✔️ | ✔️ | ✔️ | ❌ |
| Manage backup and restore plans | ✔️ | ✔️ | - | ✔️ |
| View RMM service information and set alerts | ✔️ | - | ❌ | ❌ |
| View and manage tickets (must be allowed on provider level) | ✔️ | ✔️ | ✔️ | ✔️ |
| Restore as EC2 instance with Restore to EC2 | ✔️ | ❌ | - | ❌ |
| Restore to Azure VM with Restore to Azure | ✔️ | ❌ | - | ❌ |
| View Backup History | ✔️ | ✔️ | - | ✔️ |
| Edit storage accounts | ✔️ | ✔️ | - | ❌ |
| Change Network credentials to access network shares with Edit > Edit Network Credentials | ✔️ | ❌ | - | ❌ |
| Edit Backup Agent options | ✔️ | ❌ | - | ❌ |
| Forcible Update and Uninstalling Backup / RMM Agent | ✔️ | ❌ | ✔️ | ❌ |
| Plan Settings Report | ✔️ | ✔️ | - | ✔️ |
| Manage backup configuration | ✔️ | ❌ | - | ❌ |
| Remote Access using Connect | ✔️ | ✔️ | ✔️ | ❌ |
| Report a problem with sending logs | ✔️ | ✔️ | ✔️ | |
| Hide computer from the list | ✔️ | ✔️ | ✔️ | ✔️ |
| Show Hidden Computers | ✔️ | ✔️ | ✔️ | ✔️ |
| Delete Computer | ✔️ | ✔️ | ✔️ | ✔️ |
| Install Agents | ✔️ | ✔️ | ✔️ | ❌ |
| Uninstall applications | ✔️ | ✔️ | ❌ | ❌ |
| Create a support case | ✔️ | ✔️ | ✔️ | ✔️ |
Offline Backup Plan Management
Offline backup plan management is now available by default. You can create, edit, or delete backup plans in new backup format on the computers that are currently offline. Once the computer becomes online, all changes will be applied. This feature requires Backup Agent version 8.0 for Windows. To manage offline editing, refer to Allow Offline Editing.
Group Actions for Selected Computers
You can select multiple computers to apply group actions for them. The following group actions are available:
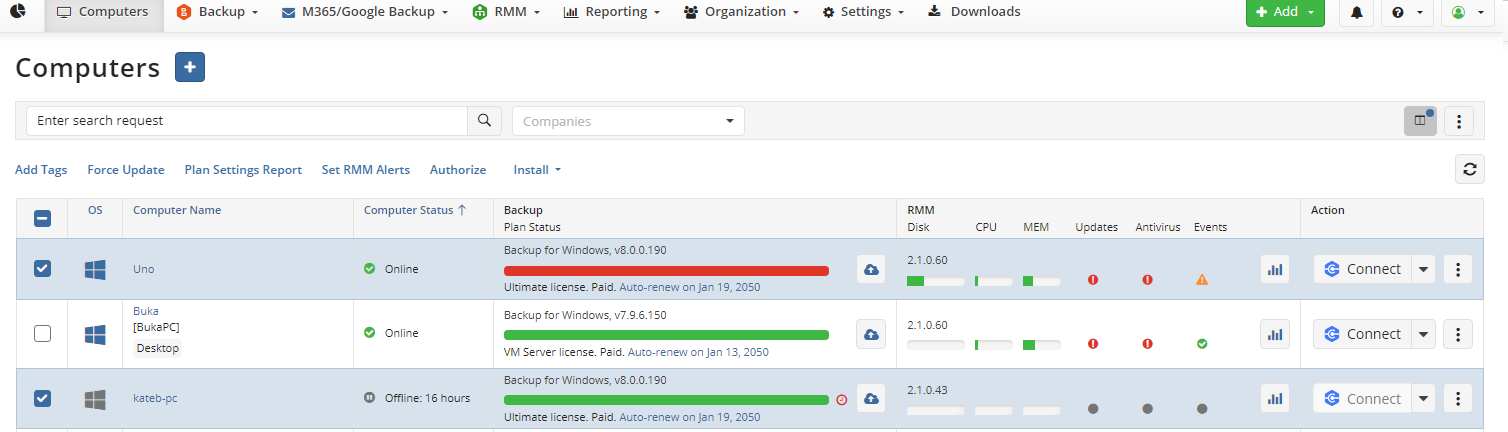
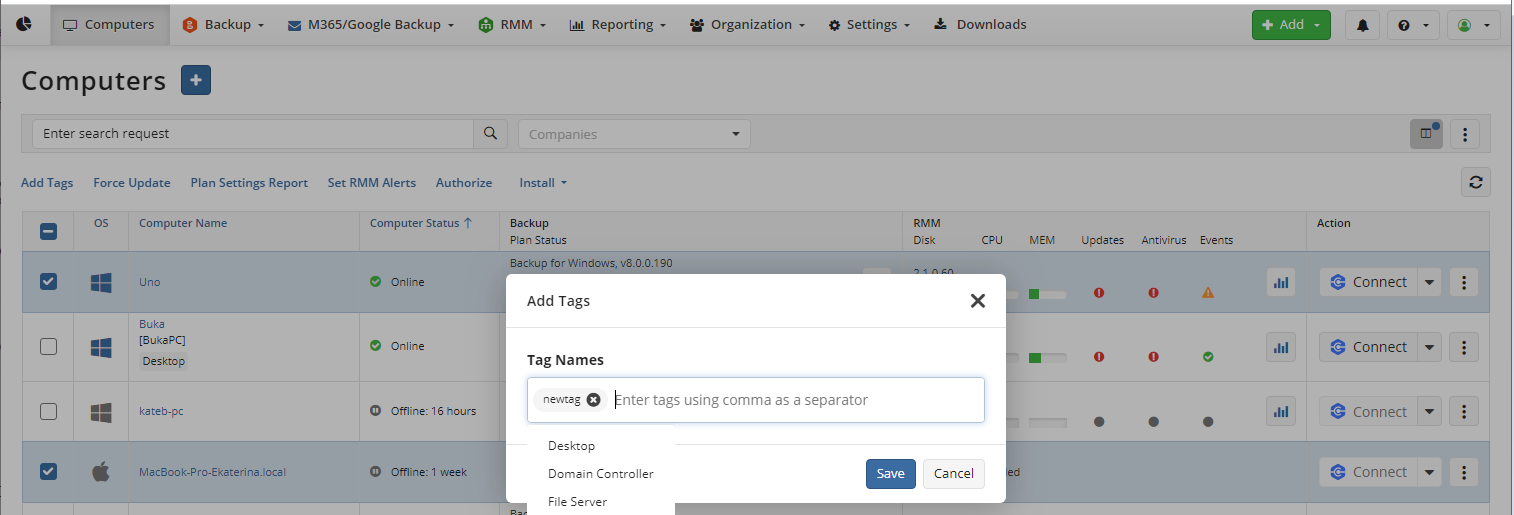
- Add Tags. Adds specified tags for all selected computers. You can type or select multiple tags. Enter a comma to separate them.
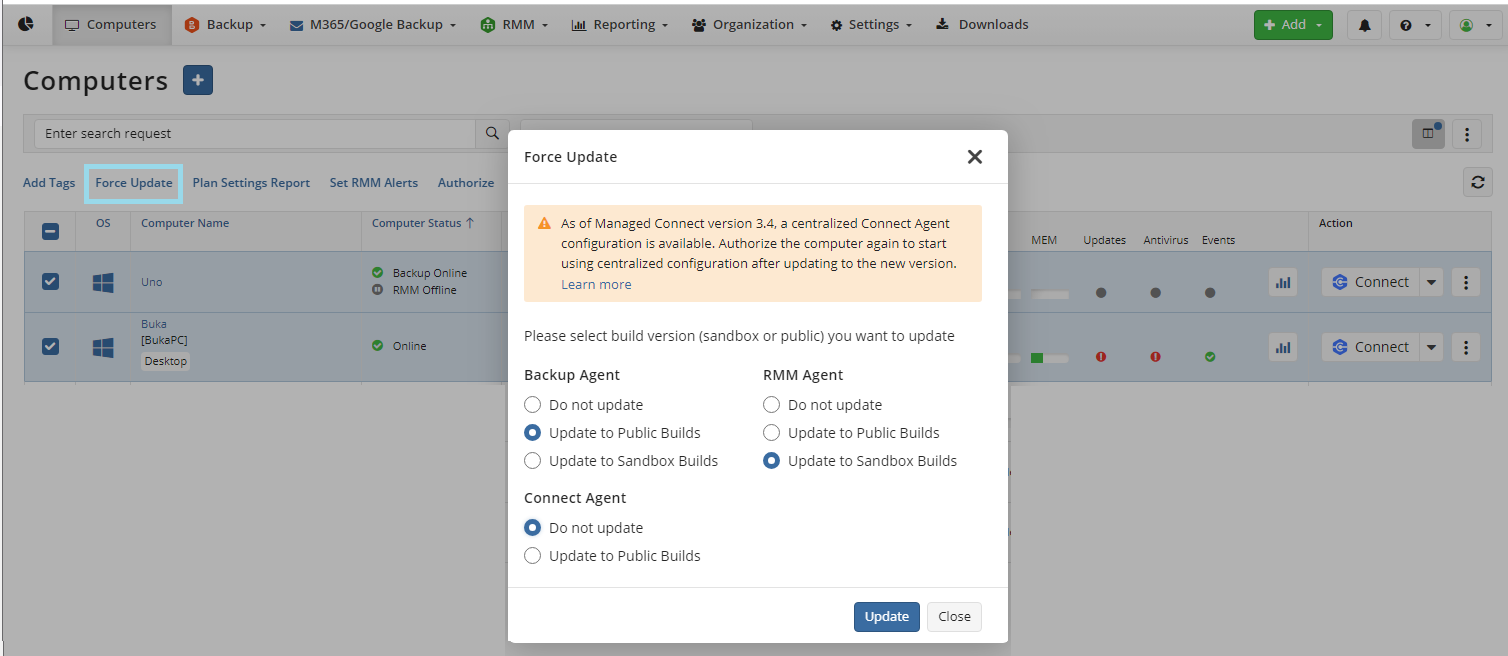
- Force Update. Forcibly updates selected Agent instances as soon as the selected computers become online. Configure what agent version will be used for update, public or sandbox.
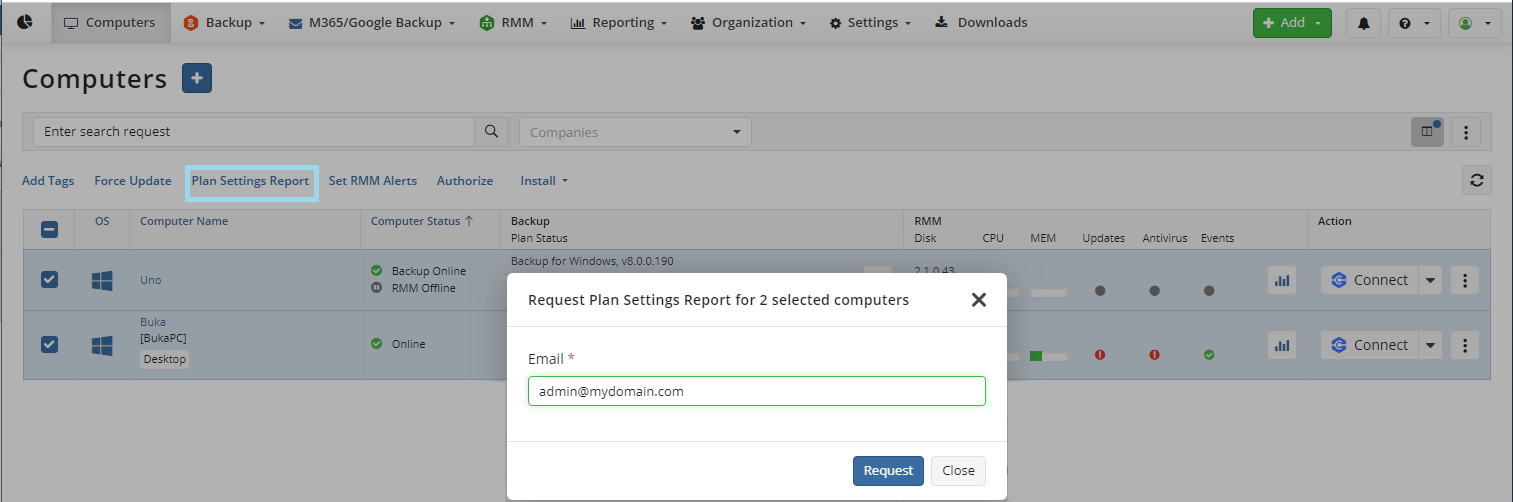
- Plan Settings Report. Sends backup plan information for selected computers (CSV format) to specified recipient email.
- Set RMM Alerts. Starts Set RMM Alerts wizard to configure RMM alerts for selected computers.

- Authorize. Associate an existing or a new user with computers that are not already authorized.
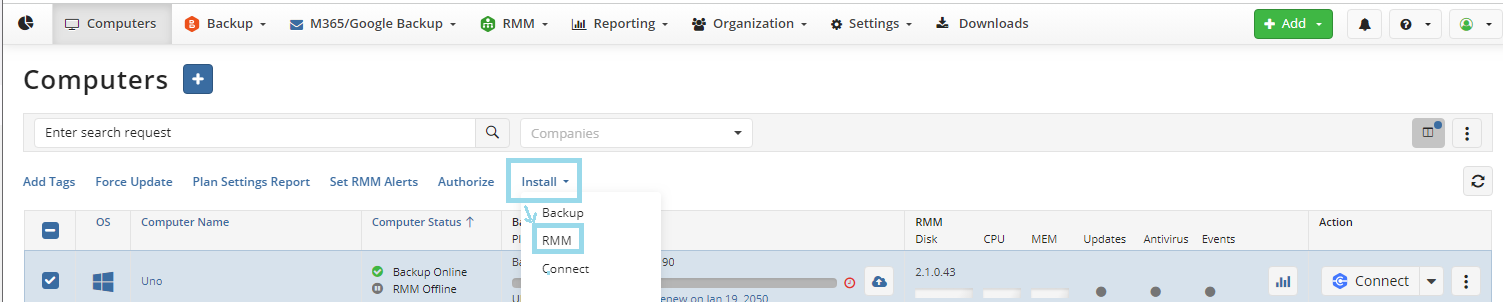
- Install > Backup/RMM/Connect. Install Backup/RMM/Connect Agent instances on the selected computers as soon as these computers become online.
Delete Computers
To delete multiple computers in bulk:
- In Computers, select computers to delete and click Delete.
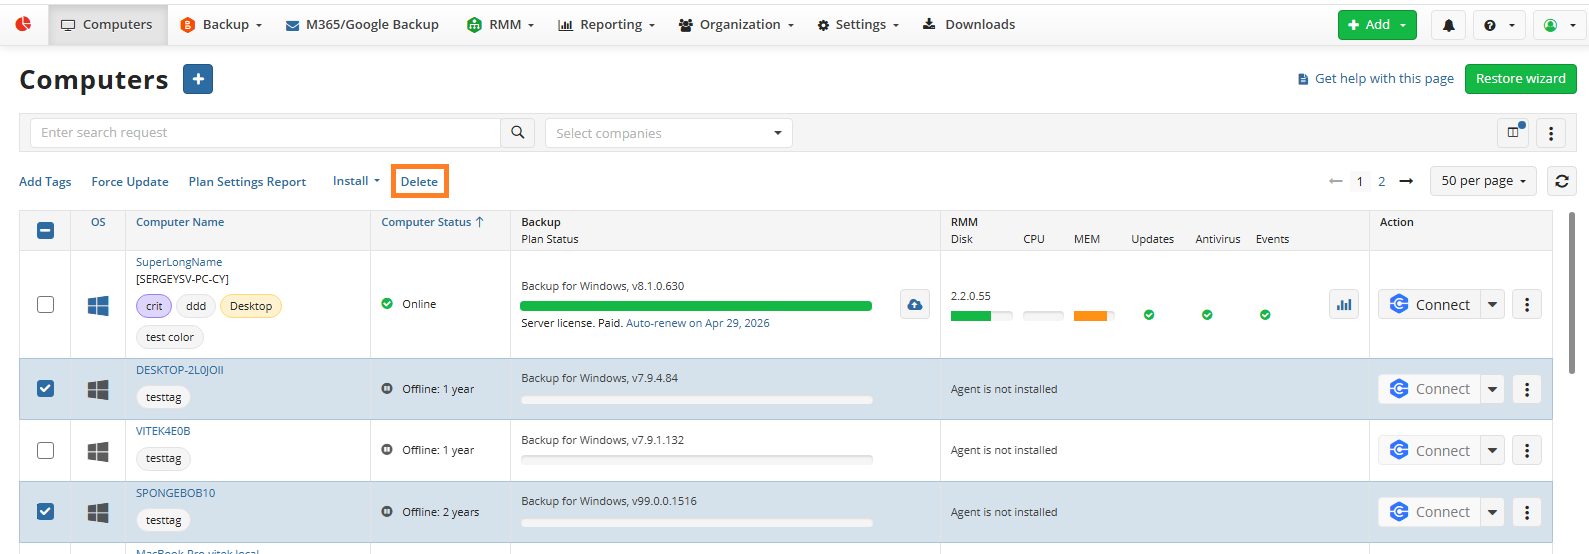
- Confirm the deletion. Computers will be deleted from the Computers grid, Agents will be uninstalled from them, but existing backup data remains on storage.
To delete a specific computer:
- Open the Management Console.
- In Computers, find a computer in the grid to delete. Use search and filters to find the required computer.
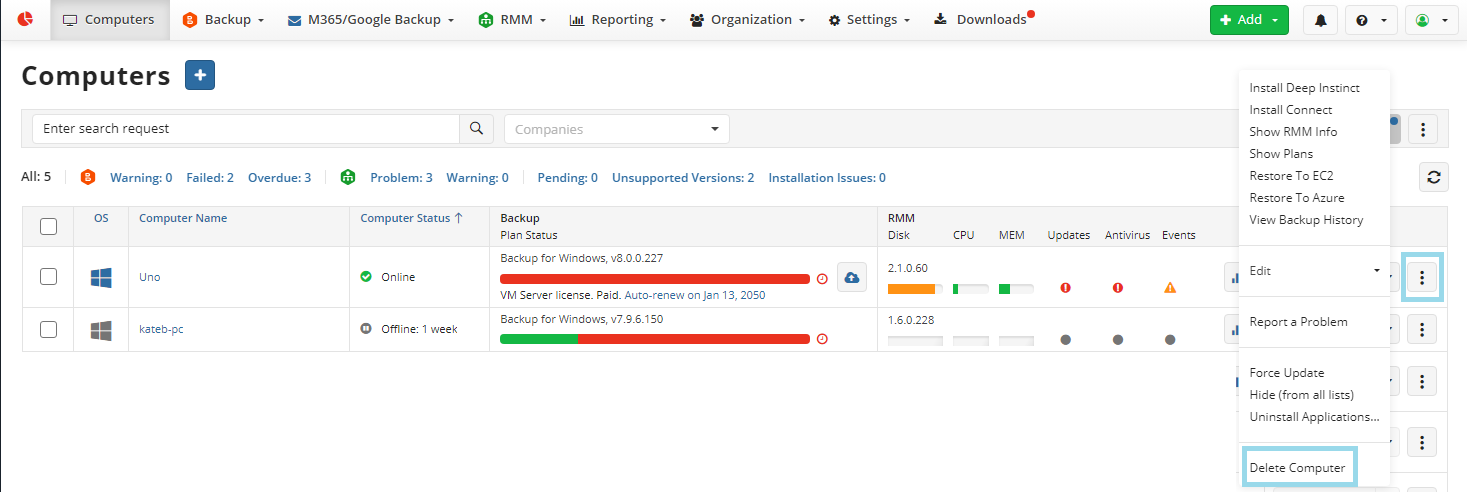
- Expand actions in the end of the computer entry and click Delete Computer.
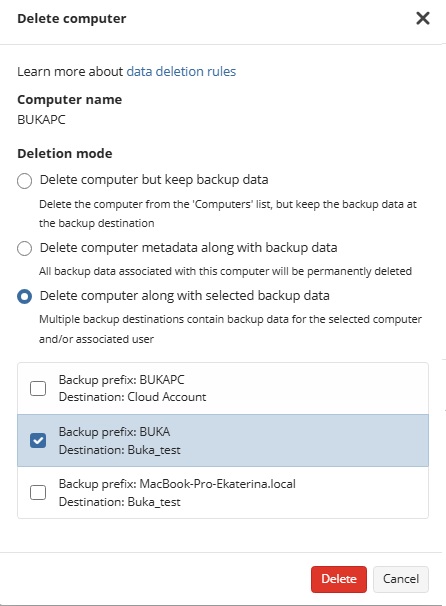
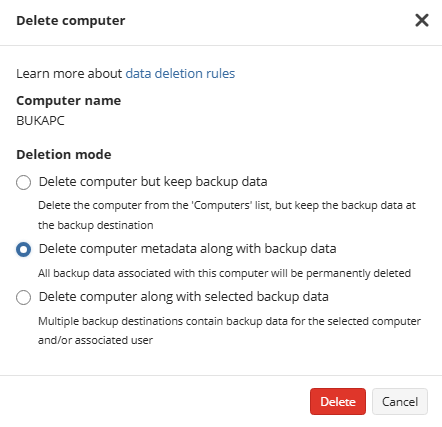
- Select deletion mode:
- Confirm deletion. The deletion process may take some days. You can monitor the progress and, if necessary, cancel the deletion in Organization > Users.
Once you delete the computer, all Agents will be uninstalled from this computer, all licenses assigned to this computer will be released and returned to the license pools, and all info about this computer will be cleared. However, after the computer is deleted, some Backup Agent settings might be still available on this computer in the C:\ProgramData\Online Backup folder, these settings will be used in case you want to add this computer again.
If the computer is not associated with the user, you only need to confirm the deletion.
Delete computer but keep backup data
With this option selected, the computer metadata will be deleted, the backup data will remain at the backup destination. Computer will be removed from the list on Computers.
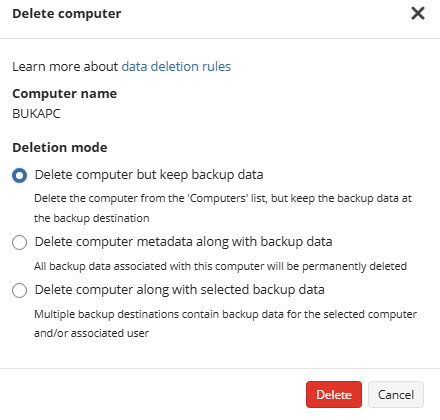
Delete computer but keep associated backup data
With this option selected, the computer and user metadata, along with the associated backup data, will be permanently deleted. This option requires Two-Factor Authentication (2FA) enabled, Delete users and Delete backup data permissions on Organization > Administrators.
This option cannot be selected if the user associated with this computer is associated with another computer.
Delete computer along with selected backup data
This option can be used to delete computer and backup data if the user associated with the selected computer is associated with another computer. In this case several backup prefixes are available to organize backup data. Select the prefixes under which the backup data should be permanently deleted. This option requires Two-Factor Authentication (2FA) enabled and Delete backup data permissions on Organization > Administrators.