Back up OneDrive
Prerequisites
To use OneDrive Backup, make sure the users included in backup have commercial or trial Microsoft 365 / Google Workspace licenses, and Drive backup is enabled for them .
To learn more about licensing, refer to the Licensing
Get Started with OneDrive Backup
To enable OneDrive backup, click Configure Backup on the dashboard, then turn on Drive backup services. Select Apply to enabled users to create OneDrive backup for all enabled users. You can enable or disable Drive Backup service for one or for multiple users on Users page as described in Manage Users.
To create the initial backup, click Save. The backup task is created and will be scheduled automatically.
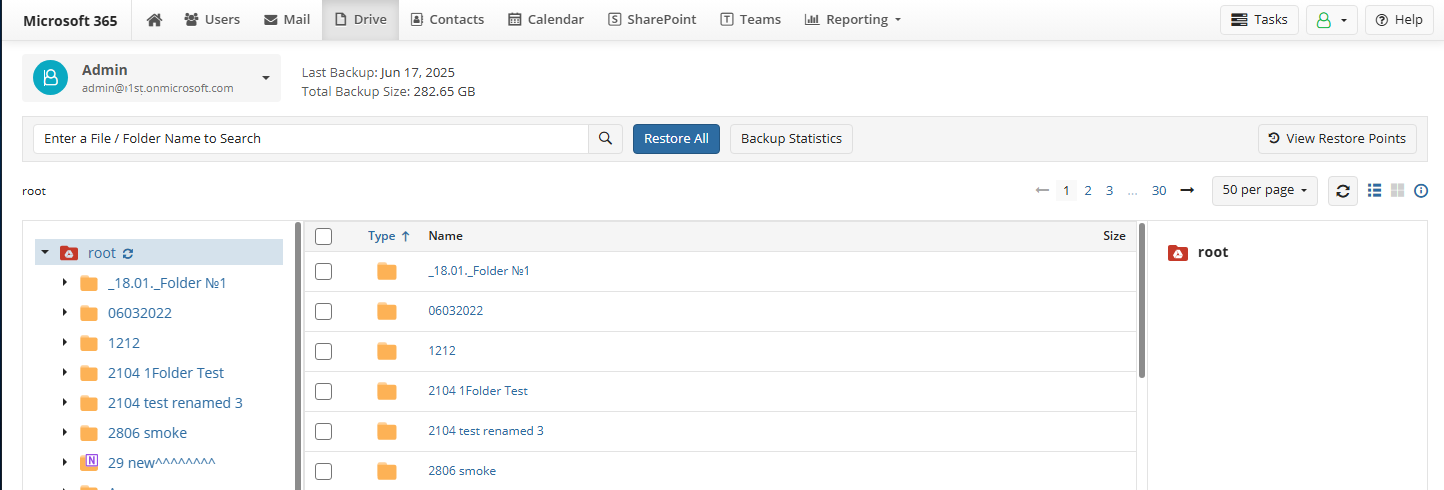
Once the initial backup is completed, you can view backed up contents.
Select the required user to see the user's Drive content.
If enabled, Drive backup jobs are scheduled to start automatically three times per day for all users.
Browse Backup Content
Administrators with Global Admin Access enabled can browse backup content to restore required content items for all domain users with enabled backup. Users if enabled can browse their own backups.
Select required user.
To view a user's Drive content, select the user from the list. By default, the backup data for the currently logged-in user is displayed.
Select Restore Point
By default, the latest backup for the current date is shown. Starting with version 4.7, you can browse earlier restore points.

To view backups from another date:
- Click View Restore points on the horizontal menu.
- Select a date to switch to that restore point.
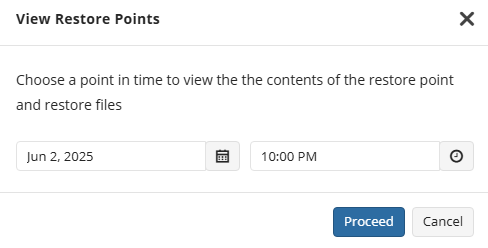
- You will be switched to the selected restore point. You’ll now see folders and documents (including earlier revisions) as they existed at the selected time and can perform restore operations for them.

Deletion is not supported in restore point view. To delete data, return to the current date
- To return to the latest backup, click Return to current date in the restore point banner.

Use Search
To find a file or folder, enter the full or partial filename and click the search icon. If a file was renamed, only the name relevant to the selected restore point will be searchable. Older names may still appear in file revisions, but can’t be searched directly. Type search expression and click the search icon to proceed. The search result appears in the right panel.

Restore OneDrive
Refer to the Prerequisites for Restore Operations chapter to avoid any issues.
Use search to quickly find required sites or team files to backup. Type search expression and click the search icon to proceed. The search result appears in the right panel.
To restore all Drive content, perform the following:
- Open the Drive tab.
- Click Restore All
- Select a Restore Point. Choose one of the following options to proceed with restoring your files and folders:
- Latest version. Restore the most recent version of your files and folders.
- Point in Time. Restore files and folders to their exact state as of a specific date and time.
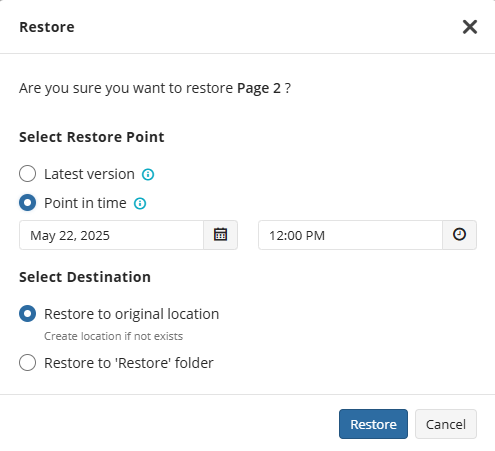
- If any items were renamed, they will be restored using the names that were current at the selected point in time.
- Consider, if any of the selected objects has no revisions after this point of time (was changed before this point of time), this object will not be restored.
Select restore destination. By default, restore will be performed for the original location for the selected account (if some folder does not exist, it will be created). In case you select restore for another account, you will be prompted to provide this account credentials.
Click Restore to create a restore job. If you have enough permissions, the Drive content will be restored to the selected location. In case of insufficient permissions you will be informed. To view the progress of the restore job created, open the Task Manager. Click the Task Manager icon to the right of the horizontal menu bar.
Restore Specific Folder
To restore the specific folder including all subfolders and content, on the Drive tab select the required folder.
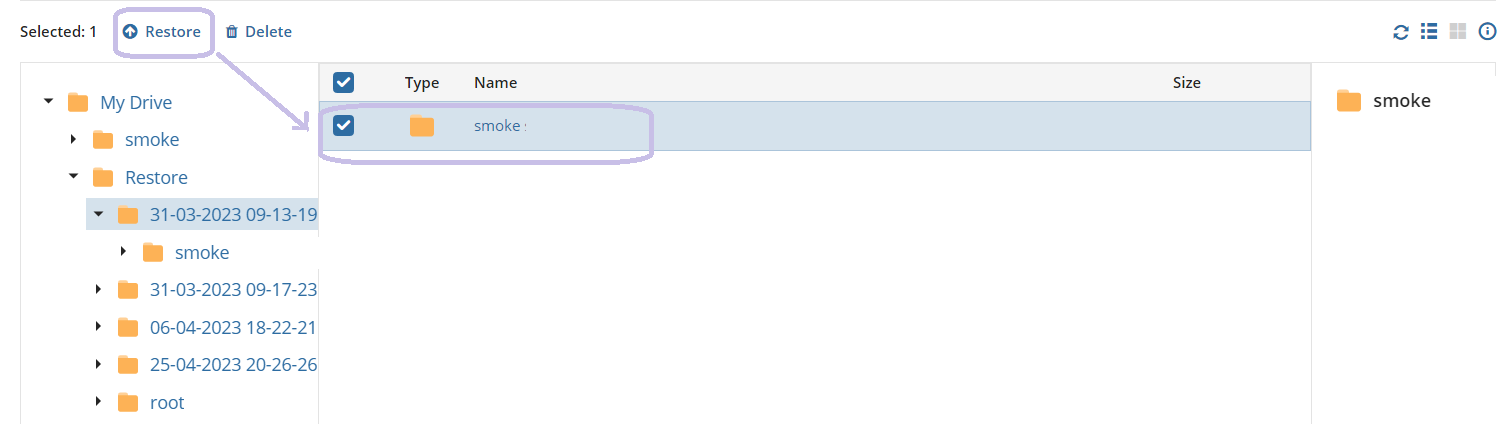
- Click Restore
- Select a Restore Point. Choose one of the following options to proceed with restoring your files and folders:
- Latest version. Restore the most recent version of your files and folders.
- Point in Time. Restore files and folders to their exact state as of a specific date and time.
- If any items were renamed, they will be restored using the names that were current at the selected point in time.
- Consider, if any of selected objects has no revisions after this point of time (was changed before this point of time), this object will not be restored.
Select restore destination. By default, restore will be performed to the original location for the selected account (if some folder does not exist, it will be created). In case you select restore for another account, you will be prompted to provide this account credentials.
Click Restore to create a restore job. If you have enough permissions, the folder content will be restored to the selected location. In case of insufficient permissions you will be informed. To view the progress of the restore job created, open the Task Manager. Click the Task Manager icon to the right of the horizontal menu bar.
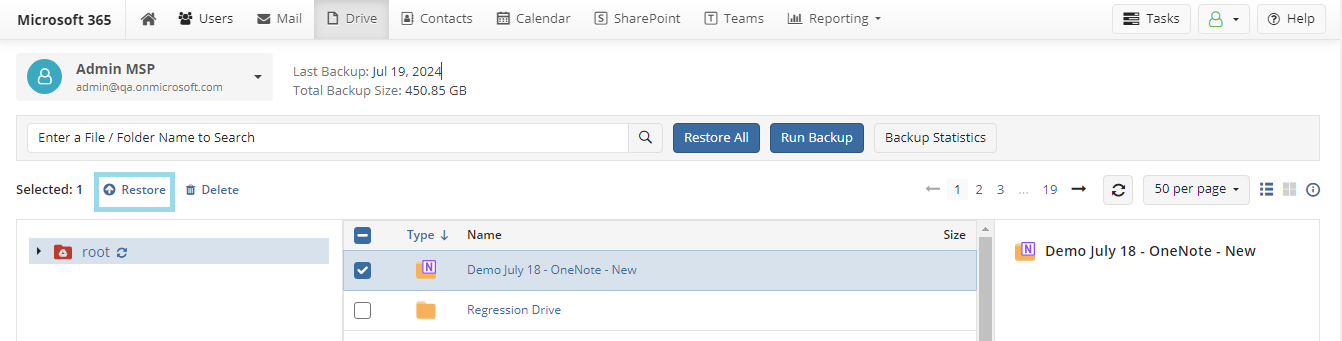
Item-Level Restore from OneDrive Backup
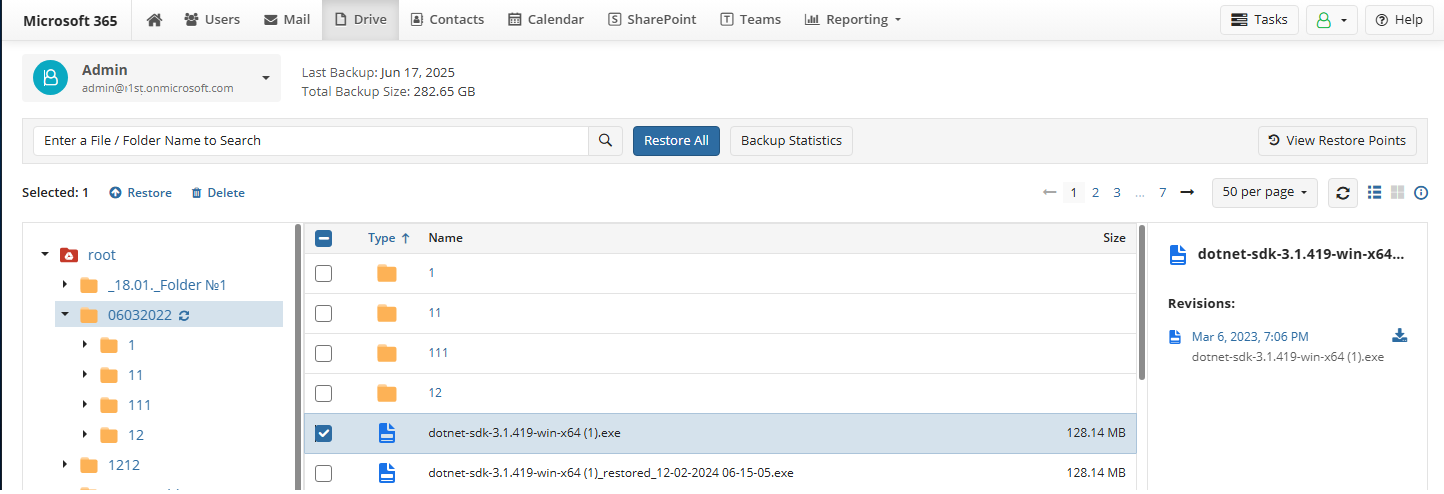
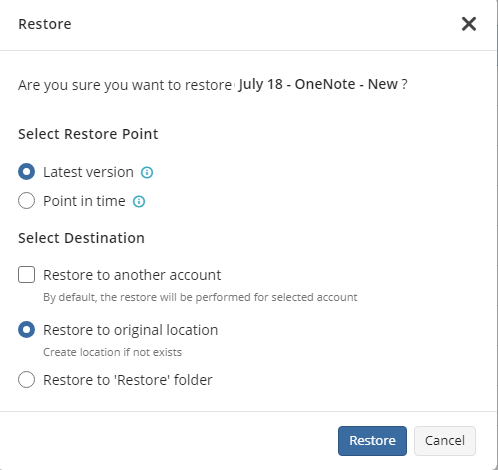
To restore a file or a folder, browse the OneDrive backup content, then click the particular item to view its revisions. Revisions appear to the right. In case of renamed files, files in all revisions made before renaming will have the original name. Click the required revision to download it to the Downloads folder on your computer. You can find a necessary file or folder by filename or part of the filename. Type the search expression and click the search icon. To restore the selected item, select one of available restore options. You have the following restore options for selected item:
- Select the restore point: the latest version or a point in time to restore files and folders to their exact state as of a specific date and time.
- Restore for selected account
- Restore for another account (you will need to enter credentials of the selected account)
- Restore to restore the selected item to the original location. You can select whether you want to restore the latest version or a version associated with selected point in time, then click Restore to create a restore job.
- Restore to 'Restore' folder to restore the selected item to the Restore folder of the user's Drive.
Click Restore to create a restore job. In case of you have enough permissions, the selected object will be restored to the selected location. If you have insufficient permissions, you will be informed. To view the progress of the restore job created, open the Task Manager. To open it, click the Task Manager icon to the right of the horizontal menu bar.
Restore OneNote
To restore specific OneNote record, including all content, perform the following:
On the Drive tab select the root folder.
On the middle panel, select required the OneNote notebook and click Restore.
- Select one of available restore options. You have the following restore options for selected item:
- Restore point: the latest version or a point in time to restore files and folders to their exact state as of a specific date and time.
- Restore for selected account
- Restore for another account (you will need to enter credentials of the selected account)
- Restore to restore the selected item to the original location. You can select whether you want to restore the latest version or a version associated with selected point in time, then click Restore to create a restore job.
- Restore to 'Restore' folder to restore the selected item to the Restore folder of the selected user's drive.
- Click Restore to create a restore job.
In case of you have enough permissions, the selected item will be restored to selected location. In case of unsufficient permissions you will be informed. To view the progress of the restore job created, open the Task Manager. To open it, click the Task Manager icon to the right of the horizontal menu bar.
Restore OneNote File Revisions
To restore specific OneNote content item, perform the following:
On the Drive tab expand the root folder.
On the middle panel, select the required OneNote content item to see the available revisions.
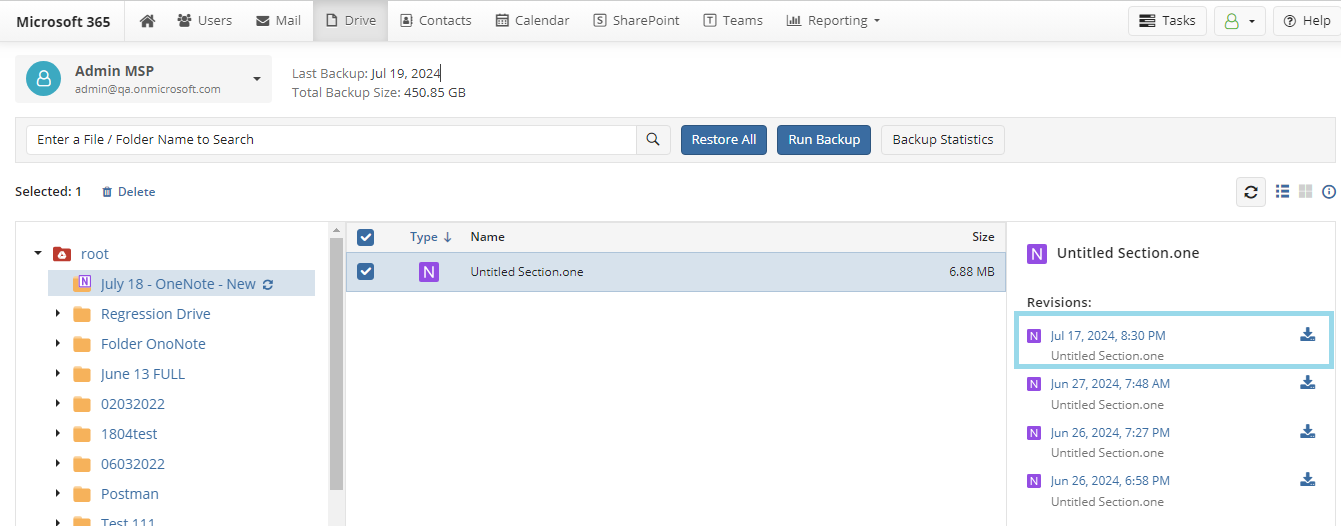
- Select the required revision and click it to download the item to your computer. Downloaded item appears in Download folder
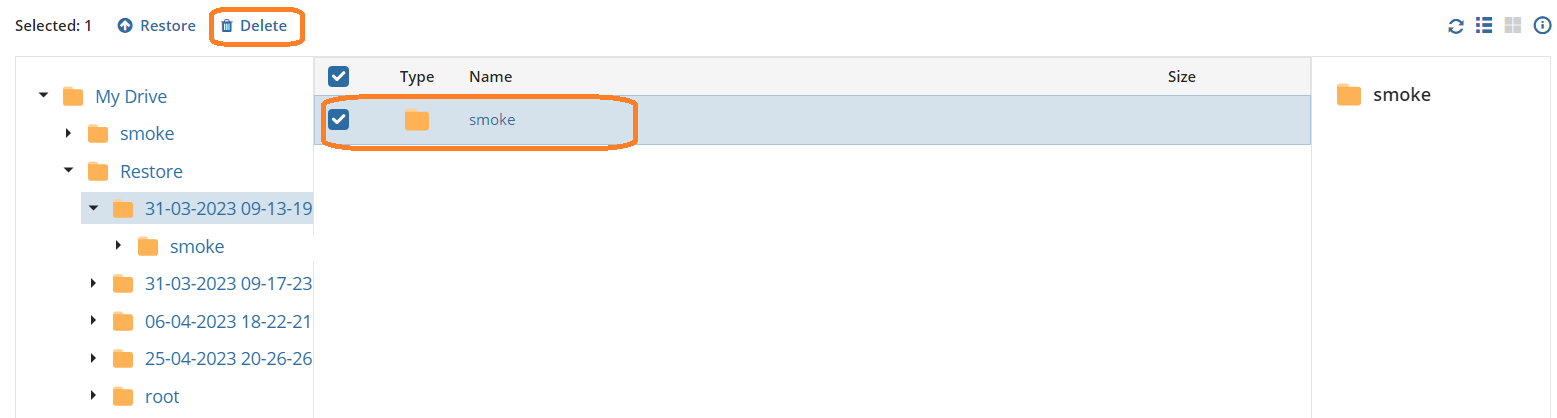
Delete Item from Backup Content
To delete any item from backup content along with its revisions, select the required item and click Delete. Provide an alternate email password to confirm this action and click Delete.
To view the progress of the restore job created, open the Task Manager. To open it, click the Task Manager icon to the right of the horizontal menu bar.