Outlook Mail Backup
Prerequisites
To use Outlook Mail Backup, make sure your users are active (enabled) and have a commercial or trial Microsoft 365 / Google Workspace license.
To back up public folders, ensure the public folders you are planning to back up have a commercial or trial Microsoft 365 / Google Workspace license, one license per public folder mailbox.
To back up shared mailboxes, consider the following:
- Shared mailboxes under 50 GB without a Microsoft license can be backed up with user mailboxes without consuming an M365/Google Backup license. However, the domain license pool must include at least one valid paid M365/Google Backup license.
According to the terms of use, there must be at least one trial/paid license on the domain in order to avoid blocking and account cancellation due to inactivity.
- Backup of each shared mailbox larger than 50 GB or with a Microsoft license requires an M365/Google Backup license.
To learn more about licensing, refer to the Licensing
A mailbox size in Microsoft 365 is always larger than the backup size:
- Backup data is compressed.
- System folders are not backed up.
- Configured retention policies might limit what data will be backed up (e.g., if the retention set to 1 year, older data is excluded).
- Backup settings might exclude specific emails.
Getting Started with Mail Backup
To enable Mail backup, click Configure Backup on the dashboard, then turn on Mail backup services. Select Apply to enabled users to create Mail backup for all enabled users.
You can enable or disable Mail Backup service for one or multiple users on Users page as described in Manage Users.
To create the initial backup, click Save. The backup task is created and will be scheduled automatically.
Once the initial backup is completed, you can view a grid of the backed up content. You can monitor the backup task processing using Task Manager
Start to type the mail folder name in the folder box to search for the required folder on the fly. More search options are described below.
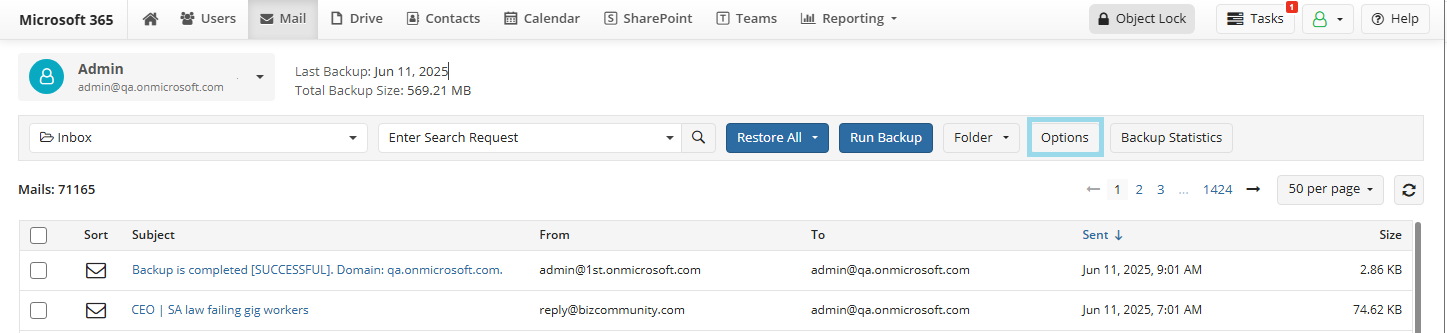
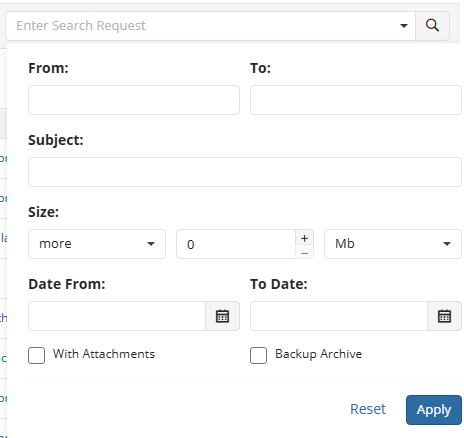
You can use a search box to search for a required Outlook Mail object. Expand the search box to configure the search expression, then click search icon
You can monitor the backup task processing using the Task Manager. Once the initial backup is completed, you can view backed up contents.
If enabled, Mail backup jobs are scheduled to start automatically twice per day for all users.
To configure backup /archive options or to run an urgent backup job, select Mail in the horizontal menu bar of the dashboard.
By default, all mailboxes of all enabled users will be backed up. If necessary, you can configure a backup job and limit the backup scope. To limit backup scope, you can configure mail backup options as described below.
Additionally, you can perform a backup or restore job for selected objects, or restore all backed up objects to the same mailbox or specified mailbox.
Configure Backup or Archive Options
By default, backup will include all mail folders of all enabled users. To limit backup scope, configure Backup Options.
Archive solution is Microsoft 365/Google Workspace Backup feature. This feature creates mail archives according to provided rules. It is neither based on or connected with Microsoft 365 nor with Google Workspace archive solutions. Enable Archive Options to use it.
To configure backup/archive options perform the following:
Select Mail on the horizontal menu bar of the dashboard.
Click Options on the horizontal menu bar.
- Click the Backup Options tab or Archive Options tab.
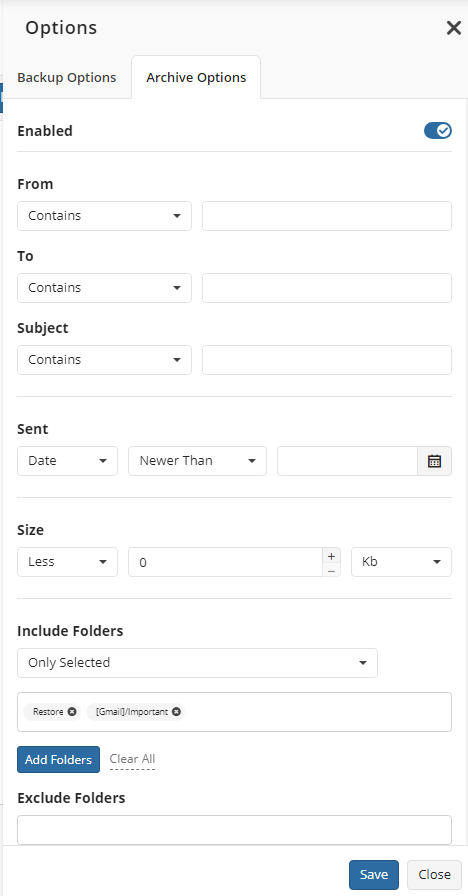
- Turn on Enabled on the top of the side panel to enable backup/archive.
- Configure criteria to backup/archive the mail messages in mail folders. You can select separate criteria for the Sent folder.
- Include folders to backup/archive:
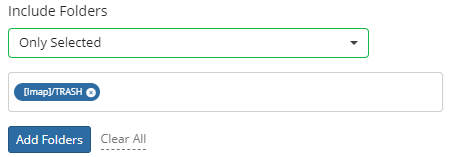
- To include mail folders: expand Include Folders control and select appropriate value.
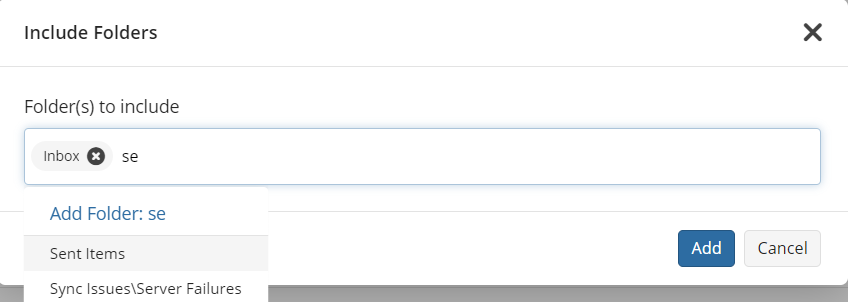
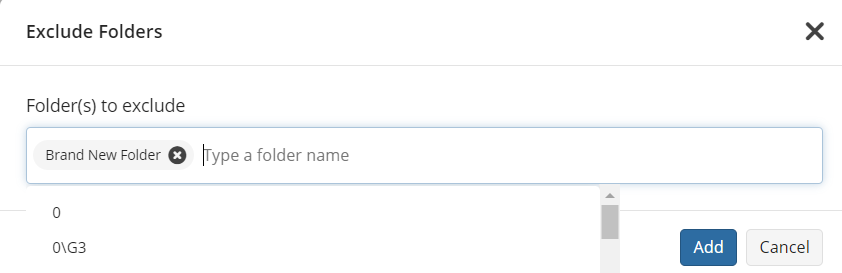
With Only selected you can include to backup/archive one or more selected mail folders only. Click Add Folders to make the selection.
To clear the selection, click Clear All
- Exclude some folders from the folders included in backup/archive:
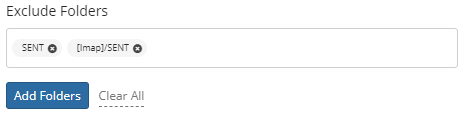
- To exclude mail folders from backup/archive: below Exclude Folders control click Add Folders to make the selection.
Configured rules and criteria will be applied to the backup/archive job for selected users. To apply these criteria to backup/archive jobs for all domain users, select the Apply to All Domain Users check box, then click Save.
Search Mail Messages
You can back up specific messages in specific Outlook mail folders of the specific user.
To back up only selected mail messages perform the following:
- Select a required user. To see mail messages of all users, click All Users.

- Select the desired folder. By default, the Inbox folder is displayed, and the rest of the mail folders are sorted according to Exchange Online order. You can type the part of the folder name to speed up navigation. To see mail messages in all mail folders, click All Mail Folders.

This search works on the fly, you can speed up the processing of the long folder lists.

Point to the mail folder to see the full path to the folder. 3. Configure mail backup options. Click Save. 4. Once you are done with configuring, get back to the Mail page. 5. Click the Run Backup button to start backup for selected scope. You will be notified about the backup job creating event.
Also you can export selected mail messages or mail folders to a PST file, as described in the Export to PST chapter.
Search in All Mail Folders
In some cases you may not know in what folder the required message can be located. With All Mail Folders selected you can type a search expression in the Enter Search Request box to look for items matching the certain criteria in all mail folders of the selected users.
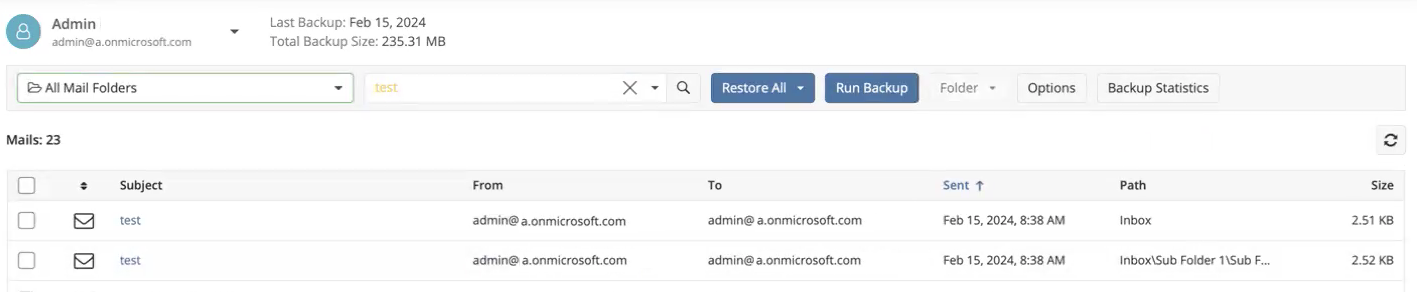
Search results will be displayed as a grid, where you can see the full path to the mail message.
Restore Mail
To restore Mail objects (folders, messages, attachments, etc.), select Mail in the horizontal menu bar. Refer to the Prerequisites for Restore Operations chapter to avoid any issues.
The following restore options are available for mail:
Root-Level
Restore all mailbox items. This option restores the entire mailbox structure to its original location.
Restore all mailbox items to. This option restores the entire mailbox structure to a different account of choice.
Folder-Level
Restore mail folder. This option restores a selected folder to the same folder or creates the same folder it is deleted.
Restore mail folder to. This option restores a selected folder to a different account of choice. The restore will be performed to the folder with the same name. If this folder does not exist, it will be created.
Item-Level
Restore selected mail messages. This option restores selected emails to Restore folder.
Restore selected mail messages to. This option restores selected emails to a different account of choice to Restore folder to a different account of choice.
Create Restore All Job to the Same Account
You can restore all mailbox items to the same account.

To restore all mailbox items to the same mailbox, select the user, then expand the Restore All control and select the Restore All Mailbox option.
Click Restore to create the restore job.
You will be notified about the backup job creating event.
To view the progress of the created restore job, open the Task Manager.
Create Restore All Job to Different Account
You can restore all mailbox items to a different account.

To restore all mailbox items to another account mailbox, select the user, then expand the Restore All control and select the Restore All Mailbox to... option. Pick an account you want to use as a restore destination. You will need to specify the selected account credentials for restore.
Click Restore to create the restore job.
You will be notified about the backup job creating event.
To view the progress of the created restore job, open the Task Manager.
Create Restore Job for a Specified Mail Folder for The Same Account
You can restore backed-up specific Outlook mail folders of the selected user.
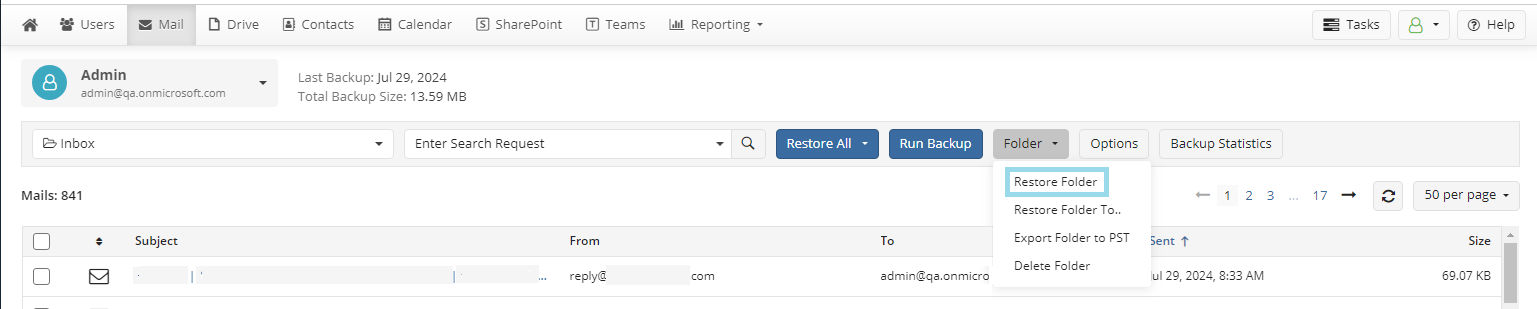
To restore selected mail folder, perform the following:
- Select the desired folder. By default, the Inbox folder is displayed, the rest of the mail folders are sorted according to the Exchange Online order. You can type the part of the folder name to speed up navigation. This search works on the fly, you can speed up the processing of the long folder lists.
- Expand the Folder and select the Restore Folder option. Select Include subfolders if you want to restore the content of all subfolders. Click Restore to create the restore job.
You will be notified about the backup job creating event. To view the progress of the created restore job, open the Task Manager.
Create Restore Job for a Specified Mail Folder to Different Account
You can restore backed-up specific Outlook mail folders to a different user account of choice.

To restore selected mail folder for different account, perform the following:
- Select the desired folder. By default, the Inbox folder is displayed, the rest of the mail folders are sorted according to the Exchange Online order. You can type the part of the folder name to speed up navigation. This search works on the fly, you can speed up the processing of the long folder lists.
- Expand Folder and select Restore Folder to. You will need to specify the selected account credentials for restore. Select Include subfolders if you want to restore the content of all subfolders. Click Restore to create the restore job.
You will be notified about the backup job creating event. To view the progress of the created restore job, open the Task Manager.
Create Restore Job for a Specified Mail Messages
You can restore backed-up mail messages in specific Outlook mail folders.
To restore selected mail messages, perform the following:
- Select the mail messages. By default, the Inbox folder is displayed, the rest of the mail folders are sorted according to the Exchange Online order. You can type the part of the folder name to speed up navigation. This search works on the fly, you can speed up the processing of the long folder lists.
- The list of messages might be very long and hard to manage. Use the Enter Search Request box above this list to look for items matching the certain criteria.
Date filter is limited by 1 month
- Once messages to restore are selected, click Restore action.
- Click Restore to create the restore job.
You will be notified about the backup job creating event.
To view the progress of the created restore job, open the Task Manager.
Create Restore Job for a Specified Mail Messages to Different Account
You can restore backed-up mail messages in specific Outlook mail folders to a different user account.
To restore mail messages to a different account, perform the following:
- Select the mail messages. By default, the Inbox folder is displayed, the rest of the mail folders are sorted according to the Exchange Online order. You can type the part of the folder name to speed up navigation. This search works on the fly, you can speed up the processing of the long folder lists.
- The list of messages might be very long and hard to manage. Use the Enter Search Request box above this list to look for items matching the certain criteria.
Date filter is limited by 1 month
- Once messages to restore are selected, click Restore to... action.
- Specify the selected account credentials for restore. Click Restore to create the restore job. You will be notified about the backup job creating event.
To view the progress of the created restore job, open the Task Manager.